Field descriptions for project
This part describes the project 10 tabs: General, Machine,Task, Solution, Check lists, Info, Contracts Orders , Events and Supplier orders
 These buttons in the menu at the top of the
screen allow you to either print out on paper or send e-mail with
information about the project (service task) that is on the screen, to a
technician.
These buttons in the menu at the top of the
screen allow you to either print out on paper or send e-mail with
information about the project (service task) that is on the screen, to a
technician.
 The first button gives you a list of the Sql
reports connected to this module. The reports are saved under
Reports->SQL Reports.
The first button gives you a list of the Sql
reports connected to this module. The reports are saved under
Reports->SQL Reports.
The second button gives you a log of all the movements between the
folders for the tasks. The administrator can decide if this button
should be available or not. Tip. The third button gives you a list of
other open task on the selected customer. Only visible if there are any
open task for the selected customer.
Tip. The third button gives you a list of
other open task on the selected customer. Only visible if there are any
open task for the selected customer.
 This button is for coping some fields from
the project module.
This button is for coping some fields from
the project module.
Example; 4 extra link buttons can be added to
the project card by the administrator. E.g. link to a home page,
Microsoft Word etc (Company XXX/PROJECT/ LINK_BUTTON_1 (..4)_TEXT and
LINK_BUTTON_1 (..4)_ACTION)
4 extra link buttons can be added to
the project card by the administrator. E.g. link to a home page,
Microsoft Word etc (Company XXX/PROJECT/ LINK_BUTTON_1 (..4)_TEXT and
LINK_BUTTON_1 (..4)_ACTION)
If you mark the double line, each user can maximize/minimize part of the screen dialog window.
E.g.:
General information
General information displays information that is pertinent for all tasks within a project. When you add a new task in a project (Project> Task) and the task is connected to a machine (Project>Machine) you don’t need to add any information underGeneral.Information entered regarding machine and address in the Machine dialog will also be shown in theGeneraldialog.
Project
Number |
Project number is assigned by the system the first time you save the project(F12). |
Owner |
Who has added the project? Standard: the user logged in. |
Start date |
Start date for the whole project. Standard: today’s date. |
End date |
The date of completion for the whole project. Standard: today’s date. When the project is closed this date will automatically change to the date you end the project. |
General project description |
Description of the project. NB!: This is information pertaining to all the tasks |
 This button is for entering project
activities. Only active when your administrator turns the setting on
(see Company XXX/PROJECT/PROJECT_ACTIVITIES_ON). A new screen will
open where you can enter different activities by Id and description. The
activities will only be valid for the selected project. Note! The
activities can also be added to each service article line (see Order) in
Evatic Service or EMPC (only possible when Companny XXX/ORDER/
INFO_LINE_03 is activated)
This button is for entering project
activities. Only active when your administrator turns the setting on
(see Company XXX/PROJECT/PROJECT_ACTIVITIES_ON). A new screen will
open where you can enter different activities by Id and description. The
activities will only be valid for the selected project. Note! The
activities can also be added to each service article line (see Order) in
Evatic Service or EMPC (only possible when Companny XXX/ORDER/
INFO_LINE_03 is activated)
Customer
Here you can enter general customer information for the project.
There are four different ways to search for customer:
Customer number
- If you remember the customer number – enter the number, and then go out of the field using TAB or the mouse
- You can enter the first part of the customer number and press F3. The result will then be displayed and you can select the customer you are looking for form the list displayed.
Extended search
 By clicking on the binoculars (located
beside the customer number) an advanced dialog will be displayed.
For more information about extended searching see:
Search
By clicking on the binoculars (located
beside the customer number) an advanced dialog will be displayed.
For more information about extended searching see:
SearchCustomer name
Enter the first part of the search name of the customer and press F3. If the system finds information from the search you will be able to select the correct customer from the displayed list
Visit name
Enter the first of the customer name and press F3.If the system finds information for this name you will be able to select the correct customer from the displayed list.
Buttons behind the customer number:
|
Find the customer using the extended search. |
 |
Open a selected customer or make a new customer. |
 |
See the selected customer’s statistics. |
 |
Select a machine from the chosen customer’s installations.(For information about installations, see: Customer and Machine) |
Select address
The customer can have several addresses. When a customer is selected the different addresses will be available in the drop down list box Name. By selecting an address the fields below will be filled in automatically. If you need to change the information for this project only you can simply change the contents of these fields. If the customer has changed address permanently you must use the open-button (beside the customer number) to open the customer and change the address there. (See Customer).
Your administrator can change the length of the address fields in the drop down list (see COMPANY_XXX \ COMBO_COLUMNS)
Address 1 |
The first line of the selected customer’s address. |
Address 2 |
The second line of the selected customer’s address. |
Post code |
Post code for the address. By selecting the post code the postal area will also be changed accordingly. If you can’t remember the whole post code, enter the first part and press F3 to search. Select the correct post code from the displayed list. Tip: Post code and town can be entered directly in this fields and it will be saved in the database. Read more here. |
Postal town or city |
The town or city for the address. To change the postal town or city, enter the name or the first part and press F3 to search. Select the correct town from the displayed list. |
Area code |
The area the project belongs to. The area will be updated automatically when the post code is changed. If you will use a different area from the standard, this can be changed by selecting from the drop down list box.
Note! Your administrator can decide how this button should be displayed.
The button displays the number of task that is in the same area. |
|
This option is only available if you have purchased the Evatic Map module. Possibility to change the coordinates/address for the service task. |
Phone/fax: |
Telephone and fax number to contact the customer. |
Department |
The department the project belongs to. Will be entered automatically depending on which department the customer belongs to, this can be changed by selecting from the drop down list box. |
Contact list |
In this drop down list box the contact at the customer site can be chosen. Note! Your administrator can decide if the contact information should be controlled by the selected machine (see COMPANY_XXX \ PROJECT \ MACHINE_CONTACT_ONLY) |
|
This button can be used to add a new contact for the customer that will be automatically added for this project, as well as on the customer dialog. |
The e-mail address for this contact. If this is filled in you can click on the text e-mail, a proposal for the project confirmation to be sent to the customer will be automatically generated. Note! Press CTRL+E despite where you are in the project screen to open the email dialog screen. |
|
Ref.info |
Use this field if special customer reference info is needed (e.g. PO number). When creating an order from this project, the reference info from the project is used as reference info on the order heading. |
Reference |
Use this field if special customer reference is needed. When creating an order from this project, the customer reference from the project is used as the customer reference on the order heading. Name or number entered here can also be shown as text line on the invoice. |
Mobile phone |
The contact persons mobile phone number (see contact). |
Buttons
 |
This button is used to define the project as completed. When the project is finished, all the tasks within the project must be completed and if possible invoiced. |
Remember!>Your administrator can add up to 6 fields that can be used freely. Enter a text or value in those fields. (Settings /COMPANY_XXX /PROJECT_INFO / INFO_01..INFO_06).
Your administrator can add also set up which project info field should automatically be transferred to the order info field (see order heading), when creating an service order from the project module (= consumable button). (Settings /COMPANY_XXX \ PROJECT \ TRANSFER_INFO_FIELDS_TO_ORDER
Project contact list
Here you can enter contact persons that are valid for this project only.
Field descriptions
| Name | Contact name |
| Phone no | Contact phone number |
| Mobile phone | Contact mobile phone number |
| Contact e-mail address | |
| Info | Info about contact |
| Title | Contact title |
These contacts will not be saved on the customer card in Evatic but can be selected on the Project Machine-tab.
You can also send e-mails to the contacts from the project:
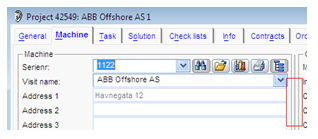
Machine
If you enter information into this tab before entering information in the <General> tab (refers to the first task of a project) this information will be copied from the <Machine> tab to the <General> tab. This way you can avoid having to enter information in the <General> tab.
Machine
There are four different ways to search for machine:
Machine number (ID number)
- If you remember the machine number – enter the number, and then go out of the field using TAB or the mouse
- Enter the first part of the number and press F3 to search. The system will find a selection for this number and you should then be able to choose the correct machine from a list.
- If you have already selected the customer dialog from within the <General> tab all the customers machines will be available in the drop down list box machine number (open the list using the keyboard: F4).
Extended search
By clicking on the binoculars (located
beside the machine number) an advanced dialog will be displayed. For
more information about extended searching see:
SearchVisit name
Enter the first part of the customer name and press F3. The result will then be displayed and you can select the machine you are looking for from the list.
Installations
If the machine you are searching for is part of an installation and you have already chosen the customer, to open a summary of all the customers’ installations, press
. Find
the correct machine, select and the information is entered
automatically.
Buttons behind the machine number
|
Find the machine using the extended search. |
|
Open the selected machine or enter a new machine. |
|
View the statistics for the selected machine. |
 |
Print out the machine report for the selected machine. This report in print format includes the contract information and a summary of all past projects for the selected machine. |
|
Choose a machine from the list of installations for the selected customer. (For information about installations, see Customer and Machine) |
Visit address
When selecting a machine as described above, the address information will be filled out automatically. If you need to change the information for this project or task you can simply change the contents of these fields. If the customer has changed address permanently you must use the open-button (beside the machine number) to open the customer and change the address there. (See: Machine).
Address 1 |
First line of customer address |
Address 2 |
Second line of customer address |
Location |
Physical location of the machine |
Post code |
Post code for the address. By selecting the post code the postal area will also be changed accordingly. If you can’t remember the whole post code, enter the first part and press F3to search. Select the correct post code from the displayed list. |
|
This option is only available if you have purchased the Evatic Map module. Possibility to change the coordinates/address for the service task. |
Postal town or city |
The town or city for the address. To change the postal town or city, enter the name or the first part and press F3 to search. Select the correct town from the displayed list. |
Area code |
The area the task belongs to. The area will be updated automatically when the post code is changed. If you will use a different area from the standard, this can be changed by selecting from the drop down list box.
The area the project belongs to. The area will be updated automatically when the post code is changed. If you will use a different area from the standard, this can be changed by selecting from the drop down list box.
Note! Your administrator can decide how this button should be displayed.
The button displays the number of task that is in the same area. |
Contact list |
In this drop down list box the contact at the customer site can be chosen. |
|
This button can be used to add a new contact for the customer that will be automatically added for this project. |
Phone/fax number |
Telephone and fax number to contact the customer. |
The e-mail address for this contact. If this is filled in you can click on the text |
|
Mobile phone |
The contact persons mobile phone number (see contact). |
General information
Miscellaneous information regarding the selected machine:
Model |
The machine’s model type. |
Installation date |
Date the machine was installed. |
Contract type |
The type of contract for the machine. If the machine is not under contract the field will show ---. Note! Your administrator can use the following settings for contract types: COMPANY_XXX \ PROJECT \ CONTRACT_TYPE_ENABLE and CONTRACT_TYPE_ONLY_VALID |
Contract description |
The description of this contract type |
Contract number |
The contract number for this machine. Note! If COMPANY_XXX \ PROJECT \ CONTRACT_TYPE_ONLY_VALID = 0, the contract number will not be displayed. |
Contract valid until |
How long the contract is valid. If a termination date is entered in the contract, this field will change to 'Termination date' and show when the contract is terminated. |
Customer warranty |
Customer warranty date. The date shows warranty valid until date. |
No. of days since last visit |
The number of days since the last service on the machine. |
No. of activities last year |
The number of activities on the machine during the last year. |
Avg.response time |
Shows the average response time for a machine. E.g 2 jobs on a machine (job1 = 3h response time) + (job2 = 6 h. response time)/2 = avg. response time for the machine is 4.5h (This information is available in Evatic Mobile) |
Machine result |
Profit/loss for this machine (whole life span) |
Estimated units to next PM |
This field shows the estimated number of units to next PM. On the model you enter the number of units between each periodic service (service interval). When adding a new task, this field will appear red if the estimated number of units to the next periodic service is 0 or below. To activate this function you must enter in Admin which symptom or action codes that are used for PM tasks. If you have previous tasks marked as PM, the system will estimate the number of units used per day and then calculate the number of units to the next PM. |
Supplier warranty end |
Shows the end date for warranty from supplier. This option is only available if you have purchased the Evatic stock management module. This Field shows date only for machines sold through Evatic. Date is warranty start (= the invoice date you enter when you enter the invoice information from the supplier) + warranty length ( = months. Each serial number inherits this from the article screen, but you can change it whenever you enter invoice information from the supplier). |
If there is any information entered as a follow up action or comments about the machine, these will be displayed in a list within the general information. Can be entered in under Machine>Action.
Task
The task(s) you enter will be listed in the bottom of this screen. Each
line contains: task number, status, date, priority, symptom text,
machine, duration, resource, SC1-3, location, contract type, contract
description, machine ID number.
Note! You can right click on an task and select <Add reminder>:
Reminder is a calendar activity linked to the
project task. Subject/text etc. are suggested default from the project.
(see Evatic Admin/ Company XXX/PROJECT/REMINDER_DEFAULT_SUBJECT).
Arrival and response times
Contract type |
The type of contract for the machine. If the machine is not under contract the field will show ---. Note! Your administrator can use the following settings for contract types: COMPANY_XXX \ PROJECT \ CONTRACT_TYPE_ ENABLE and CONTRACT_TYPE_ONLY_VALID |
Received by |
The user that received the task. Standard: the user logged in |
Date |
The date the task was received. |
Time |
The time the task was received. |
Response time |
The promised response time. This number refers to the maximum number of hours before the task will be started. If the machine is connected to a contract the response time will be taken from this contract type. If not, the standard response time defined in Evatic by the administrator will be used. The hours of work for each individual day is set up by the administrator. |
Date |
The date for the latest possible response. (Standard: calculated in accordance with the response time). |
Time |
The time for the latest possible response. (Standard: calculated in accordance with the response time). |
Solution time |
Point of date/time for task solution. Note! Your administrator decides if the field should be active or not (see contract type). |
Contract number |
The contract number for this machine. Note! If COMPANY_XXX \ PROJECT \ CONTRACT_TYPE_ONLY_VALID = 0, the contract number will not be displayed. |
Contract valid until |
How long the contract is valid. If a termination date is entered in the contract, this field will change to 'Termination date' and show when the contract is terminated. |
|
Button for problem management.(Note! This Option can only be used in if you have purchased the problem management module) |
Agreed visit date |
The user can set an agreed visit date if this is discussed with the customer, these fields will also automatically show the default duration of this task if this is set up. The user can also manually change both agreed visit date and duration. The information here (if a duration is set) will be suggested as visit date when the task is assigned to the first technician. |
Check list |
Button to select the checklist for the project. This list is available for the technician on his Evatic Mobile. Under the Solution tab, the comments from the technician are to be found. |
Fixed price |
You can enter a estimated fixed amount cost for this task. When creating an order with a fixed amount value, Evatic automatically add an order line with this article number and amount. |
Fixed price (Cost) |
The amount the employees should receive for the job (= cost price). This filed will be shown on the Evatic Mobile. The cost price will be divided among the number of technicians sharing the job (not editable). The cost price is linked the fixed price on the task. If this amounts are used, the cost price on the service articles should be 0. |
Service articles |
The dispatcher can choose the service articles code before the work is assign to the technician. E.g. If you are working with different kind of prices (on the same machine and the same technician), this will help the technician. When he starts the work time in mobile, the right service article codes are already chosen. If the task has a service article selected here this choice will be used instead of (default) service articles selected on the machine, technician, department etc. (see COMPANY_XXX \ PROJECT \ SHOW_SELECT_ SERVICE_ARTICLE) Read more about default service articles here Note! You can also set this up as default codes based on selected symptom codes. Read more here. |
Pre-paid units
|
Select which pre-paid account you would like to deduct from Note! See Contract If an account is selected here, it will default be added to all orderliness connected to the task Button to open the pre-paid account |
Task description
Symptom codes |
Drop-down list boxes where you can select common tasks. If you press <Enter> in one of these boxes, after a selected symptom code, the task will be placed in the symptom description. Using the mouse you will only select task/symptom code. Note! Your administrator can set up default symptom code(s) whenever you enter a new task. |
|
By building a folder tree structure under Settings>Project>Symptom tree, you will be able to make a selection here when creating a new project. By clicking on a node in the folder tree structure the text in the tree structure and/or a symptom text will be returned to the system code description in the project. This button is also available if you use the symptom dependencies and not the symptom tree. Read more here. |
Priority |
The priority of the task. Select from the Drop-down list (F4). |
Description |
A text description of the task. If necessary you can enter information particular to this task. |
Task tree
Select the node within the tree where you wish to place the task. (This tree is also available from within the solution tab).
If you have selected a machine from task, the tree will automatically select the default/standard node for the chosen machine. (For how to change this see: Machine).
If the task has a technician assigned to it the tree will automatically select the default/standard node for the chosen technician. (For how to change this see: Technician).
Pre-order
Possibility to add articles to the project, which automatically will be linked to the order, when the project is completed.
| No | The sequence the articles are displayed in. |
| Article no/-desc. | Search on article no/-name. Enter minimum 2 characters and press F3 to start the search. Select the right article from the list. |
| Q-O (Quick orders) | Select articles from the quick order list |
| Qty | The number of the selected article to be delivered. |
| Planned stock | Select stock from which the article is to be collected from |
| Qty on planned stock | The number of items exist on selected stock |
| Qty already planned | The number of items are planned on other tasks |
| Qty free to plan | The number of items are available for planning |
| Qty on main stock | The number of items exist on main stock |
| Show other tasks | Show tasks where the item is already planned. It is possible to select from which stock. |
Note! Article numbers in generations are added as functionality here. If you enter the old article number when entering an article in the pre-order table, the system will automatically replace the old with the new (see Article)
Aggregated article. If you select a aggregated article (virtual article), a pop up window will appear to ask if you would like to add the combine articles. If YES, the table will be filled with the articles (the aggregated article is marked green and the combine articles orange).
- Aggregated article has sales price, but not cost price and is marked as invoicable.
- The combine articles have cost price, but not sales price and are marked "hide" (not invoicable).
- The aggregated article does not have a stock.
If default stock is not set up, the default stock on the article screen dialog window will be used.
Menu
|
|
Internal comment
Free text field for entering internal comments (CTRL + N adds user, date and time).
Solution
Assign to resource
This is a list where you can select technicians to solve the task. There are other easier ways to do this under Project->Summary.
Remember that to change information in the assign list you only have to move to another row. If you press F12 you will try to save the entire task and not only the assignments. If the task is in planning mode or is accepted by a technician you will get a message that it is not possible to save the task. Even if you not are able to save the task using F12 you might be able to change assignments that not are accepted by changing information in the list and move to another row.
| Tech. | The technician number can be selected from a list using the mouse or F4. Or enter the whole number and move to the next field. If you have several technicians, you can search for the technician by entering part of the number/name and press F3. To see all the technicians again, enter blank and press F3. |
| Name | Refers to the selected technician number. You can also use this dropdown to search or select technician |
| Modified | Information when this assignment last was changed |
| Status | Current status on this assignment. An assignment can have multiple statuses. Examples are Assigned, Downloaded, Accepted, Rejected, Callback, Returned, Done. This field will show the last status for this row, if you want to see history you can right click and choose “Event history” |
 |
Click on this button to send the project directly to the technician’s e-mail address. This is a longer and more informative message than you otherwise send by pressing the email- button in the menu at the top of screen. |
Tot. planned, Tot. worked, Tot. Remaining |
3 extra columns can be added (see Company XXX/ PROJECT/ SHOW_WORKED_TIME). They will show the planned time for the service task, worked time and remaining work time for the technician. The work time and remaining work time are calculated by using the following Evatic Admin setting: Company XXX/ PROJECT/SHOW_WORKED_ TIME_SERVICES_TYPE (default #W1#) (see service articles). |
| Planned from | If the assignment is planned with a from and to date you can add the planned visit date here. |
| Duration | Duration of the planned visit |
| Planned to | End time of the planned visit |
| Use work hours | Should the system use the work hours set up on calendar (calendar linked to contract type, department and company) to calculate the end time of the visit based on from date and duration? |
Add new planned visit for the same technician.
If the user move to next row and set focus in the planned from field the system will ask you if you want to add new planned visit for the same technician.
You can also mark a line and right click and choose “Add new planned visit”
Right click functions
| Event history (all technicians) | Select this to see a list of all events linked to assignments of this task |
| Undo check out | Here the user can call back an assignment that is accepted by the technician. This choice is only available if the selected row has the status Accepted. |
| Re-send to mobile | This function change status to Assigned so the assignment again can be reached on a mobile solution. This choice is only available if status is Rejected, Callback, Returned or Done. |
| Add new planned visit | Choose this to insert a new row where you can add a new planned visit for the technician on the selected row. |
Action codes
In the drop down list boxes you can select standard actions. By pressing <Enter> from within any of these boxes the action will automatically be inserted into the description. Using the mouse you can only select the action code. More detailed information regarding the solution can be entered in the text field below if needed.
Action tree: This function has to do with the
action dependencies. You must
activate the settings in Evatic Admin to see this button.
Task returned from Mobile
If a task is assigned to several technicians, the action text from all the technicians will be filled in. This happens when the task is synchronized back from mobile and the technician is not a teamleader. The text from different technicians will be added with date/time and technician name as heading (like CTRL + N) in the actiontext field. (Teamleader decides the action codes) Your administrator can decide the date format with the setting Company XXX/Evatic Service/DATE_FORMAT.
Task tree
Select the node within the tree you want to assign the task to. (This tree is also available from the task tab).
If you have selected a machine for the task, the tree will automatically denote this node as the default/standard for the selected machine (To change this see: Machine).
If the task has a technician assigned to it the tree will automatically denote this node as the default/standard for the selected technician (For how to change this see Technician).
Meter readings
In this list you can enter the service readings for the meters installed on the machine. If no machine is connected to this task the list will not be available.
| Meter | The name of the meter (cannot be changed here. See Settings>Model) |
| Pr.date | Shows the date of the last service meter reading (cannot be changed here. See Settings>Model) |
| Pr.counter | Shows the actual number from the last service meter reading (cannot be changed here. See Settings>Model) |
| Date | Date for this meter reading |
| Counter | The number from this meter reading. |
Information entered here is saved with other information about the task by pressing (F12).
Buttons
Duplicate task |
Make a copy of the task to be inserted into the same project. |
Send to HelpDesk |
Button to send the service task to HelpDesk. A new screen will open where you can select symptom codes and folder. Note! Your administrator can decide what should be the received date. Company XXX/HelpDesk/MOVE_TO_SUP_CHANGE_ RECEIVED_DATE |
Consumables |
Moves you to the order module where you can record the consumption of time and of parts. Note! When a order is created from an service project for a cash-customer, the delivery address and invoice address will be equal the address set under the General tab on the service project. If an open order already is linked to the customer/project, the order screen is not automatically opened. A pop up window will open first, where you can decide to add on existing order or create a new one. |
Finish |
Denote the task as completed. When the last task of a project is completed you will also be asked if you want to finish the whole project. Completed tasks will not appear in Project->Summary. (the task is completed by the technician) Note! Your administrator can decide if the task automatically can be finished by technicians using mobile. See Company XXX/Evatic Mobile/PROJECT/ALLLOW_FINISH_PROJECT and ALLLOW_FINISH_PROJECT_ONLY |
Check list
Report tool for the technicians.
If a check list is add to the project, the following icon will be shown
next to the text Check lists  .
.
This tab will be divided into the check lists added and the possibility to add or delete. The same check list can be used on different tasks.
1. Before any check lists are shown, a technician under the Solution tab must be selected.
2. Select checklist from the drop-down list (see Checklist tab)
3. Mark if the checklist should be connected to a machine or not (a checklist -ID can also be selected)
Note! If the “Installation tree” is used and there is a relation
between machines, then the sorting of the checklist will be according
to the Installation. If the “Installation” is not used then the sorting
will be first on machine number, then on checklist code.
(The same sorting will be for the technician using EMS)
4. Select if the checklist should be displayed as tree or list.
Extra lines will show the different technicians added to the checklist.
If the technician is marked red, no values are added to the checklist.
If the technician is marked green, values are added to the checklist
If the technician name is green, you can right click and select other
technicians from the menu. This to transform the checklist points to the
other technician
Tree:
Note! If you mark somewhere in the tree structure, the structure will expand automatically (+/-)
When selecting a check list , a tree structure with all the added levels will be displayed. For each Group, the properties Name and Accessories are shown, and for each Check point, the properties Name and Value are shown. It is not possible to edit the levels in the tree structure directly. In order to edit, you select a checkpoint node/level in the tree structure, and a own window will be displayed to the right where you can enter values, comments or select statistic group. Also previous values can be displayed (historic data).
At the top you will see how many points are mandatory and how many have been checked. This will be displayed as a progress-bar (e.g. 50 %).
List:
Note! If you mark somewhere in the list, the structure will expand automatically (+/-)
The list contains normal Groups (= yellow lines) and/or Groups with accessories (= green lines). The Check points are grey lines. The advantage by using this structure is that you can enter values, comments or select statistic group directly behind each e.g. check point. The value field can contain 4000 signs.
E.g. If the list contain Groups with accessories (= green lines), a new list with different columns ( 1 for each serial number) will be displayed to the right.

If the machine has e.g. 2 accessories, the checkpoints under this group will be displayed 2 times.
Note! Your administrator can set the following setting: COMPANY_XXX \ PROJECT \ CHECK_LIST_AUTO_ADD_DEF_VALUES. This gives the user the previous values entered as default next time the checklist should be filled.
The column historic values will show earlier added information to the checkpoint. You can double click on the value to copy it to the existing checklist.
How to create documents from the checklists.
If you right click on one of the check lists a menu where you can create/preview a document is opened. If you create a document this is stored under the Events tab. Note! document templates must be added in order to use this function.
Note! Your administrator can set up so that the checklist PDF document automatically is saved under the Events tab. See Checklist.
How to add checklist based on the same type.
If checklist that are the same should be added to a project, a ID (text, serial no, location etc) on each check list must be added.
Should each technician only select from defined ID's, enter the ID's as machine properties.
E.g.:
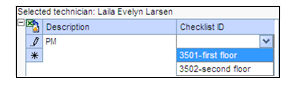
The technician can also type his own ID, this ID will be added to the machine property list when the project is synchronized back from Evatic Mobile.
Note! All the historic values will be added to this extra level (= ID), so when the technician visit the customer again, the history only shows values added for e.g. "3501-first floor".
Your administrator decides if the ID should be used. (See Company XXX/PROJECT/ CHECK_LIST_ID_PROP)
Info
This tab shows information entered about the machine/customer that is connected to the task.
If there is information in this field a icon  will be shown next to the text: Info
This field displays the same information as the field Machine/Customer -> General (Information) in the Machine/Customer dialog screen. Here you can enter information about the machine/customer and save by pressing <Update machine/customer information >.
Order information: Text entered here will be added automatically to the Info tab (see Order).
| Extern no | Only Info. Shows the external project number/task number |
| Extern reply mail | Only Info. Shows the reply email for the extern project |
| Extern status | Only Info. Shows the status on the extern project. |
Note! If projects has been created through the recurring project module, they will here be marked with the blue text line < Generated from recurring project 58/1>
Press the blue text to open the recurring project. The same is for sales project.
Remember! Your administrator can add up to 6 fields that can be used freely. Enter a text or value in those fields.(Settings -> COMPANY_XXX
- TASK_INFO - INFO_01..INFO_06).
Contracts
This tab displays contracts that are connected to both the customer and the machine that are selected for the task. Select a contract and press Show Contract, this gives you the possibility to both view and change the contracts. This tab will not be available if no contracts are connected to the customer or the machine.
Contract no. |
The number of the contract. (Info) |
Row no. |
The row within the contract. (Info) |
Article description |
Article description used for the fixed price row or volume row. (Info) |
Type |
The type of contract row for the machine/customer (Info) FP - Fixed price PV - Volume price |
Contract type |
The type of contract selected for this contract (Info) |
Orders
This tab displays a list containing all the orders and lines within the orders that are connected to the project. Remember! That this function is for information only on an open project. To add information to an order, double click or use the <Consumables> in the <Solution> tab. If there are open orders for this project the system will give you the choice of adding the new order to the existing orders (select button Add to selected order) or adding a new order (select button Create new order.
If the order connected to a service project is credited, the orderline is displayed as a red line.
Always displayed at the top in this dialog are the total cost of the order, total sale exclusive VAT and Result (%) for all orders
Events
Documents with information regarding the project can be linked in here. All types of document can be linked in. When the document is linked in, it does not matter where on the hard disk the document is stored. The file is now within the Evatic database and is accessible to all users of Evatic.
If there are files under this tab a icon  will be shown next to the tab: Events.
To add a document, press the <Insert document> button. The option to select which file to add will then appear.
A document can also be added by drag & drop. Select the Document that you want to store on the tab, click and hold the left mouse button, and drag the selected items into Evatic. Place the pointer on the blue caption-line (notice also that the pointer changes when you place the pointer on the caption-line) , and release the left button. (Several documents can be moved at once).
Double click to open the document or select the file from the list and press<Open document>.You can also edit and save the MS office documents stored here.
To delete a file, select from the list and press <Delete document>.
If you have Evatic Mobile you can decide if the file should be exported into Evatic Mobile. To make the file available for Evatic Mobile select the chosen document and press <Use in Evatic Mobile> . To remove the document press once more.
You generate a pdf-document by pressing the button <Service Report>. It is similar to the service order (press
), which includes Symptom, Working hours,
Travel and consumables
Note! Out-going E-mails can also be stored here.
The list displays:
| Icon showing file type (Word, Excel etc.) | |
| Name | Name of the file |
| Created | The date the file was entered into Evatic |
| Size (Kb) | Size of the file in kilobytes |
| Mobile | Cross off selection showing if the file is available in Evatic Mobile or not |
Remember! Documents linked to the customer
(Tip) and
machine, can also be accessible here.
Note! An Email can be added by drag & drop. Select the Email (Outlook) that you want to store on the tab, click and hold the left mouse button, and drag the selected items into Evatic. The mailsystem Outlook must be set up for the user (see User settings) before you can drag & drop emails.
How to use document templates
If documents based on templates should be added (= same template as Sales project), right click in the list and select <New document>.
A new screen dialog screen opens where you can select template.
How to create templates, read more here.
PDF:
When a document is added (Word or Excel) it is possible to create a PDF document from it. Mark the document and right click to see the menu option " Create PDF from document".
Supplier order
Showing info about to be ordered articles from mobile. This option is only available if you have purchased the Evatic stock management module and the setting COMPANY_XXXPROJECT / SHOW_SUPPLIER_ORDER_STATUS is activated.
| Status | Red = only proposal exists (need to do something on these lines. (See Article/Stock Admin) |
| Supplier order | Supplier order number |
| Line no | Line number on the supplier order |
| Supplier no | Number of supplier that order is sent to (for information only). |
| Supplier name | Name of supplier that order is sent to (for information only). |
| Order no | Info. Sales number connected to the article line. |
| Article no | Info. Article number connected to the supplier order |
| Article description | Info. Article description connected to the supplier order |
| Stock no | Info the stock number the articles are ordered to. |
| Qty ordered | Info. Number quantity ordered |
| Qty received | Info.Number quantity received |
Double click to open the supplier order.
Menu: Right click and select among <Open supplier order<, <Open proposal window>, <Open order> and <Open article>.