Calendar
The calendar in Evatic is used every day. One of the first things you start the workday with is to see if there are any activities set up.
The calendar is created with a week plan and pages for each day per month. Additionally there is a function to see colleagues appointments and to make reservations.
In this chapter you will learn more about Daily plans/ Work plan, Week plan and Monthly calendar.
Remember! If the technician wants to see the planned service projects, used time on orders (where from-to time is entered), availability period, in all the different calendars (see salesman tool->calendar, customer and project->resource calendar), the user must be marked as a technician in Evatic Admin (see User). If the user is marked as a sales person in Evatic Admin (see User), he will find his activities under the calendar (see salesman tool->calendar and customer).
Your administrator can also choose the function here for only seeing your own customers (Global_User/Evatic Sales/SALESMAN_ONLY_OWN).)
Calendar heading
- Shows the name of the user of the calendar.
- Shows today's date.
Monthly calendar

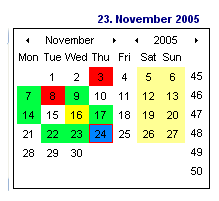
The monthly calendar is important for moving quickly to another day, month or year.
By clicking on the arrows next to month and year, it is possible to change the displayed month and year.
By clicking on a date, the work plan changes to the selected date/week.
The colors tell how busy a salesperson is during the day. This makes it easy to see when the salesperson has free time and is available for booking a meeting, etc. The colors and durations are set by the administrator.
Daily plan/ Work plan

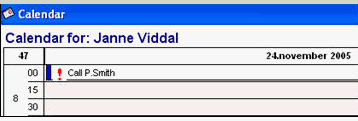
Displays only activities with selected start and end times. The week number and the date are shown at the top of the calendar for your convenience (e.g. Week 47/November, 24 2005). To the left all the different hours are listed (Your administrator can decide it the time intervals should be divided into 15 or 30 minutes.)
Different icons can be linked to the activity:
Icon |
Description |
|
The activity is set up with a reminder, either through Evatic or email/SMS. The activity is connected to a customer The activity is connected to a sales project The activity has low priority The activity has high priority The activity is marked as private (invisible to other users). |
Menu
To see the menu, right click with the mouse in the calendar.
| New activity | Adds a new activity. (If you mark one activity and right click with the mouse, you get the following options: Change-,Copy-, Cut-, Delete activity) See also Activity, menu. |
| New availability period | Adds a new availability period (If you mark one availability type and right click with the mouse, you get the following options: Change-,Copy-, Cut-, Delete availability period) |
| Paste activity | Inserts an activity which e.g. has been copied. |
| New customer-activity | Adds a new activity (from the customer card). |
Buttons
| Button | Description |
 |
The calendar displays each day separately |
 |
The calendar displays each week separately. Shows 5 days. |
 |
The calendar displays each week separately. Shows 7 days. |
 |
A print button allowing the printing of the activities for the chosen day or week. |
Events
A list of all the activities, documents, emails, orders, service projects, sales projects, packing slips and recurring projects. Double click on a selection from the list to show the e.g. chosen order. Read more here.
Also you can right click and select e.g from the menu: New activity, New document, New order etc.
Remember! Events shown here, are only those entered by the user. The events stored under Customer, are events entered by all users.
Remember!Several of the functions here are only available if you have purchased the sales module. For example, sales projects, email, customer activities, document templates are e.g. not accessible if you do not have the sales module.
Activities
A list of activities with a date but not a start-end time. New activities can be added, changed, change status and deleted from this list.
Tree structure
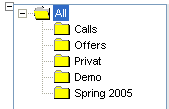
Here you can build a tree structure to sort the activities. Each user can build his own structure with different levels.
|
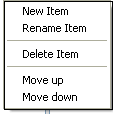
1. If you are starting with an empty screen, click with the right mouse button to open this menu.
2. Select New Item.
|
|
You will then see the box shown to the left.
3. Enter the name for the node at the top of the folder tree. Typically this might be called, All or something similar.
4. Then press < Enter> on your keyboard. |
|
5. Click then with the right mouse button on the node you have just set up and select New Item from the menu displayed.
A new node below the first will be entered into the folder structure, as displayed below. Repeat the actions for the first node giving this node a relevant name and press <Enter> again. |
E.g.;

Buttons/Choices:
| To day | Mark if only today's activities should be displayed in the list. |
| + / - | Opens/Closes the view of the tree structure. |
 |
Export the list to Excel. |

