Fleet Management System
Connect to a Fleet Management System
After ESH has been successfully installed, open it in Google Chrome. The URL will be displayed after the installation has successfully run through. The webpage will prompt for a login. Use a valid Evatic Service user to logon to the solution. After a successful login you are on the start page where you can create new “Integrations” and “Connections”.
Printfleet
Use the button Add integration and press Create button for Printfleet. Give the integration a unique name and description.
Select the Company and Description required from the Dropdown list.
Enter user and password for Printfleet connection. A user for the Printfleet access can be generated in the Printfleet Web-Application by your Printfleet Administrator.
Enter the Printfleet Web Service API web-address (URL). This usually looks like this example:
http://Your_PrintfleetServer/restapi/3.4.5/
Save the integration with the Save button and then press Test connection button to check the connectivity to the Printfleet Web Services API. This must return a successful feedback in order to work. If the connection is configured the webpage will show a tree-view representing the device-management-groups in Printfleet.
FM-Audit
Use the button Add integration and choose FM-Audit. Give the integration a unique name and description.
The connection URL to the FM-Audit Web Service looks like this example:
http://Your_FMAuditServer/fmacentral/webservices/publicapi.asmx
For FM-Audit integrations insert the Dealer-Names (“IDs”) like they are shown in the Web-GUI of FM-Audit. Multiple ids are separated by a ‘§’ character.
Press the button “Test connection” to ensure connectivity works correctly.
In the FM-Audit connector you must choose a field from FM-Audit that will be used to retrieve the unique number from FM-Audit that should be used for the device-mapping against the Evatic Database (EDB).
Troubleshooting for FM Audit
Scheduler throws:
The provided URI scheme 'http' is invalid; expected 'https'. Parameter name: via
- Open the web.config file located at C:\inetpub\wwwroot\EvaticServiceHub
- Comment out:
Scheduler throws:
The maximum message size quota for incoming messages (6553600) has been exceeded
- Open the web.config file located at C:\inetpub\wwwroot\EvaticServiceHub
- Increase the value for maxReceivedMessageSize where binding name="FMAuditCentralPublicAPIBinding"
JetAdvice
To connect Evatic ECMM to JetAdvice you need to configure a user inside Jetadvice that is enabled to use the Web Service API of Jetadvice. Ensure that the webserver on which you run ESH is allowed to access this URL: https://api2.jetadvice.com. Use the button Add integration and choose JetAdvice. Give the integration a unique name and description.
For JetAdvice integrations you also need to insert the View ids for devices, meters and supplies which are displayed in the web page when creating an integration.

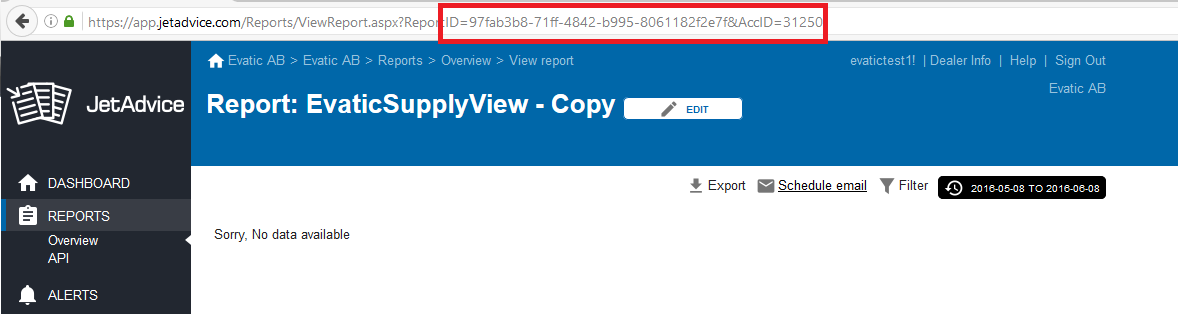
How to retrieve the view ID
For retrieving the view ID you have to login your user account at JetAdvice, and go to Report section. Find your corresponding Evatic account. The reports showed below is from our test account which you cannot see. Use your ECMM integration account to make sure you will see the reports.
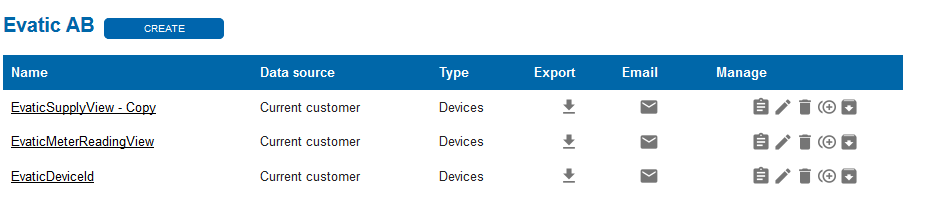
To retrieve View id for supplies open EvaticSupplyView and select the ID from the url.
Repeat the same procedure for View id for devices and View id for meters.
Configure JetAdvice reports
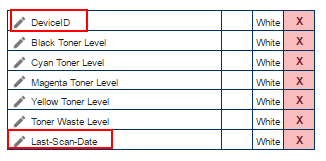
Login to JetAdvice, and go to Report section. Find your corresponding Evatic account. Select the edit button for the report you wish to modify. Each report has a set of mandatory fields which have to be present. In addition, other fields can also be included. Mandatory fields for EvaticDeviceId report are displayed in the table bellow.
LastActiveDate must be DateTime.

Mandatory fields for MeterView report are highlighted in red. DeviceID, Counter-Date-End.
Counter-Date-End must be DateTime.
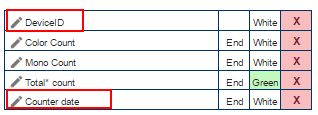
Mandatory fields for SuppliesView report are highlighted in red. DeviceID, Counter-Date-End.
Last scan date must be DateTime.
KFS
KFS integration is an ECMM integration type and will follow normal setup and process. Follow the standard documentation for that part.
In order to create an KFS integration press Add integration button and choose Kyocera Fleet System client (KFS). Give the integration a unique name and description.
- Enter the KFSWebservice API web-address (URL).
- Enter a valid user and password for the KFS-connection.
Save the integration with the Save button and then Test the connection to the KFS Web Service API by using the button “Test connection”. If the connection is correctly configured, you will see the “tree structure” of device-groups as they are organized in KFS.
Then select the groups you want to collect device information from and Save.
After the integration was created press the Open button. This will lead to the Scheduler page. Go to the Scheduling tab. In case the Run button does not appear, enabling it by pressing Enable button. You are now ready to start the integration.
<!\[CDATA\[*/ if (parent.HighlightPage != null) {parent.HighlightPage("M2M\_Fleet\_Systems")} /*\]\]>