Connect Staging Tables
Overview
This type of integration is used to import or export mass data from external systems. It's a specific type of integration and should not be mistaken for ESH Staging Database.
Create a Staging Tables integration
Use the button New integration and choose StagingTables. Give the integration a unique name and description. Press Save and note the ExternalSystemGuid and ExternalSystemId. You will use this information when sending or requesting data with the Web Service requests
Service sequence description
Evatic staging services are designed to deliver reliable tool with high data transfer throughput. It is essential, that each of the service method handles data of only one type, ie. articles, addresses etc. This means that data entities are not passed within logical entities - that is why the coming data should be processed in certain order, and processing should be started after all of data has been received.
This is why the staging transactions idea has been introduced. Staging transaction is just an implementation of transactional processing pattern – it doesn’t create a sql transaction or distributed transaction scope in background. After staging transaction is created, all data should be transferred within one transaction.
Then commit transaction call will trigger import data. Our data processing job will process data in certain order, ensuring all data dependencies and relations will be used. If any errors occurs during import, error information will be stored for each row separately, for further retrieval.
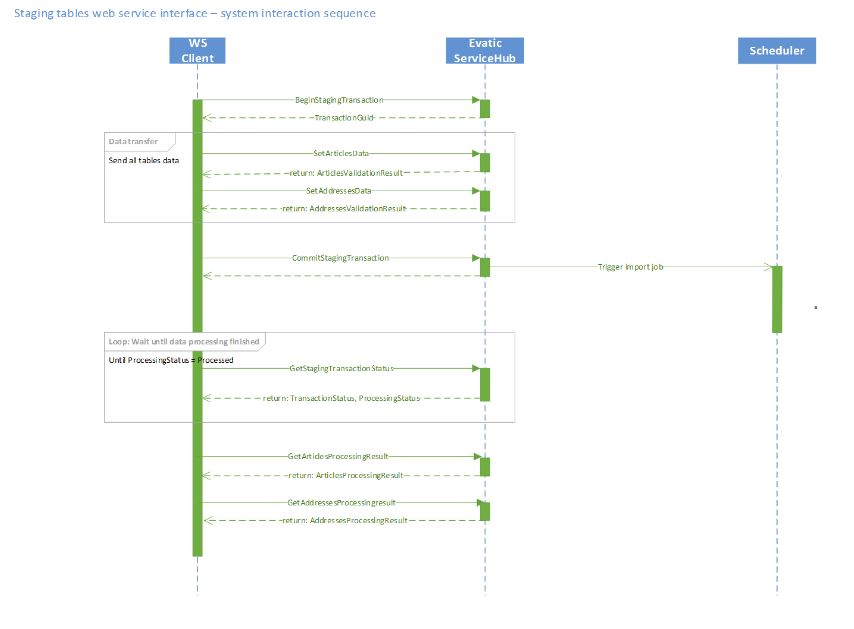
Below the standard service call sequence is described:
- BeginStagingTransaction – opens staging transaction on Evatic Data Staging side and returns TransactionGuid. This identifier should be used when communicating with other methods in the service.
- SetxxxData – use it for transferring the data to staging tables in Evatic Data Staging. Each of the set commands has a limit of max number of transferred rows per one method call. The default is 10000 and can be changed in configuration file. So if you must to transfer 10000 rows, call the SetxxxData method 10 times with 10000 rows in each request. SetxxxData method implementation checks if the passed TransactionGuid is valid, and if unique key constraints and field length validations are fulfilled. If any validation fails, the row will not be saved, and information about it will be returned in the response of SetxxxData (each not saved row will be returned with validation error message).
- CommitStagingTransaction – closes the transaction and triggers data processing job. After that, no more data transfers in the scope of transaction are allowed. The data processing job will perform import from Evatic Data Staging to Evatic Service.
- AbortStagingTransaction – if validation error ratio during SetxxxData is too high, you can cancel transaction calling AbortStagingTransaction method. After that fix your data and begin new transaction to transfer it.
- GetStagingTransactionStatus – after commiting staging transaction, check if data import to Evatic Service is finished (in service response ProcessingStatus = Processed)
- GetxxxDataProcessingResult – gets processing result. If there were any errors during import, you can read them here.
Diagram
Authentication example
When preparing service client for usage, it’s necessary to pass username and password. The general rule is that the user is authenticated with current ESH/ECMM database.
var serviceClient = new StagingTablesServiceClient(endPointName, serviceAddress);

serviceClient.ClientCredentials.UserName.UserName = serviceUser; //user from db

serviceClient.ClientCredentials.UserName.Password = servicePassword; //password