User Manual for Evatic Partner Web
Initial setup
Getting Evatic Partner Web (EPW) installed and working with your existing Evatic database require some assistance from an Evatic consultant. However, once the system is set up, there are certain settings to adjust in Evatic Service to get the partners set up.
Adding a partner
To get a partner set up in the system, there are 3 things that need to be set up:
- The partner must be registered as a technician
- The partner must be registered as a customer
- The technician must be connected to the customer
- Look up the password in Evatic Admin
First, register a new technician by selecting Settings -> Technician -> Technician.
Fill in necessary information. Remember to check off the box for Service.
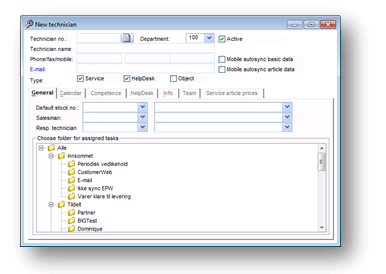
Under the tab Service article prices, add the group of service articles that should be available to the partner.
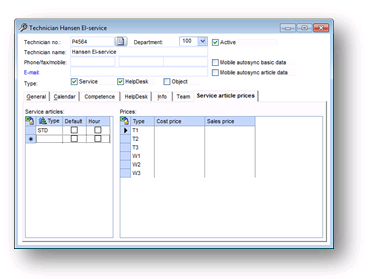
It might be a good idea to mark the technician number for partners differently than regular technicians, to easier separate between the two.
When the technician is added, open the partner as a customer.
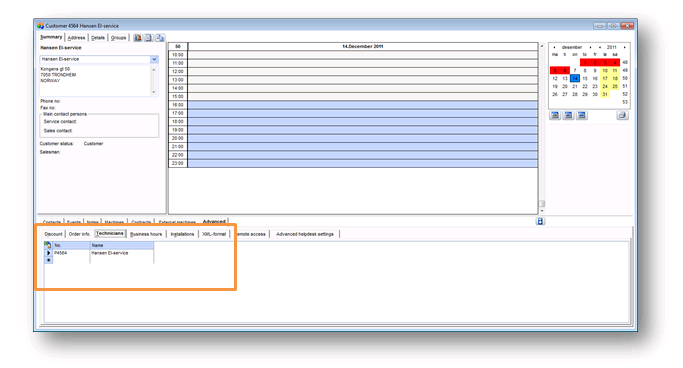
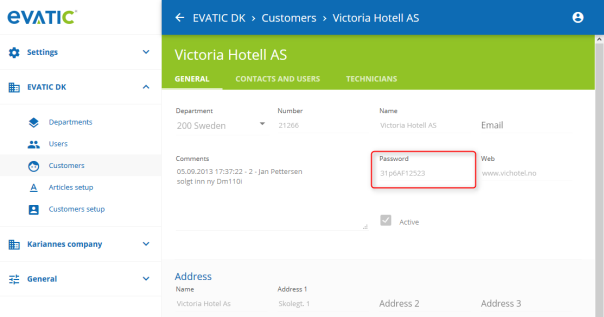
The partner is now set up, and only needs the password from Evatic Administration Web.
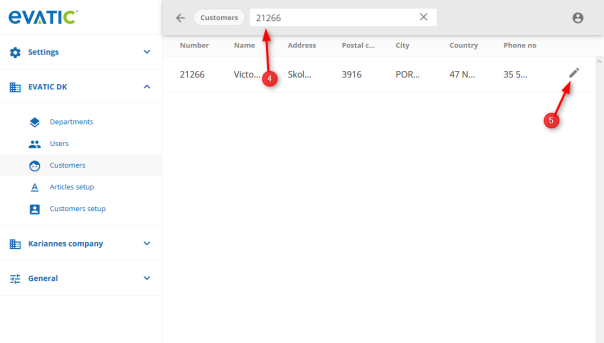
Open Evatic Administration Web and expand tab with Company name (1) and select Customers option (2). Use search button to search for customer (3).
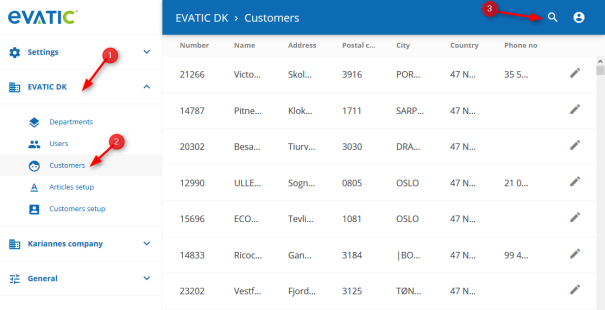
Type customer number and press enter (4). Open customer with edit button (5).
Password for selected customer is in place presented on the screenshot.
Allocation machines to the partner
The partner can create projects and register meter readings only for machines that are allocated to the partner. This is done in Evatic Service.
Open the machine.
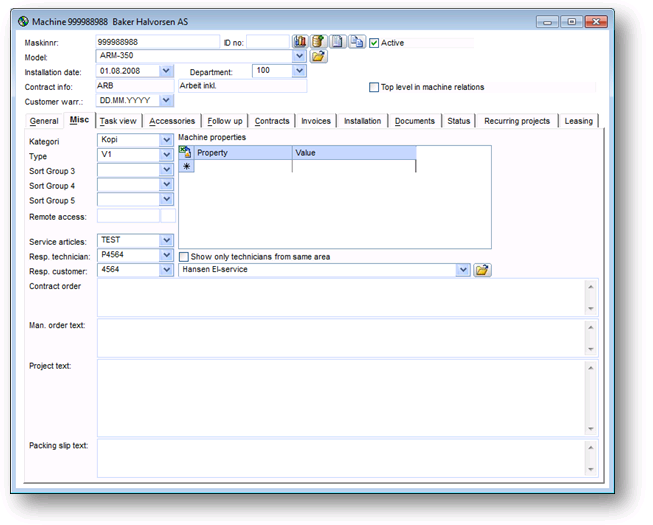
Add the partner both as Resp. technician and Resp. customer.
The machine does not have to be allocated to the partner before assigning them a project created in Evatic Service.
Logging in
Accessing the direct URL to your installation of EPW will bring up the log-in screen.
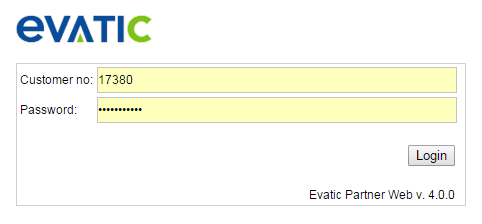
The log-in screen can be changed to go with your organisation’s design guidelines.
Two log-in types are available – User or Customer.The setting LOGIN_TYPE in Evatic Admin decides whether different log-in types should be available. More on this in the ‘Settings’ chapter.
User is an Evatic Service user, and will allow access to an online planner. Customer is a service partner, and will allow access to the partner’s projects and project history. Both log-in types are described in the chapters below.
Type in your log-in credentials to access EPW.
The setting START_PAGE defines the default starting page after logging in.
Log in as customer (Service partner)
Log in as a service partner by choosing Customer as log-in type. Please see chapter above for instructions on how to set up and allow EPW-access for a service partner.
Projects
Projects can either be created in Evatic Service and assigned as with any regular technician, or created by the partner directly in EPW.
Working with projects
Projects assigned to the partner are found under .
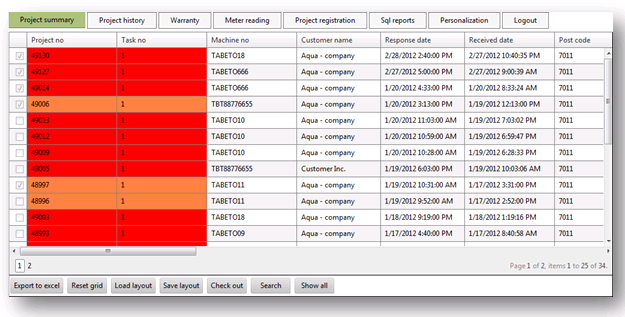
All open projects are shown here. Projects that have gone passed their response date are marked as red. The column all the way to the left marks whether the project is checked out or not.
The list can be sorted by any column by clicking the column name. The layout can also be changed, by resizing and moving columns. Clicking will then save it, and can be loaded again by clicking ‘Load layout’.
Check out a project
A project can either be checked out by marking it in the Project summary-list and selecting Check out, or double-clicking the project to see more information first.
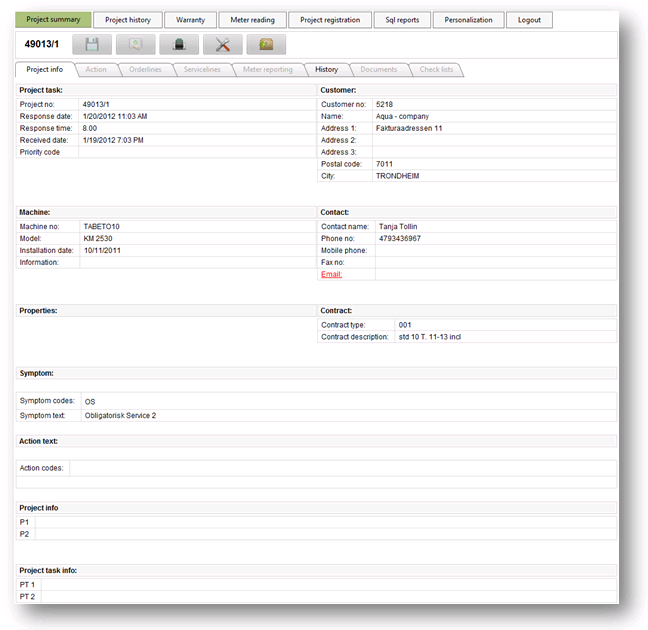
The tab Project info shows a summary of the projects details.
Click  to check out the project and start working on it.
Adding work details
The Action tab is where the partner will provide information on the service rendered. Action codes available are defined in Evatic Service.
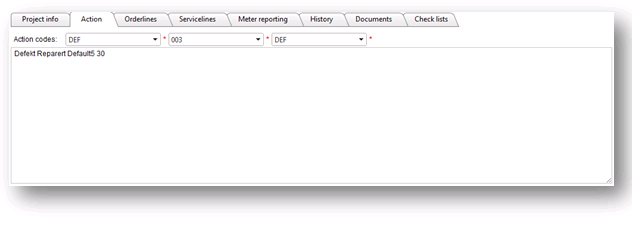
Information provided here will not disappear if the user is switching between tabs on the current project. But the user must click for the information to be saved before accessing a different project or module (unless the project is completed or returned).
Adding articles
Articles are added under the tab Order lines.
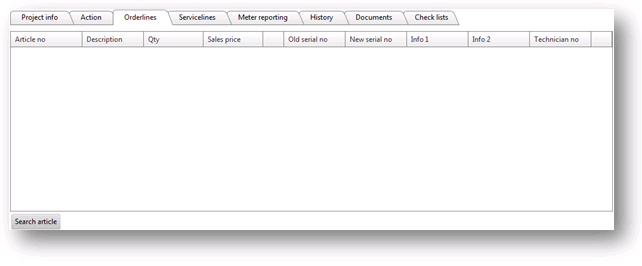
Look up articles to add by selecting .
Search for articles either by typing parts of the article number or name. Two extra buttons can be used as filter.
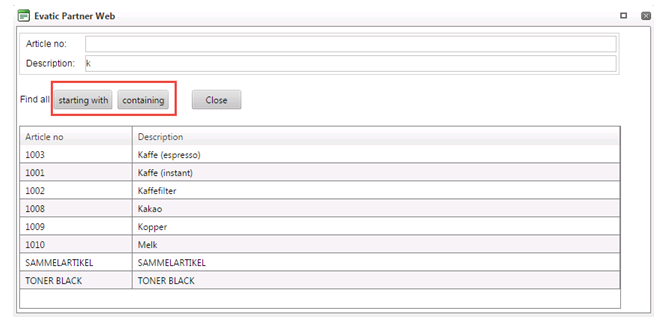
The amount of articles shown on every page can be adjusted under ‘Personalization’.
Double-click on an article to add to the project
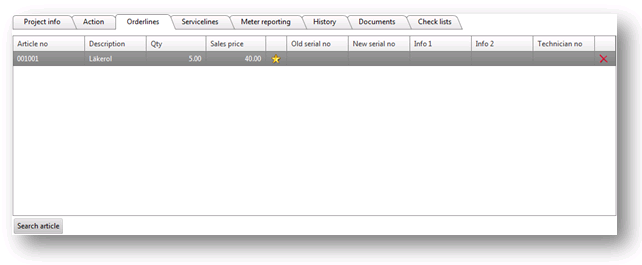
Change the quantity and price directly in the table. Delete the article from the list by clicking the red X on the right.
The star is for adding a warranty claim. More on this further down.
Adding service lines
The partner can add travel time and labor under the tab Service lines.
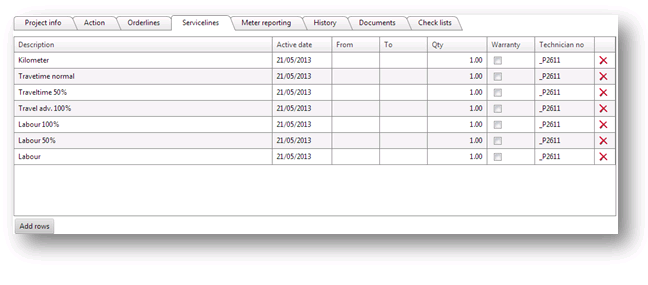
Empty rows are automatically added, similar to the service articles in the selected service article group for the technician. Click to add more empty rows, if necessary.
Select date and time (from/to) for each service article.
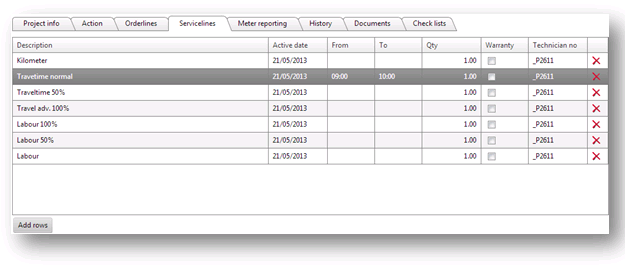
The quantity is automatically set based on the time chosen, but can be changed in case the work/travel time is different from the invoiceable time.
Click the red X to delete a row. It is not necessary to delete rows without quantity.
Adding meter counts
If meter reporting is part of the project, the meters can be found under the tab Meter reporting.
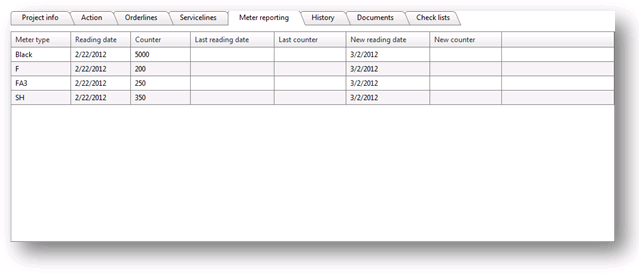
Set the New reading date and insert the new count in New counter.
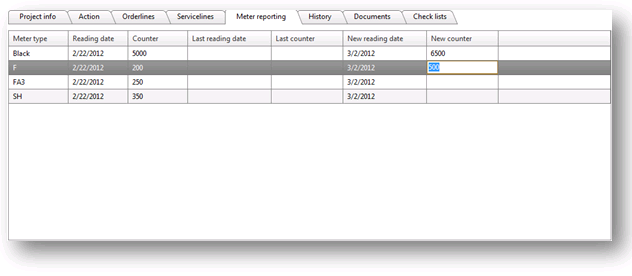
Viewing machine history
The machine history can be found under the tab History.
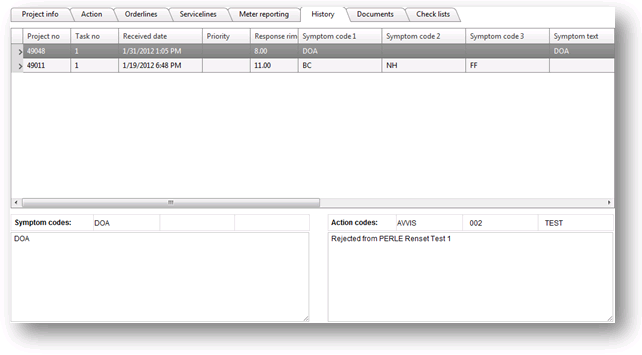
A complete list of the machine’s projects is shown, and selecting a project will provide information about the issue, and how it was solved by the technician.
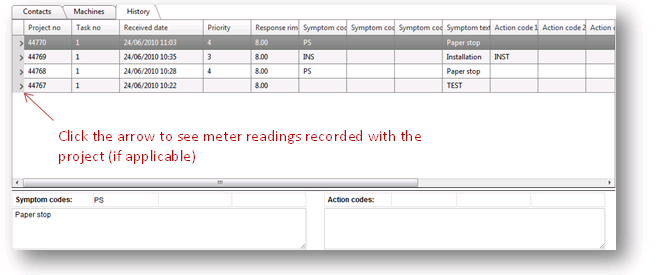
Clicking the grey arrow on the left will provide a list of meter counts affiliated with the project.

Viewing and adding documents
Documents can be found under the Documents tab.
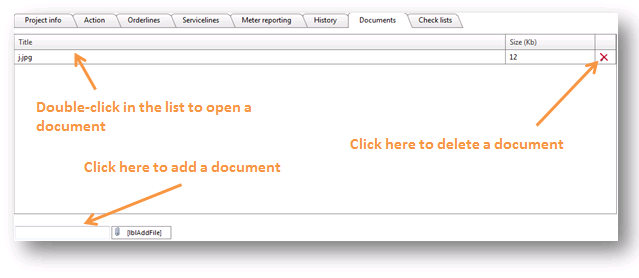
Filling out a checklist
Check list(s) are added to the project, and are available to the partner under the tab Check lists.

Check lists must be added to the project in Evatic Service, and can thus not be applied directly to projects created by the partner. Except for check lists connected to a symptom code – projects created by a partner containing this symptom code will contain the selected check list.
Saving or completing a project
Use the buttons on top of the project for saving, completing, printing or returning a project.

Hovering over the buttons with the mouse pointer will indicate its function.
Creating a project
The partner can create projects for the machines where it is set as the responsible technician and customer (as shown above).
Click to start.
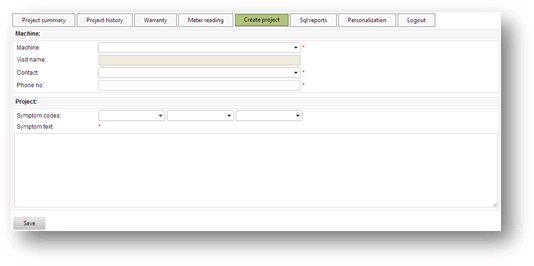
The access to is controlled in Evatic Admin. See ‘Settings’ for more info.
Click on the machine drop-down-list to bring up the machine search window.
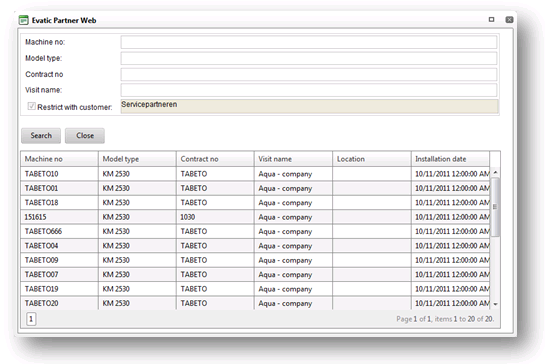
Search filters are available in case of a large machine list. Double-click on a machine to add it to the project.
Click on the contact drop-down list to select a contact person.
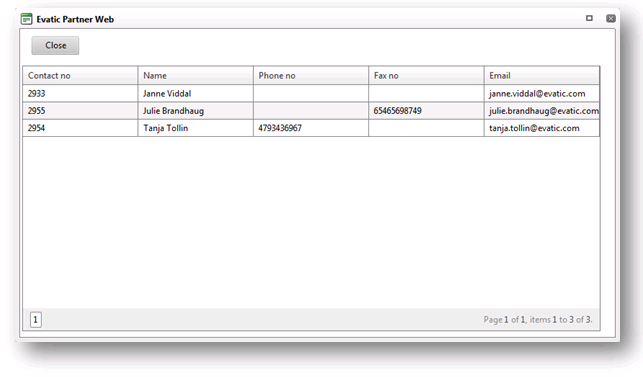
If contact persons are added to the machine, only these will be available. If no contact person is added to the machine, all of the customer’s contacts will be available.
If the contact person is not in the database, simply type in the name and phone number for the person. Note that this will not add a contact person to the customer – this will only apply to this particular project.

Continue with selecting applicable symptom codes and filling out a symptom text.
Click . The project will be created and immediately made available in the partner’s Project summary.
Project history
The project history shows all completed projects executed by the partner in the selected time frame.
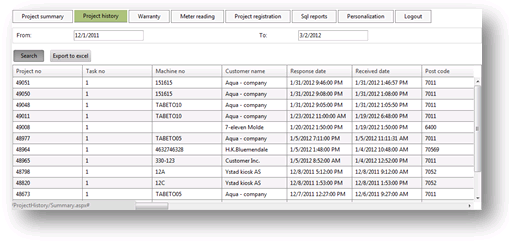
Double-click on a project in the list to provide full details on the project.
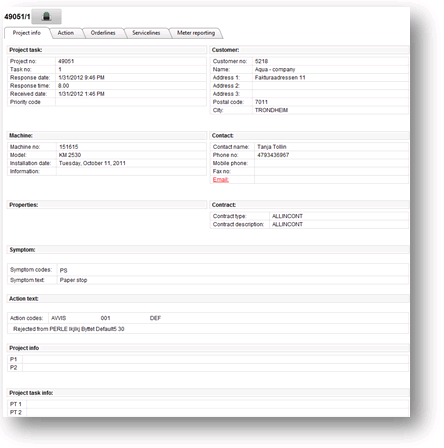
In addition to the summary, the tabs on top provide details on articles used, service rendered and meters reported (if applicable).
Meter reading
The partner can register meter readings for all of its allocated machines with generated reading letters. This is found under the menu option .
Registering meter readings manually
The list is blank, allowing the partner to filter customer, machine and/or model.
[MISSING IMAGE]
Press , and a list of reading letters will be listed.
[MISSING IMAGE]
Enter the new count in the column New counter.
Click to save.
Importing new meter counts
A list of new counts can be imported from an Excel document. Bring up a list of meter reading letters as shown above, and click . This will generate a document with some additional columns. It is important that the order of the columns are not changed.
The columns are set up like this:
- Contract number
- Customer number
- Customer name
- Machine number
- Model type
- Meter type
- New reading date
- New counter
- Reading date
- Counter
- Address name
- Address 1
- Contact name
- Contact phone
The partner can insert the new count in the correct column (H). When done, hit .
If the file contains many counts, it is better to use the new import meter reading function. See Import meter reading

If the imported information looks OK, then click to save the new counter.
Import meter reading
The partner can also import meter readings by uploading an excel file under the menu option .
This function is faster than the one described above, and displays more information.

Click and select the Excel file you want to import.
The file is uploaded and saved in the database.

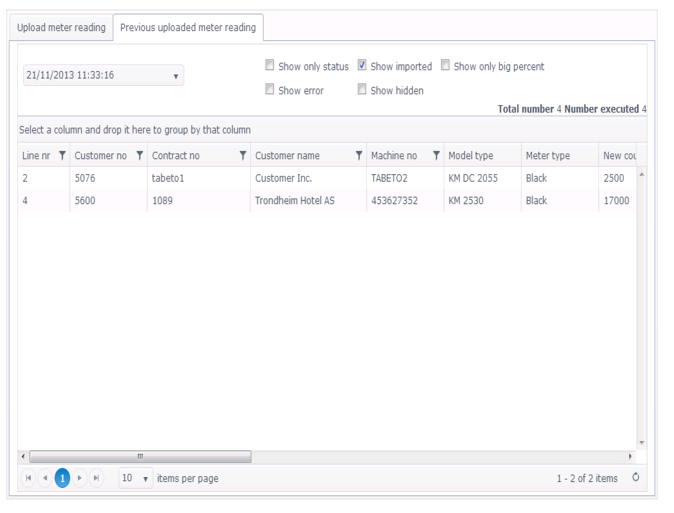
Under the tab Previous uploaded meter reading the partner can see all previous uploaded meter readings, including failed imports.
Select date for import and the criteria to limit the list by using the check boxes to the right.
Warranty
The partner can file new warranty claims, as well as looking up the status of previous ones directly in EPW.
Filing a warranty claim
There are two ways to file a new warranty claim.
- Select the menu option , and the tab New warranty claim.
- When working on a project and the article has been added as an order line, click on the yellow star,
 .
.
Both will bring up the following window, but only option 2 will automatically fill out information.
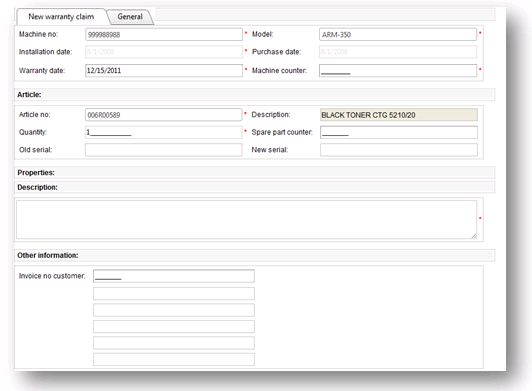
Fill out the necessary fields (marked with *), and hit .
Viewing existing warranty claims
Existing warranty claims can be found under the menu option , and the tab General
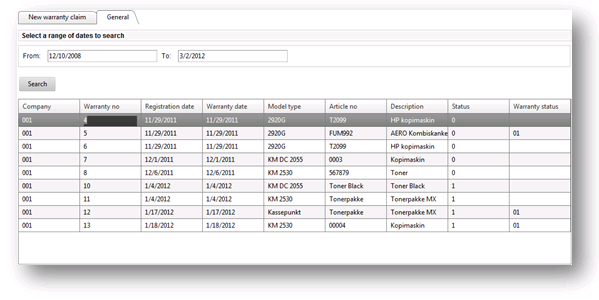
The warranty claims are listed, with the option to filter by date.
Double-click on a claim to get more information, and the option to add a comment.
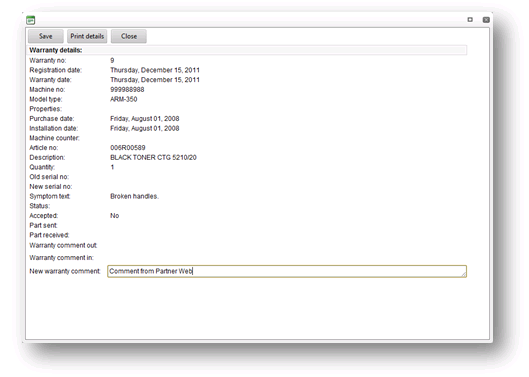
Click to save the new comment, if added.
Log in as user
Logging in as a user will provide an online version of the project overview in Evatic Service, with the option of creating and assigning projects, among other things.
Project summary
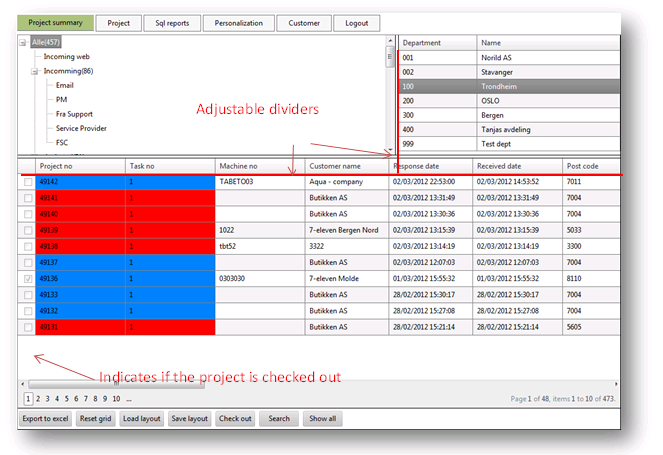
For a user experienced with Evatic Service, the project summary should appear familiar. The folder structure is provided on the top left, accessible departments are at the top right, and project tasks in the folder are listed in the bottom table. The same color coding according to response time and/or priority code as set up in Evatic Service is applied throughout EPW.
At the bottom you will find buttons related to the layout of the project summary, as well as the option to search using the machine number. After doing a search, click ‘Show all’ to remove the filter applied by searching.
The columns can be moved around and resized by the user.
The folder structure and departments will not be displayed if the user is connected to a technician (Type, user) in Evatic Admin.
Working with projects
To look up an existing project in EPW, simply double-click in the project summary. The window that shows is similar to the one shown when working with a project while logged in as a service partner.
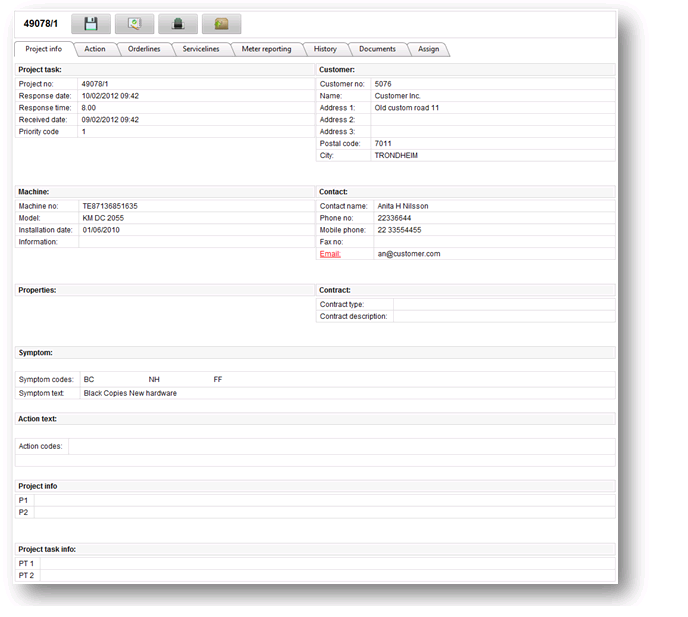
To learn more about working with projects in EPW, please see the chapter about this above.
Assigning technicians
The only project-related feature available to a user and not a service partner is the ability to assign projects to technicians. To assign a project, double-click to open it, and head to the tab Assign.
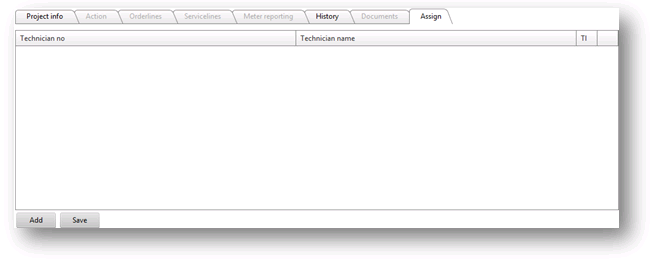
Click to add a line.
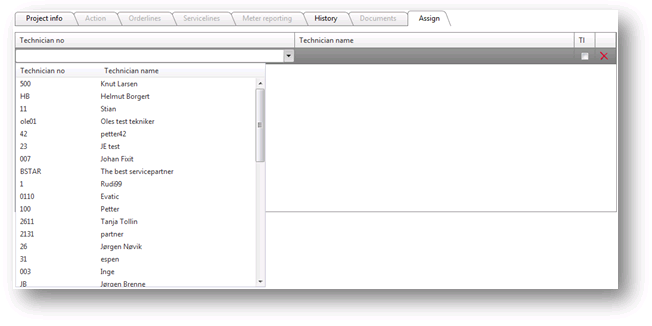
Click on the line, and select the technician to add. If several technicians are added, then one of them needs to be marked as team leader. Click sava and theproject will be moved to the team leader’s folder.
Creating a project
To create a project directly in EPW, click on the button in the top navigation. This view has more options than for a service partner, since there are no limitations as to which customers and machines the user has access to (other than department).
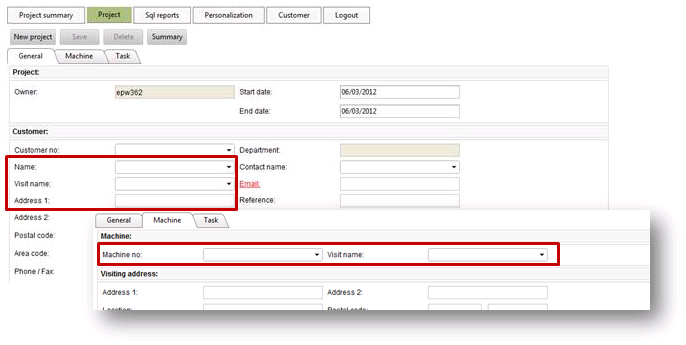
Selecting customer and machine
You can either start by adding a customer or a machine. Click in either of the fields marked above to bring up either the customer search window…
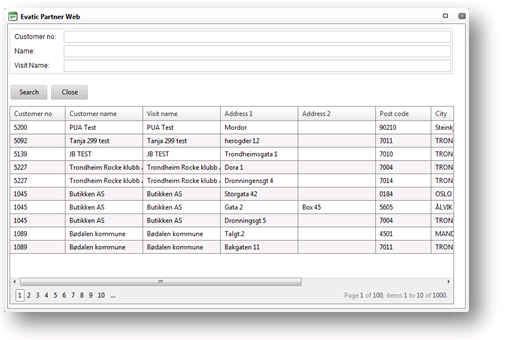
…or the machine search window.
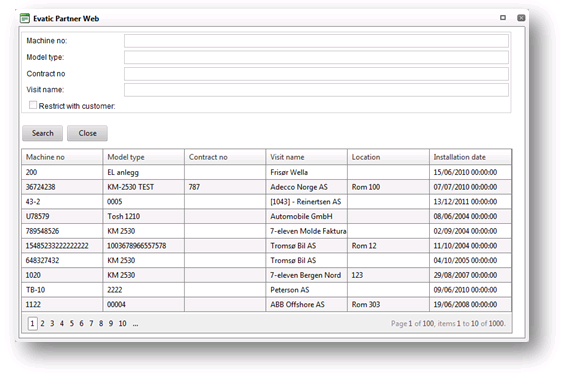
By selecting a customer first, the machine search will automatically show only this customer’s machines. However, this restriction can be removed to create a project where the customer and the machine are not connected.
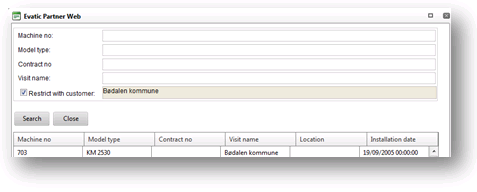
If you select a machine first (without selecting a customer), the customer information will automatically be filled based on the machine’s customer information.
Select an available contact by clicking Contact name.

Provide project task info
The last tab, Task, is for providing information about the project task. As with Evatic Service, the user can insert response time and planned duration, fixed price (if applicable), and symptom codes and text.
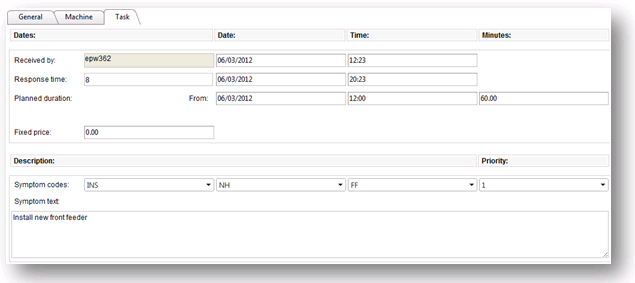
Click to save the task. The task will be saved in the folder set for new projects.
Customer look-up
The option to look up customer information is available to users in EPW.
Click in the top navigation.
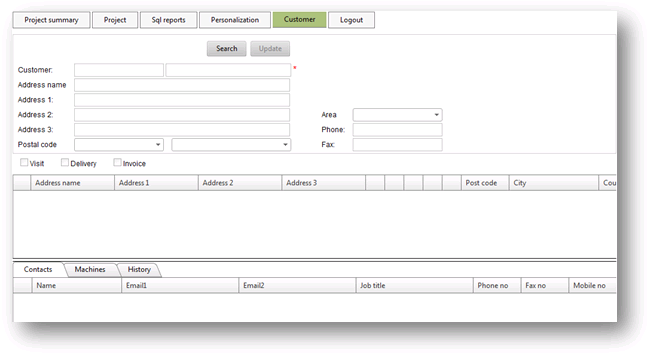
Click to bring up the search window.
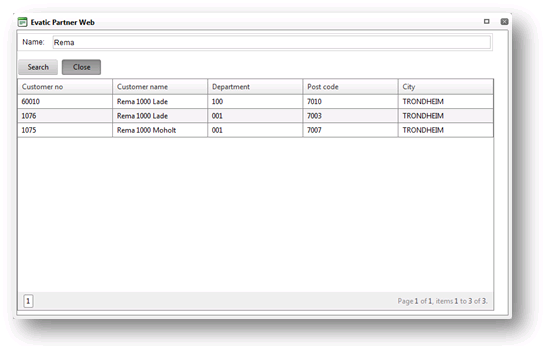
In the search field the user can search in any field – customer name or number, department, city or post code. Note that the user can search for only one criterion at the time.
Double-click on a customer in the search results, and the customer details are displayed.
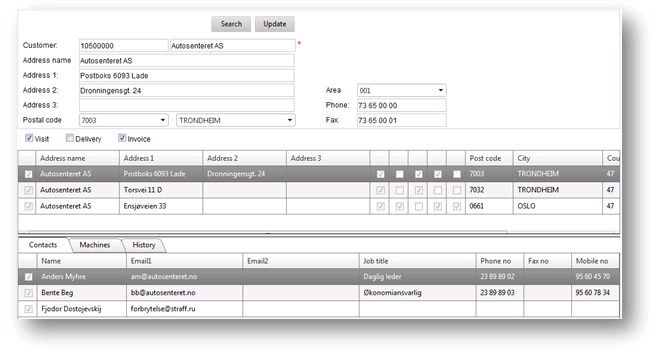
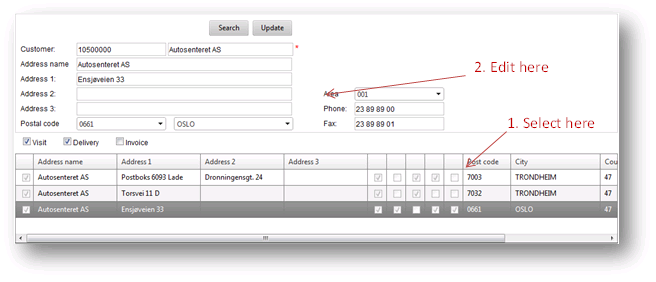
Edit an address
The user can change an address by selecting it from the list, and make the edits above the list.
Edit, add or delete a contact
In the bottom of the customer information window, there are 3 tabs, Contacts, Machines and History

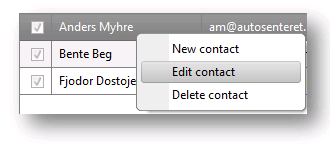
Click on the tab Contacts to view a list of contacts. To edit a contact, either double-click the contact, or select it and right-click -> Edit contact
This will bring up the contact information, which can be edited and saved by clicking .
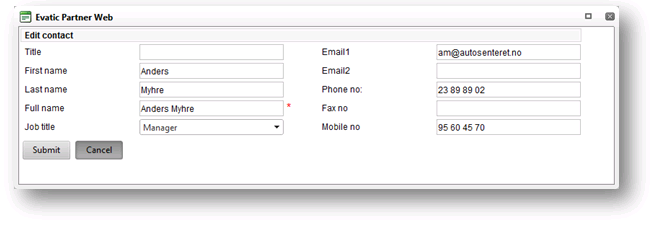
To add a contact, right-click in contact list and select New contact. This will bring up a blank contact, allowing you to add the necessary information.
To delete a contact, select the contact in the contact list, right-click and select Delete contact.
Edit a machine
Under the tab Machine, all machines connected to the customer are available.

To view and/or edit a machine, either double-click on a machine or right-click -> Update machine.
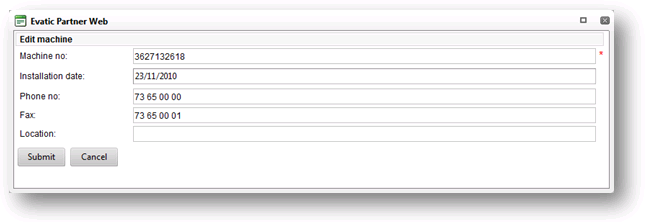
After editing, click to save.
Customer history
View the customer history by selecting the History tab at the bottom of the customer information window.
A list of finished projects related to this customer is provided. Select a project to view symptom-, and action codes and text at the bottom.
Personalization of EPW
The user has the option to change certain aspects of EPW under the menu option .
Under the tab General, the user can change the language and amount of rows per page when searching in various places throughout EPW.

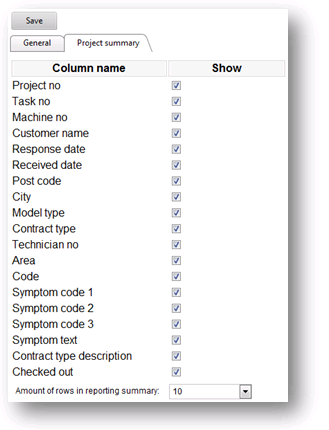
The tab Project summary allows the user to add/remove columns to be shown in the project summary windows, as well as the amount of rows shown on every page.
SQL reports
Under the menu option , an array of reports can be made accessible to service partners and users.
The setting SQL_REPORTS_NODE sets which folder of reports that should be available on EPW. More about this below, in the ‘Settings’ chapter.
The available reports are listed with their name and description.
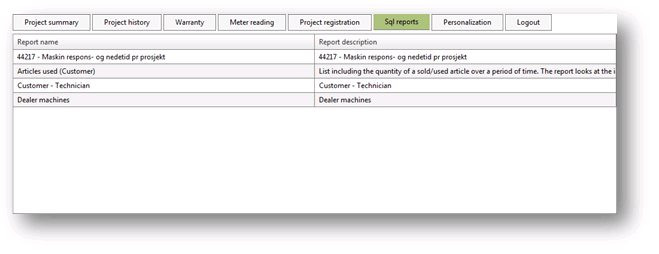
Double-click on a report to run. If the report is password protected enter the password.
The report’s search criteria are shown, and can be filled out similarly to Evatic Service.
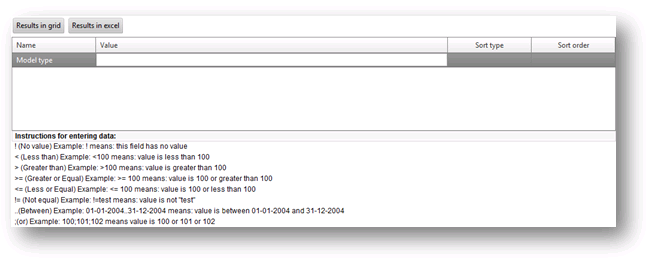
Click to get the results directly as an Excel-file, or to get the results in the browser.
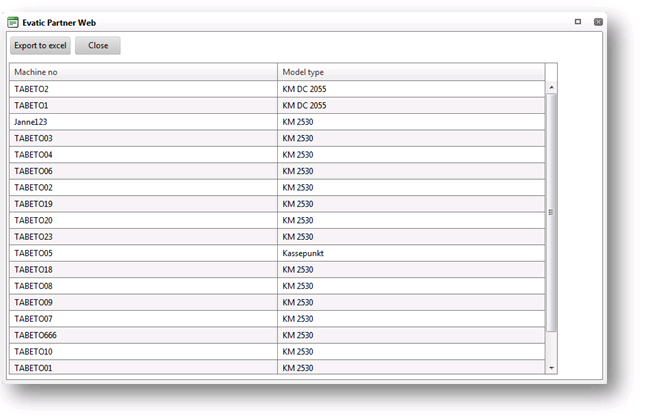
You can still click after getting the results in a grid.
Settings
The settings to control EPW can be found here by searching for Evatic Partner Web in EAW.