User manual for Evatic Mobile Service
Introduction
Evatic Mobile Service is a web application designed for field service technicians using mobile devices like smartphones and tablets. Up-to-date system requirements can be found here.
This documentation will guide you through the functionality and use of Evatic Mobile Service. Please bear in mind that some of the functionality in Evatic Mobile Service is controlled by settings in Evatic Admin Web, and some by the serial-code. This means that some are controlled by your administrator, and a few functions you have to purchase the right to use.
Settings for Evatic Mobile Service can be found in Evatic Admin Web under the following strings:
- General \ Mobile licenses
- Settings \ COMPANY_XXX \ Evatic Mobile
- Settings \ COMPANY_XXX \ ARTICLE
- Settings \ COMPANY_XXX \ DEPARTMENT_XXX
- Settings \ GLOBAL_USER \ Evatic Mobile
Please refer to the Evatic Admin Web help for a complete list and description of available settings.
How Evatic Mobile Service works
Evatic Mobile Service is a web-application, meaning it is capable of running in the browser of your device. However, for the most popular mobile platforms (Android and iOS), we have developed apps available in Google Play Store and the Apple Store.
The application communicates with the Evatic database through a web-service, meaning the device needs to be online to send and receive data. When project tasks are downloaded to the device you can work offline, and return data when you are back online.

Setting up users
Please see this section updated in our customer portal: how to add a technician.
Basics
Logging in
Please see this section updated in our customer portal: How to log in for the first time.
About
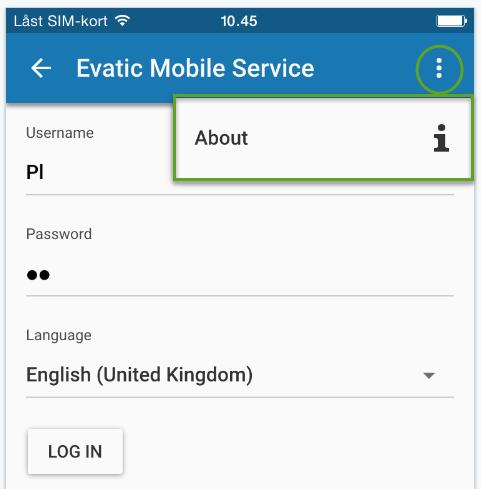
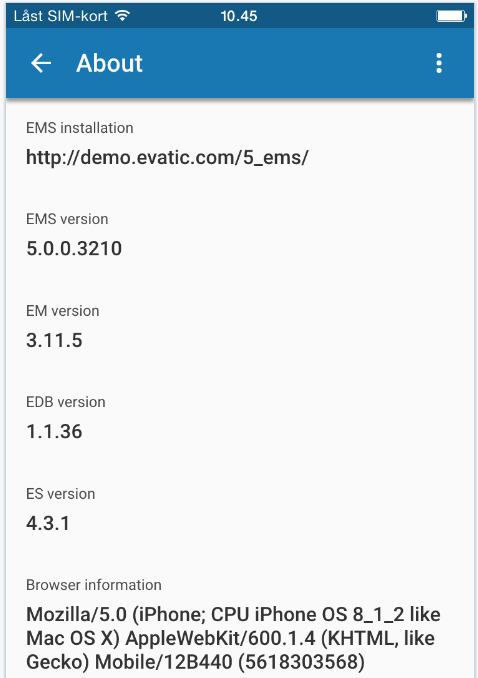
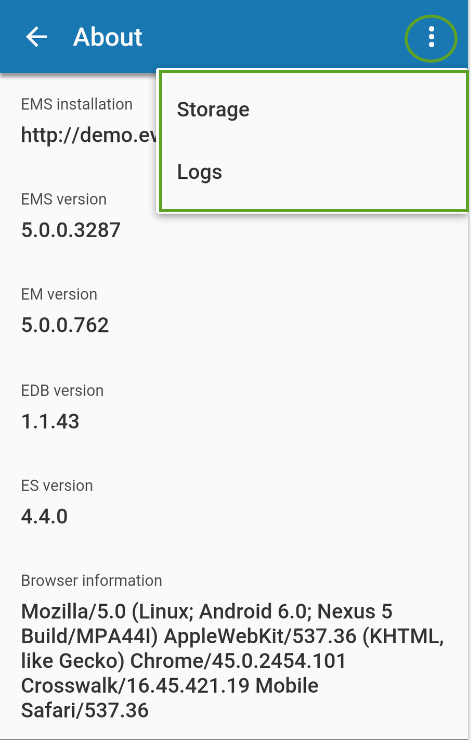
Information about the installation, Evatic mobile version and browser information can be found in the login view and in the menu when you are already logged in.
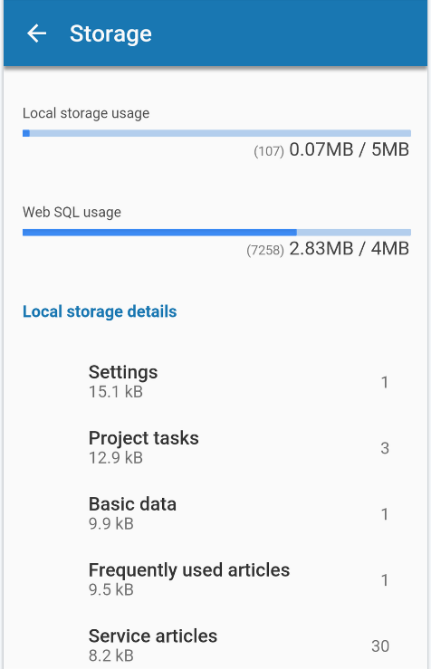
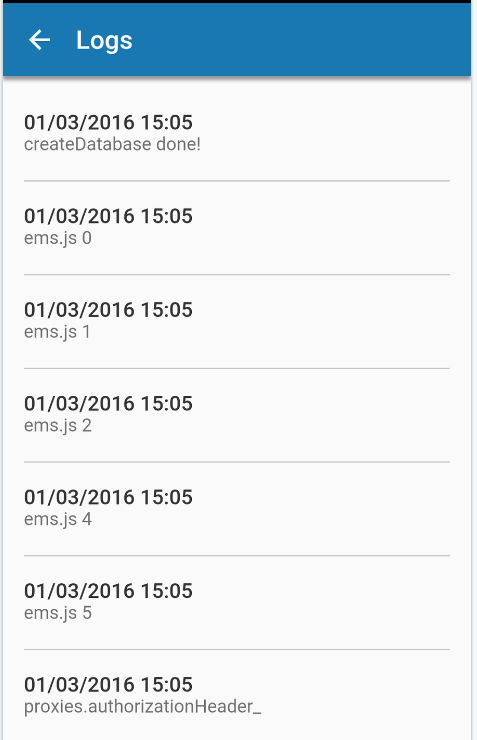
A more detailed information about the local storage use can be accessed by selecting Storage. In addition, you have some Logs for when task was last synced, when technician status was set etc.
Synchronization (settings and articles)
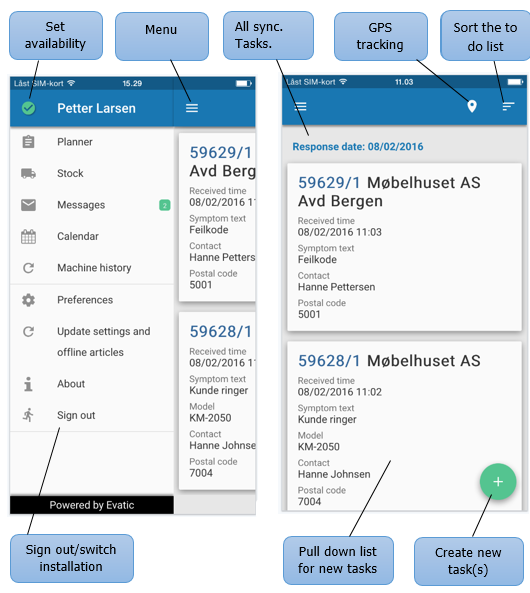
To see all settings and synchronization options, tap the menu button . You can also swipe to the right to access the menu.
There are two options for synchronization:
|
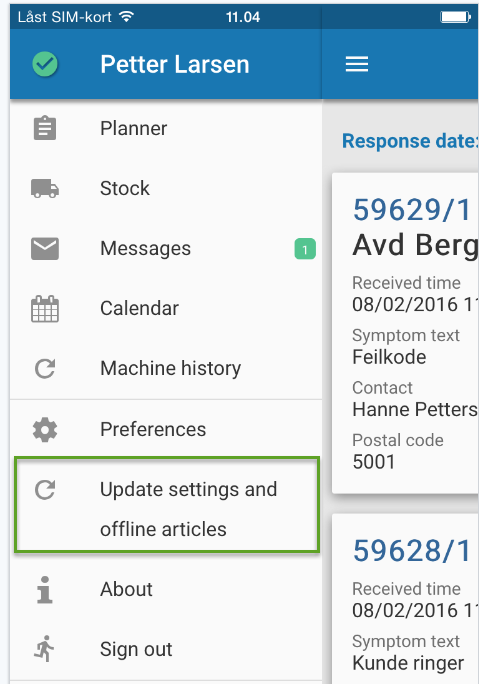 |
Update settings and offline articles: Syncs all basic data, settings and offline articles.
New tasks ("Pull to refresh"): Checks the server for new tasks assigned to you. Evatic Mobile Service can be set up by your administrator to automatically perform this check in a set interval. |
Preferences
Select Preferences to view a set of options for how Evatic Mobile Service should behave.
|
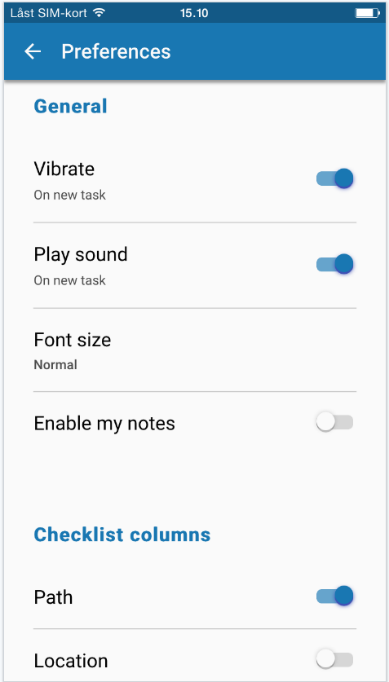 |
Vibrate/Play sound: Vibrate/Play sound when new tasks are synchronized. Font size: Depending on the device screen. There are 4 options (small, normal, large, extra-large). Large is available if pixels on the screen > 480, Extra Large is available if pixels on the screen > 600. Enable my notes: Text field for the technician to enter notes. Checklist columns: Extra information added to the checklists |
Machine history
Select Machine history to search for history for all customers’ machines. Enter customer name and press search:
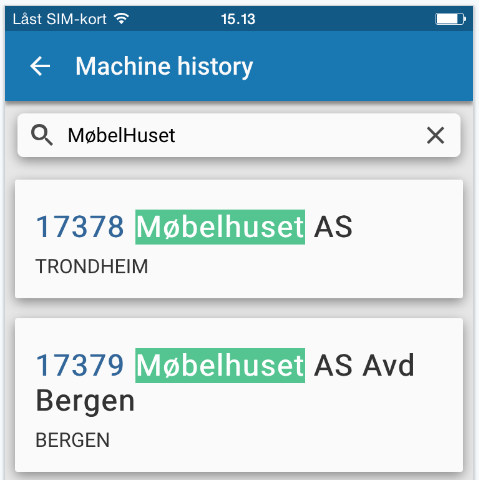
Tap on the customer to see the customer machines. To see the history for the machine, tap on the machine and all project tasks registered on that machine are displayed.
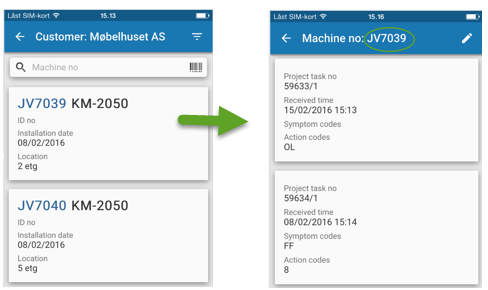
In this view, you can also add new machines. Tap the  add-button to add a new machine to the customer. This option is controlled by setting in Evatic Admin Web.
Overview
After logging in, you are presented with the To do list. We will go through all areas thoroughly through this guide, but here is a description of the buttons and information on the screen.
Working offline
As mentioned, Evatic Mobile Service communicates with the Evatic database through a web-service which is accessed through Wi-Fi or mobile internet. But in cases where the device has no network connection, you can still work with your synchronized tasks offline.
When you are working offline, you can work with the tasks similarly to working with them when you are online. Information, articles and services are stored in the local database and can be synchronized when the device is back online.
Planned date is excluded from this and cannot be updated offline.
Please note that your system can be set up to search for articles online, and in such cases you can only add articles already synchronized to your device when working offline.
The To do list
The To do list is the main window of Evatic Mobile Service. A view of all synchronized task are listed.
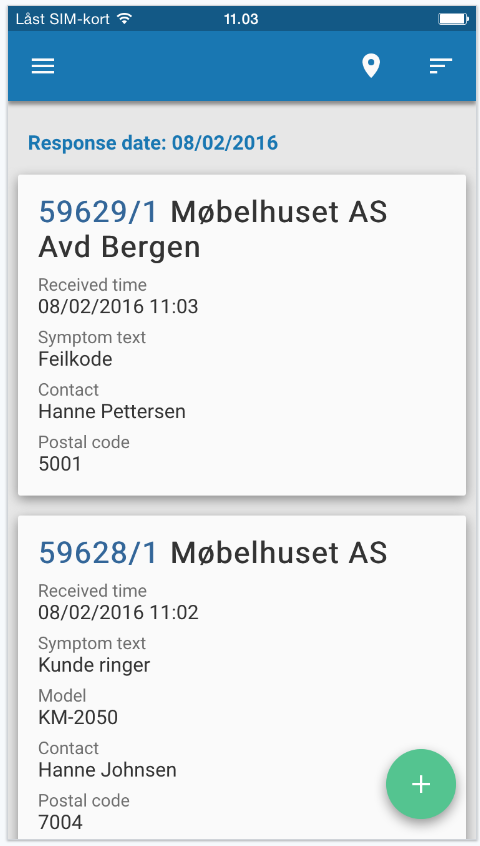
By default, all of your open and assigned tasks are presented in this list, but your administrator can limit your maximum amount of available tasks.
The information shown for tasks in this list can be modified by your administrator in Evatic Admin Web.
If the coordinator is using the time planning function in Evatic Service, this is displayed as multiple cards in the to do list in EMS. You can easily see the difference between the assignments as the 'planned from' time is displayed.
Creating a new task
Tasks can either be created by a coordinator in Evatic Service, or directly in Evatic Mobile Service. If created in Evatic Service, the tasks will be available in your To do list after performing a ‘task sync’ (Refresh the task list by "pulling down"). A task created in Evatic Mobile Service can either be assigned to yourself directly, assigned to a different technician, or simply be made available to the coordinator.
To start creating a new task in Evatic Mobile Service, tap the button for creating new tasks, .
Selecting customer
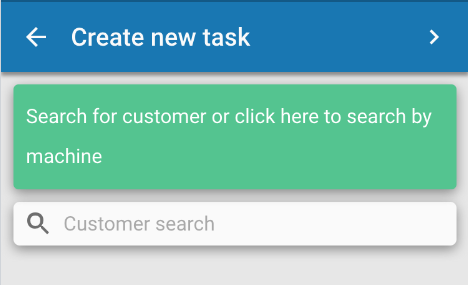
First, search for and select a customer. In the search bar you can type in the customer name or address, or a combination of both.
Tap the magnifier or press enter to search.
If you want to search by machine instead, tap the green bar at the top.
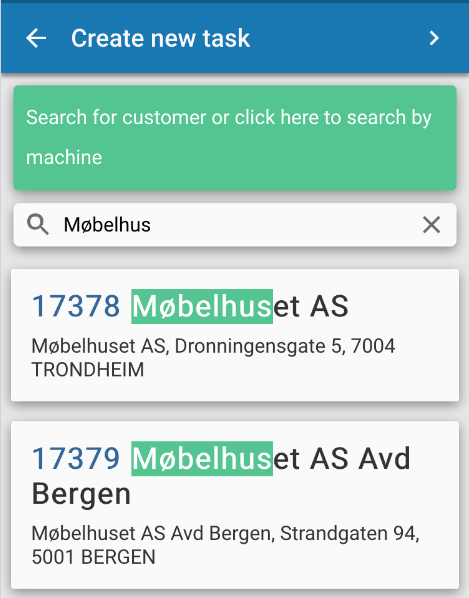
Search results are listed as shown, with the search criteria highlighted. If the desired customer is found, proceed by selecting it from the list (tap on the right customer).
Selecting machine
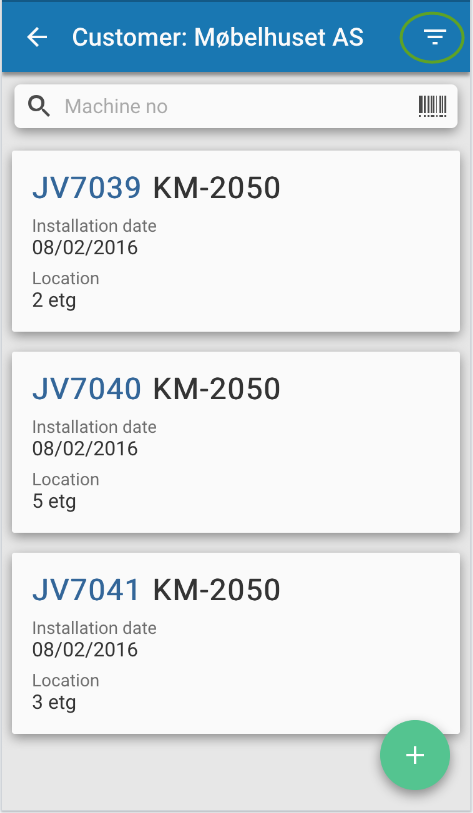
Once a customer has been selected, his machines are listed. If no customer is selected, you can search by machine number and Location. To filter the machine search, click the filter button in the heading for more options.
Tap the machine to add it to the task.
Tap the  add-button to add a new machine to the customer. This option is controlled by setting in Evatic Admin Web.
Selecting contact information
After machine and/or customer are selected, you proceed to select contact information for the task.
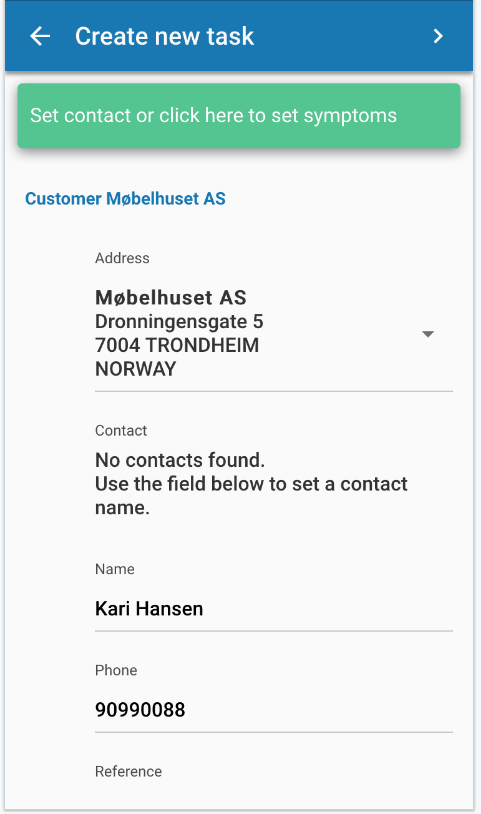
The task’s customer address and contact information can be changed here. If the correct contact information is not in the database, then a new name and phone number can be typed in. This will then be saved in the Evatic database on the task.
Further down is the machine information and contact information. If the machine is not set up with any contacts, a name can be typed in.
Tap on the right arrow in the heading to move on to symptom codes and text or click the green bar at the top.
Setting symptom codes and text
A description about the task can be added when you select symptom- codes and/or text.
Select symptom codes from the drop-down menus, and add/edit text if necessary.
If the symptom text contains an URL, it will be visible as a link and you can open the address in the web browser.
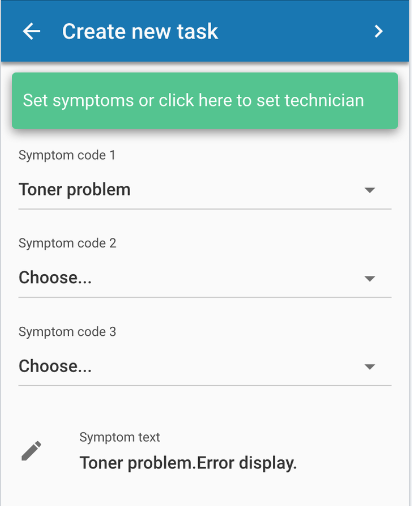 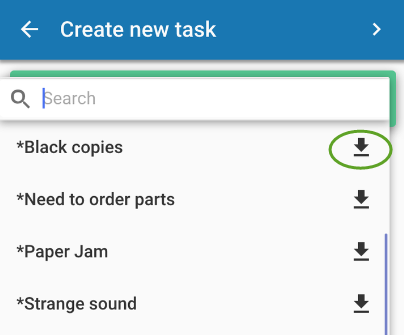
When you have more than 30 symptom codes, a search field will become visible. Note that you can use the arrow to copy the symptom code text down to the symptom text field.
Tap on the right arrow in the heading or tap the green bar at the top to move on to assigning the task.
Assigning task
The task can either be assigned to yourself, assigned to a colleague, or just be made available to the service coordinator (not assigned to anyone).
|
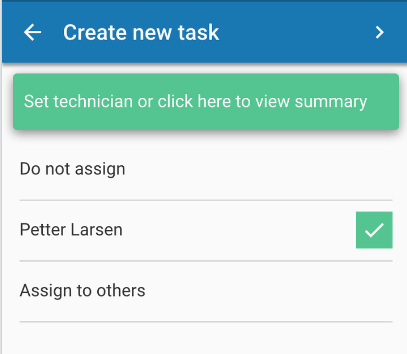 |
Do not assign: The task will be created in a designated folder, available for the service coordinator to assign. Technician name: Assigns the task to yourself, and synchronizes to your Evatic Mobile Service at the next task sync. Assign to others: Allows you to assign the task directly to another technician. |
Select an option and tap the right arrow to move on to the task summary.
Task summary
The task summary lists all information provided through the previous steps. As addition you can add task title and agreed visit date and time under summary.
|
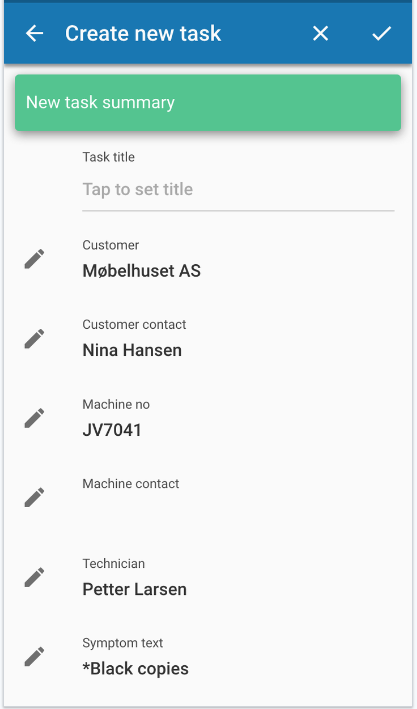 |
Tap  to edit the information next to it. When all provided information is correct, click  to create the task or tap the green bar at the top. If the task is assigned to you, it will be available in Evatic Mobile Service after a Task sync is performed. |
Working with tasks
Open the To do list for a view of all tasks assigned to you, in this case sorted by response date.
You can select what to sort by with the  -button.
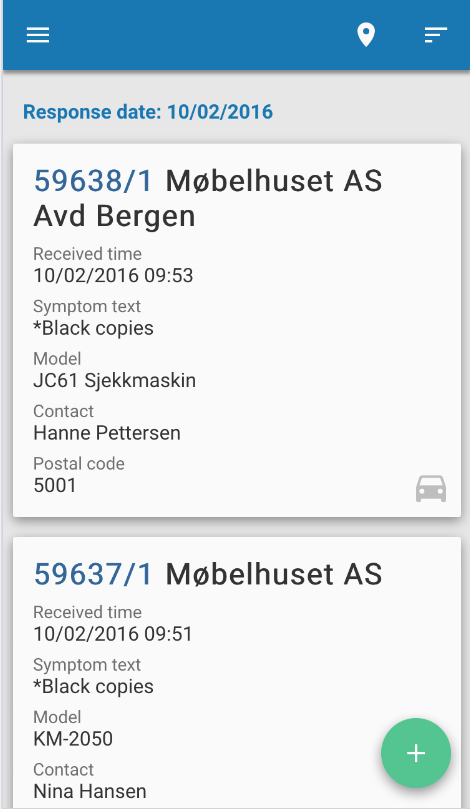
The sorting options are by customer name, planned time, response time, received time and postal code. Or you can drag and drop the tasks in you own order.
When the task has been accepted, the task is visible in the to do list with a status symbol  . This symbol changes while travelling to () or working on () the task.
Tap on a task to find information about the task, accept and start working on the task.
Task information
The Task information window shows customer, machine and task information (by scrolling down).
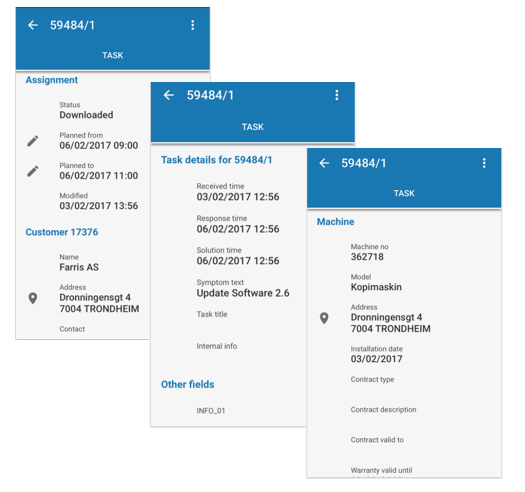
Certain fields have buttons, either for viewing more information or editing information. It is also possible to tap on the whole row to edit/view the information. Note! You need to accept the task before you can edit the information (see more chapter 5.2)
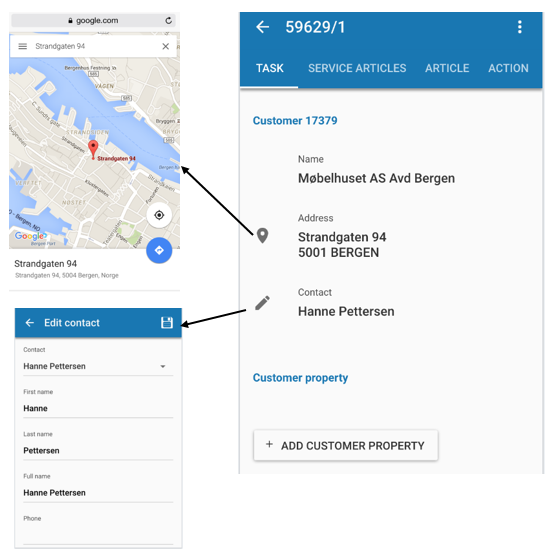
Changing or edit machine on task
Changing which machine the task is connected to can be done by searching for the machine.
Scroll to the bottom of the Task information to view the machine connected to the task. Here you can edit the machine, change the machine or add a new machine.
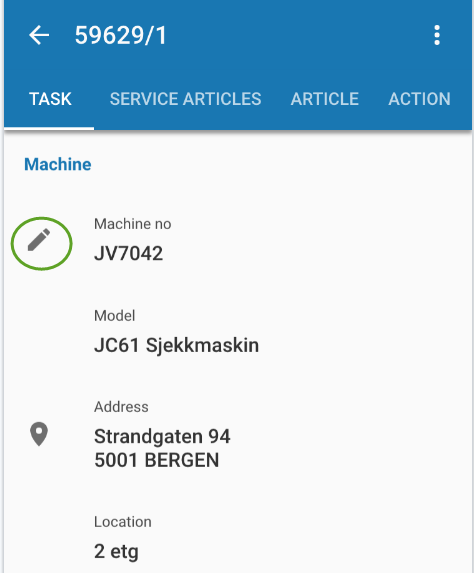
If you already have a machine connected to the task, the edit machine window will open.
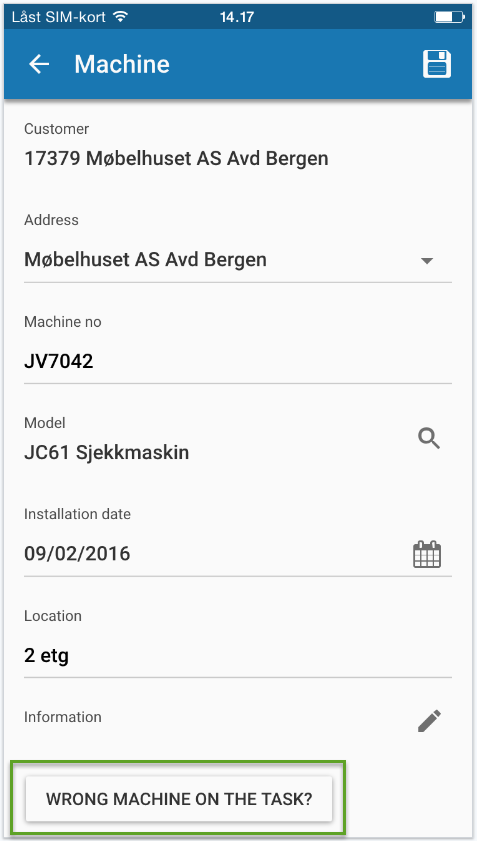
Tap the button "Wrong machine on the task?" to change or add a new machine to the task.
Search for a new machine (or leave field blank to view ALL of the customer’s machines). The filter button in the header can be used for more advanced search.
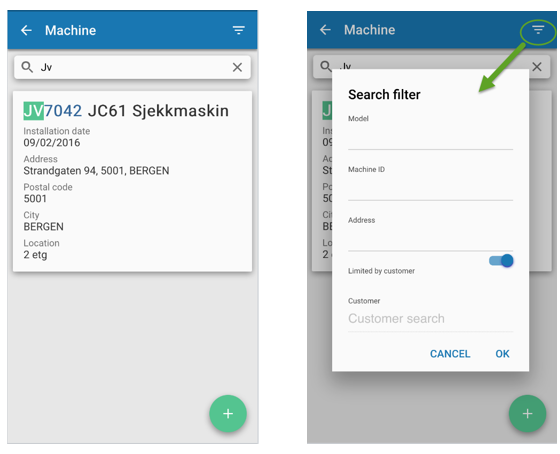
Tap the  add-button to add a new machine to the customer.
View project history
The Project history shows detailed information from completed tasks connected to the customer and/or machine. Settings in Evatic Admin Web determine whether to synchronize tasks only connected to the machine, or those connected to the customer.
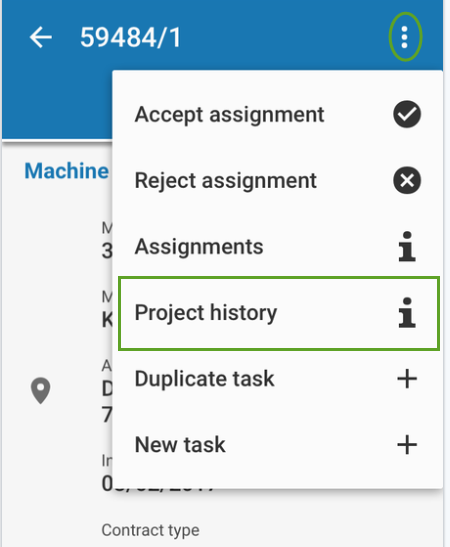
To download the history for a customer/machine, tap the task in the To do list, and tap the history log button.
Tap on a task to see more detailed information.
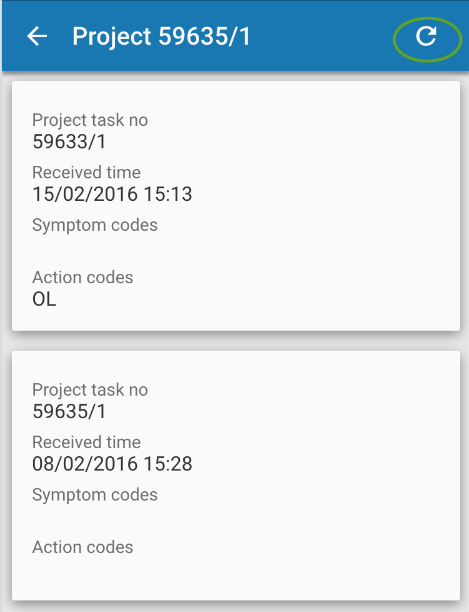 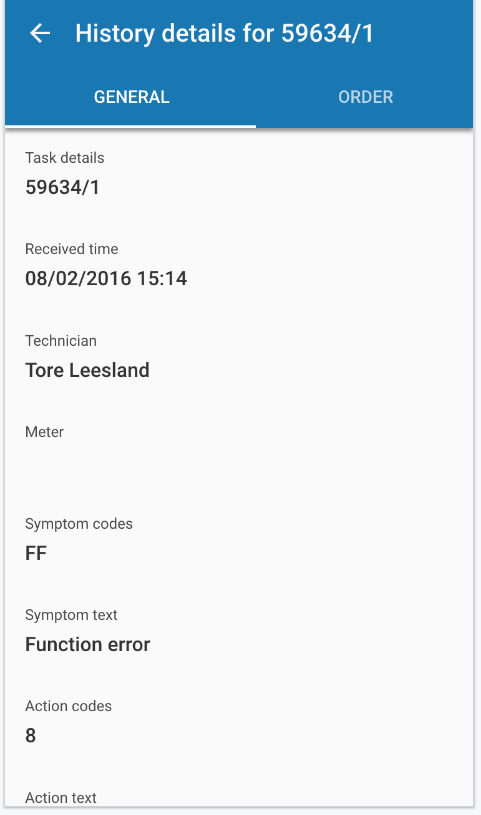
Tap the Sync-button to download the history tasks and list them. Tap on a task to see more detailed information
Once the history is synchronized, it can be accessed even when working offline.
Assignment (accept / reject)
Please see this section updated in our customer portal: how to control assigned tasks.
Assignment overview
Your coordinator can plan several assignments (planned from - to time) on the same task. Tap the menu button in the heading to see the different assignments.
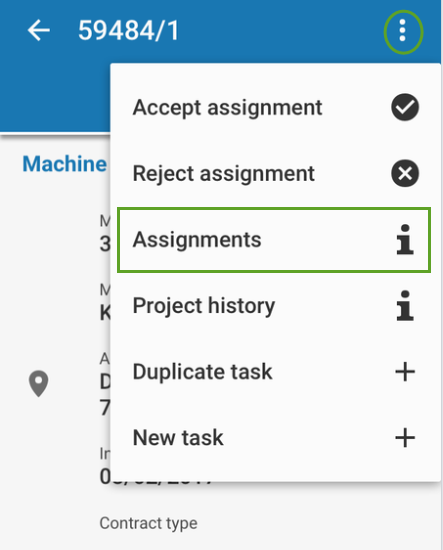 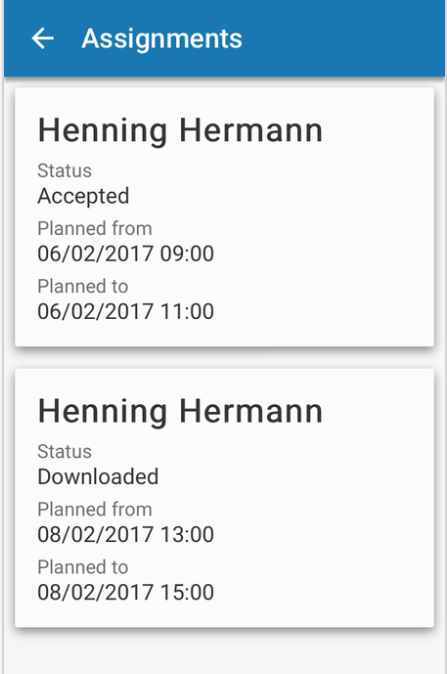
Tap the assignment to edit the planned from - to time. Note! You can only edit your own planned times.
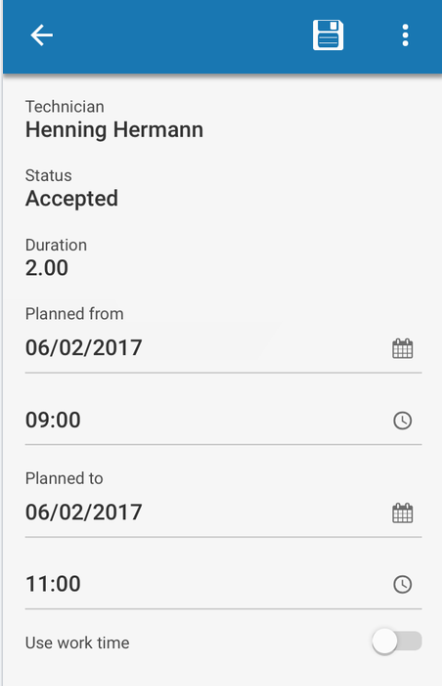
Assignment status
The following statuses can be found for each assignment:
- Assigned
- Downloaded (The Task has been synchronised to your EMS)
- Done
- Rejected
- Returned
- Callback (Dispatcher has called the assignment back).
- Deleted (Dispatcher has deleted the assignment).
Duplicate task or add a new task
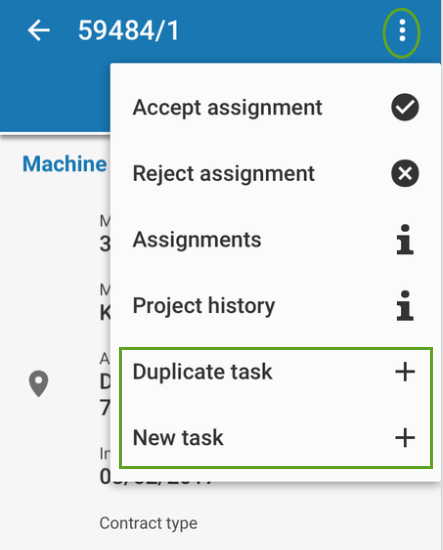
Tap the menu button in the heading when the task should be duplicated (= a copy of the task will be inserted into the same project) or a new task should be added into the same project. This button is available in all views when working with a task.
Adding work and travel time (service articles)
Please see this section updated in our customer portal: how to register work- and travel hours.
Adding services articles manually
Please see this section updated in our customer portal: how to register work- and travel hours.
Editing service articles
Tap on each added service article to edit.
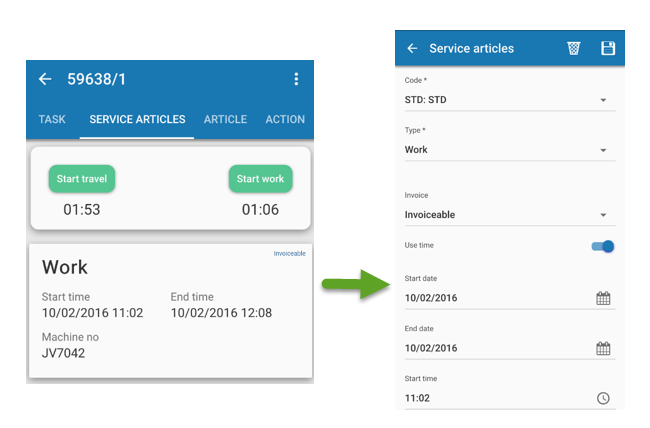
Selecting to edit the service article will show a view identical to the one for manually adding a service article, filled with information from the one selected. Edit the information as you would when adding a new service article manually. Tap the Save-icon in the heading and the service article is updated.
If the service article should be deleted, tap the Delete-icon in the heading.
Edit machine for service articles
If the customer has an installation tree (e.g. machines placed in the same vicinity), you can choose to apply service articles to different machines without changing the machine linked to the task.
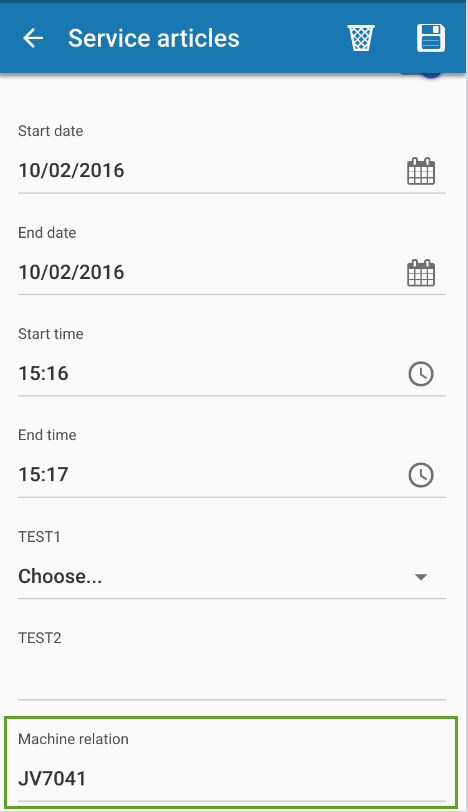 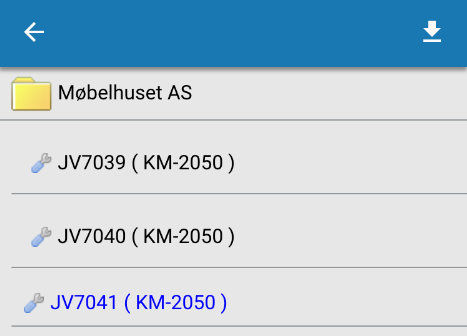
Tap the machine installation field to select a machine from the installation tree.
Select a machine by tapping on it, and confirm by answering Yes.
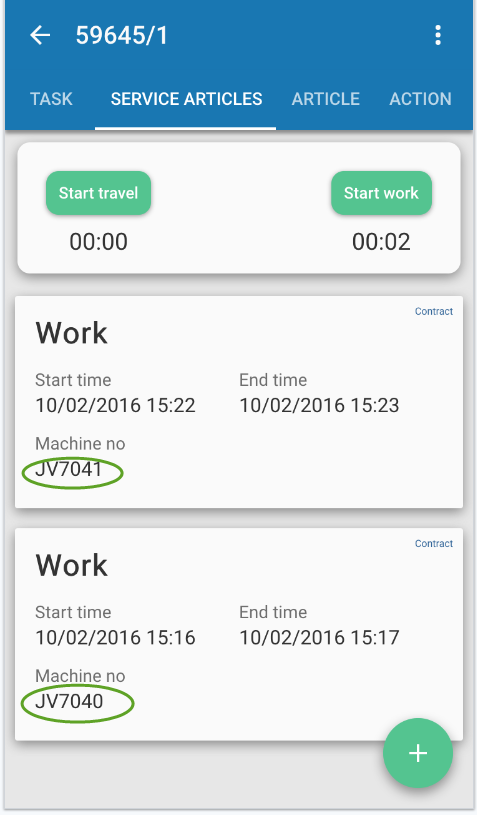
In the start/stop-window you can see the selected machines.
This only changes which machine articles and service is registered towards, not which machine the task applies to.
Adding articles
Please see this section updated in our customer portal: How to order parts to complete the task.
Please see this section updated in our customer portal: How to register articles used from mobile stock.
Pre-order articles
Please see this section updated in our customer portal: How to install ordered parts for a customer.
Aggregated articles
Aggregated articles are multiple articles combined into one, i.e. a service kit. Adding the aggregated article will subsequently add all the articles that it consists of.
Add the aggregated article just like you add regular articles (as described above).
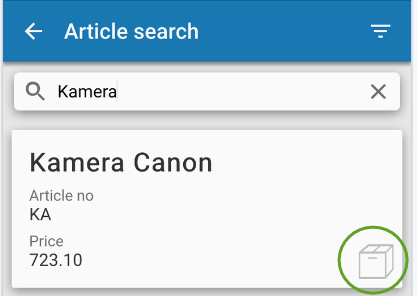
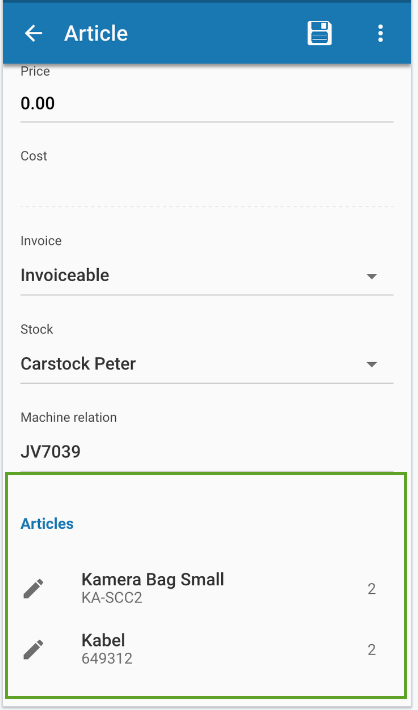
When you have added the aggregated article, you can tap to open and see the articles that are combined.
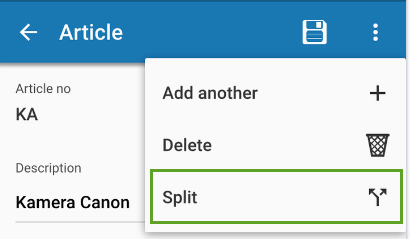
The combined articles can be added as regular articles if you decide to split e.g. the service kit.
Note: There are several settings in Evatic Admin Web controlling aggregated articles (allowed to delete, change quantity etc.). Please ask you administrator for more information about this.
Adding action text
Please see this section updated in our customer portal: how to describe the work done.
Attachment
Please see this section updated in our customer portal: how to attach photos to a Task.
Adding meter reading
Please see this section updated in our customer portal: how to register Meter Readings.
Checklists
Please see this section updated in our customer portal: how to use checklists.
Adding signatures
Please see this section updated in our customer portal: how to attach signatures.
Complete, Return or Sync data
Please see this section updated in our customer portal: How to return a task.
Please see this section updated in our customer portal: How to complete a task.
"Complete" sends the task to a designated folder (e.g. 'Finished from EMS'), indicating to the service coordinator that it is ready to be invoiced (your administrator can set this up to automatically: finish the task and send an invoice).
If there are several assignments or technicians on the task, the task is first moved to the designated folder when all the assignments have been completed (= status 'Done'). Note! If some assignments on the task have been rejected or returned, the task will be allocated in the technician folder.
Sync order lines sends all registered articles and service articles to the server, but keeps the task in your Evatic Mobile Service. The articles that are synced to the server will be locked for editing.  = Symbol for showing that articles are locked.
|
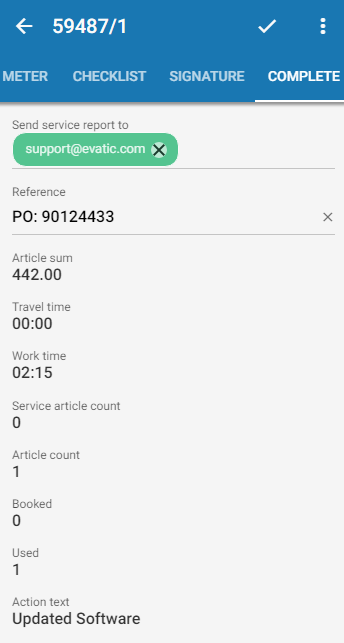 |
This view includes a summary of work and travel time, as well as sum and amount of articles. Articles and service articles synced to the task earlier is not included here – this view includes only the articles in Evatic Mobile Service, waiting to be synchronized to the server. If you tap the Send service report to field and add an email address, a service report will be sent to the email address (Note! E-mail is sent as the project is completed). Your Administrator can activate a setting, so that if a contact person with an email address is added to the task, the e-mail address is automatically suggested as the receiver of the email. Reference is a text that can be included on the invoice (billing number, contact name etc.). |
Articles and stock management
Please see this section updated in our customer portal: how to order, update and move article stock in EMS.
Send & receive messages
Please see this section updated in our customer portal: how do messaging works between EMS and ES.
The Planner
Please see this section updated in our customer portal: The planner in EMS.
Set availability
Please see this section updated in our customer portal: set availability status in EMS.
Calendar View
Please see this section updated in our customer portal: how to add holidays or other availability period.