User Manual
Warning
This manual is out of date for versions later than 7.4.0.
Many functionalities are being migrated from Evatic Service to Evatic Admin Web. All new functionalities are published directly in our customer portal. The entire manual will be moved soon.
Evatic Administration Web (EAW) is a web product that replaces Evatic Admin. EAW allows for
- organizational structure setting up and administering
- settings searching and changing that are used by all Evatic products
- products log checking
- managing dictionaries like countries, postal codes etc.
Access to Evatic Administration Web
Authentication
During EAW installation process the Evatic Setup Tool creates a default EAW user, that has full access rights in EAW. When you open EAW you will be met by this login screen.
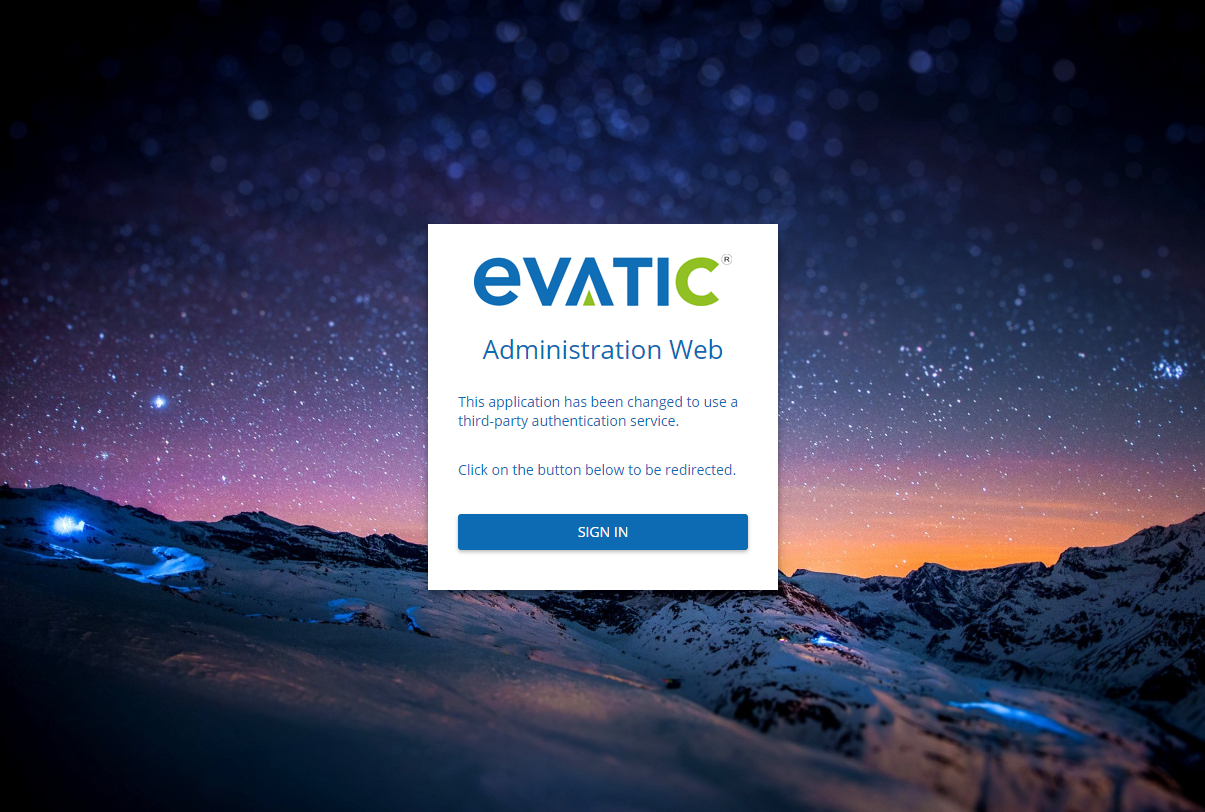
Clicking on the button SIGN IN will redirected to a third-party authentication service that will look like this page.
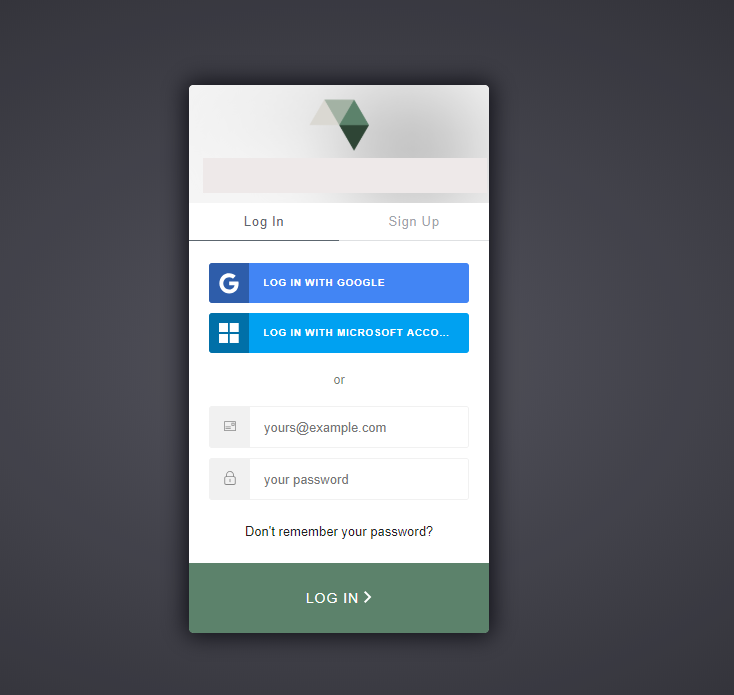
In this page you can either sign in using an existing user (for instance Google or Microsoft user) or create a new user choosing “Sign up”. The only thing you must be aware of is that the user you create or choose to log in with must match the email address on the user added in the installation process (or other existing users in EAW).
Lost password
To set a new password click on "Don't remember your password?" link in the authentication window and follow the steps there.

Edit profile
Click user profile icon in right top and then select Edit profile option.
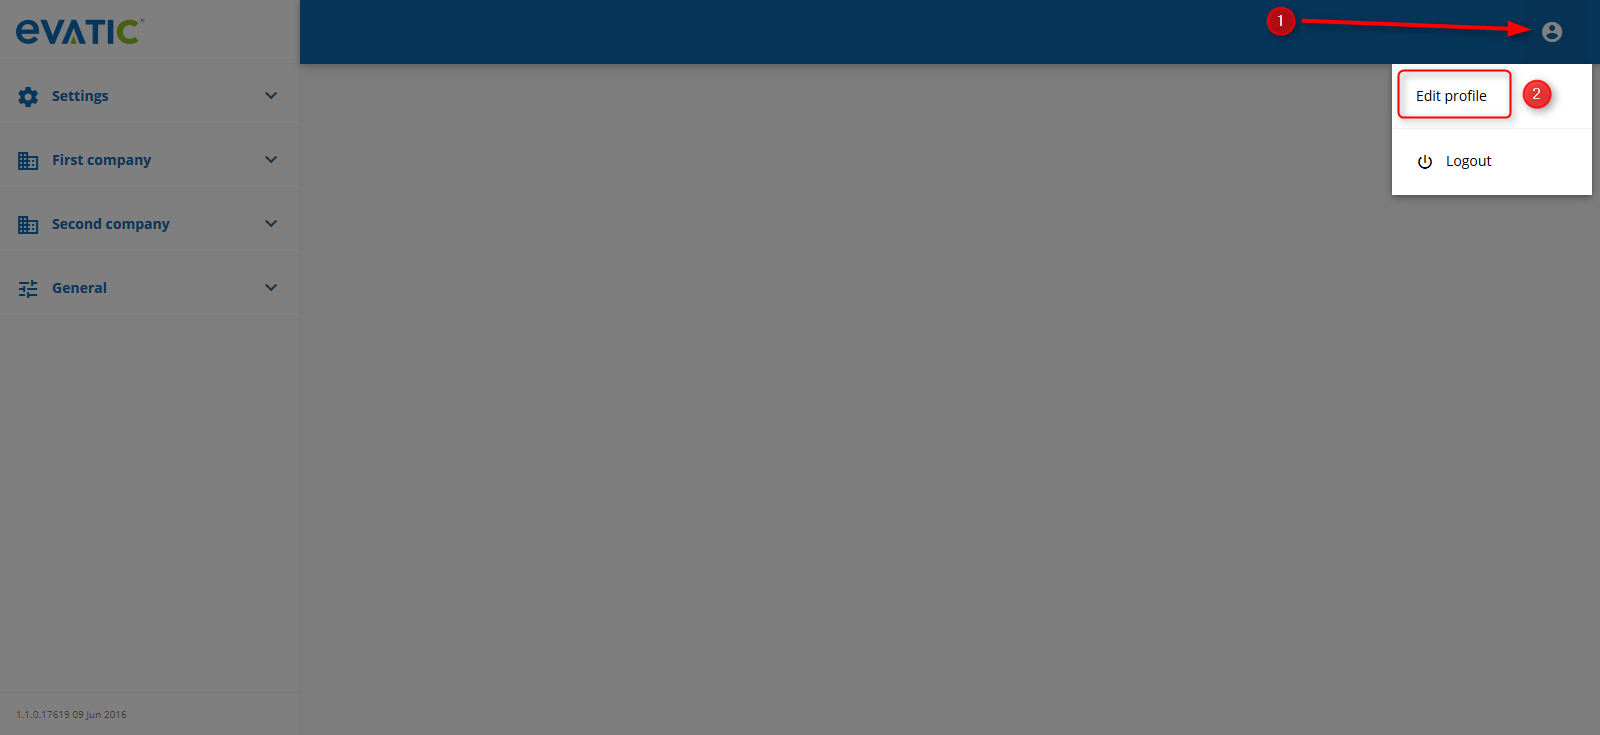
On this view you can change your name, e-mail and the avatar image.
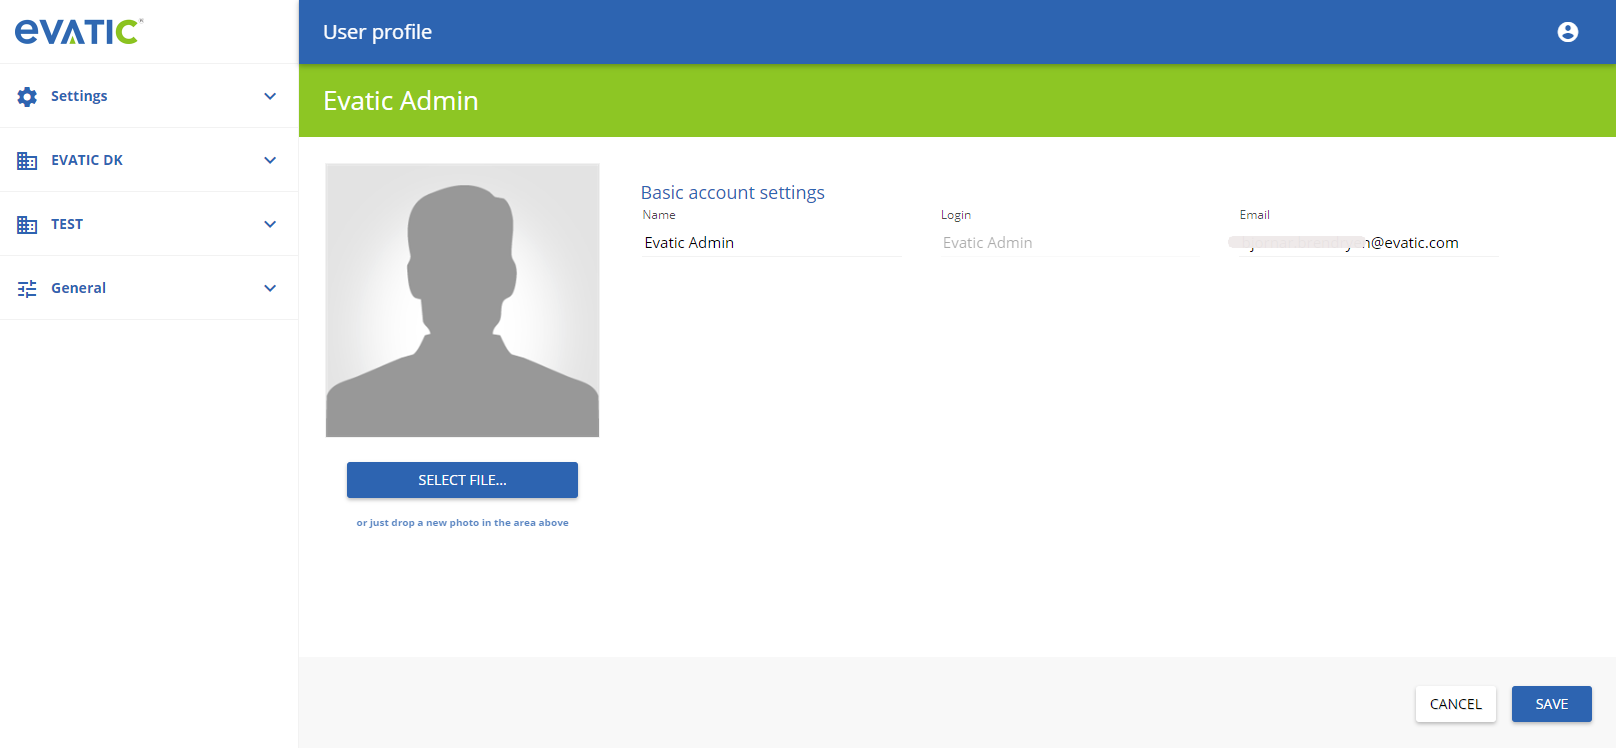
Change avatar
Click on SELECT FILE and choose an image. Supported file formats: .png, .jpg, .gif. If you use Chrome browser you can also drag and drop an image directly onto the avatar.
Companies
Create and manage companies
Please click on this link to read about how to manage companies.
Departments
Create new department
Please click on this link to read about how to manage departments.
Set department working hours
See setting company working hours.
Set department custom working hours
See setting company custom working hours.
Users
Add new user
Please click on this link to read about how to create a new Evatic user.
Set department restrictions
Go to Users, select a user from the list and click Edit icon (pencil).
Department restrictions on user are available when setting APP_USER_DEPT_LIMITATION_ON is set to TRUE.

Click on (1) to give access to all departments. Tick / untick checkboxes (2) to give access / deny access to the selected departments. Save changes with SAVE button (3).

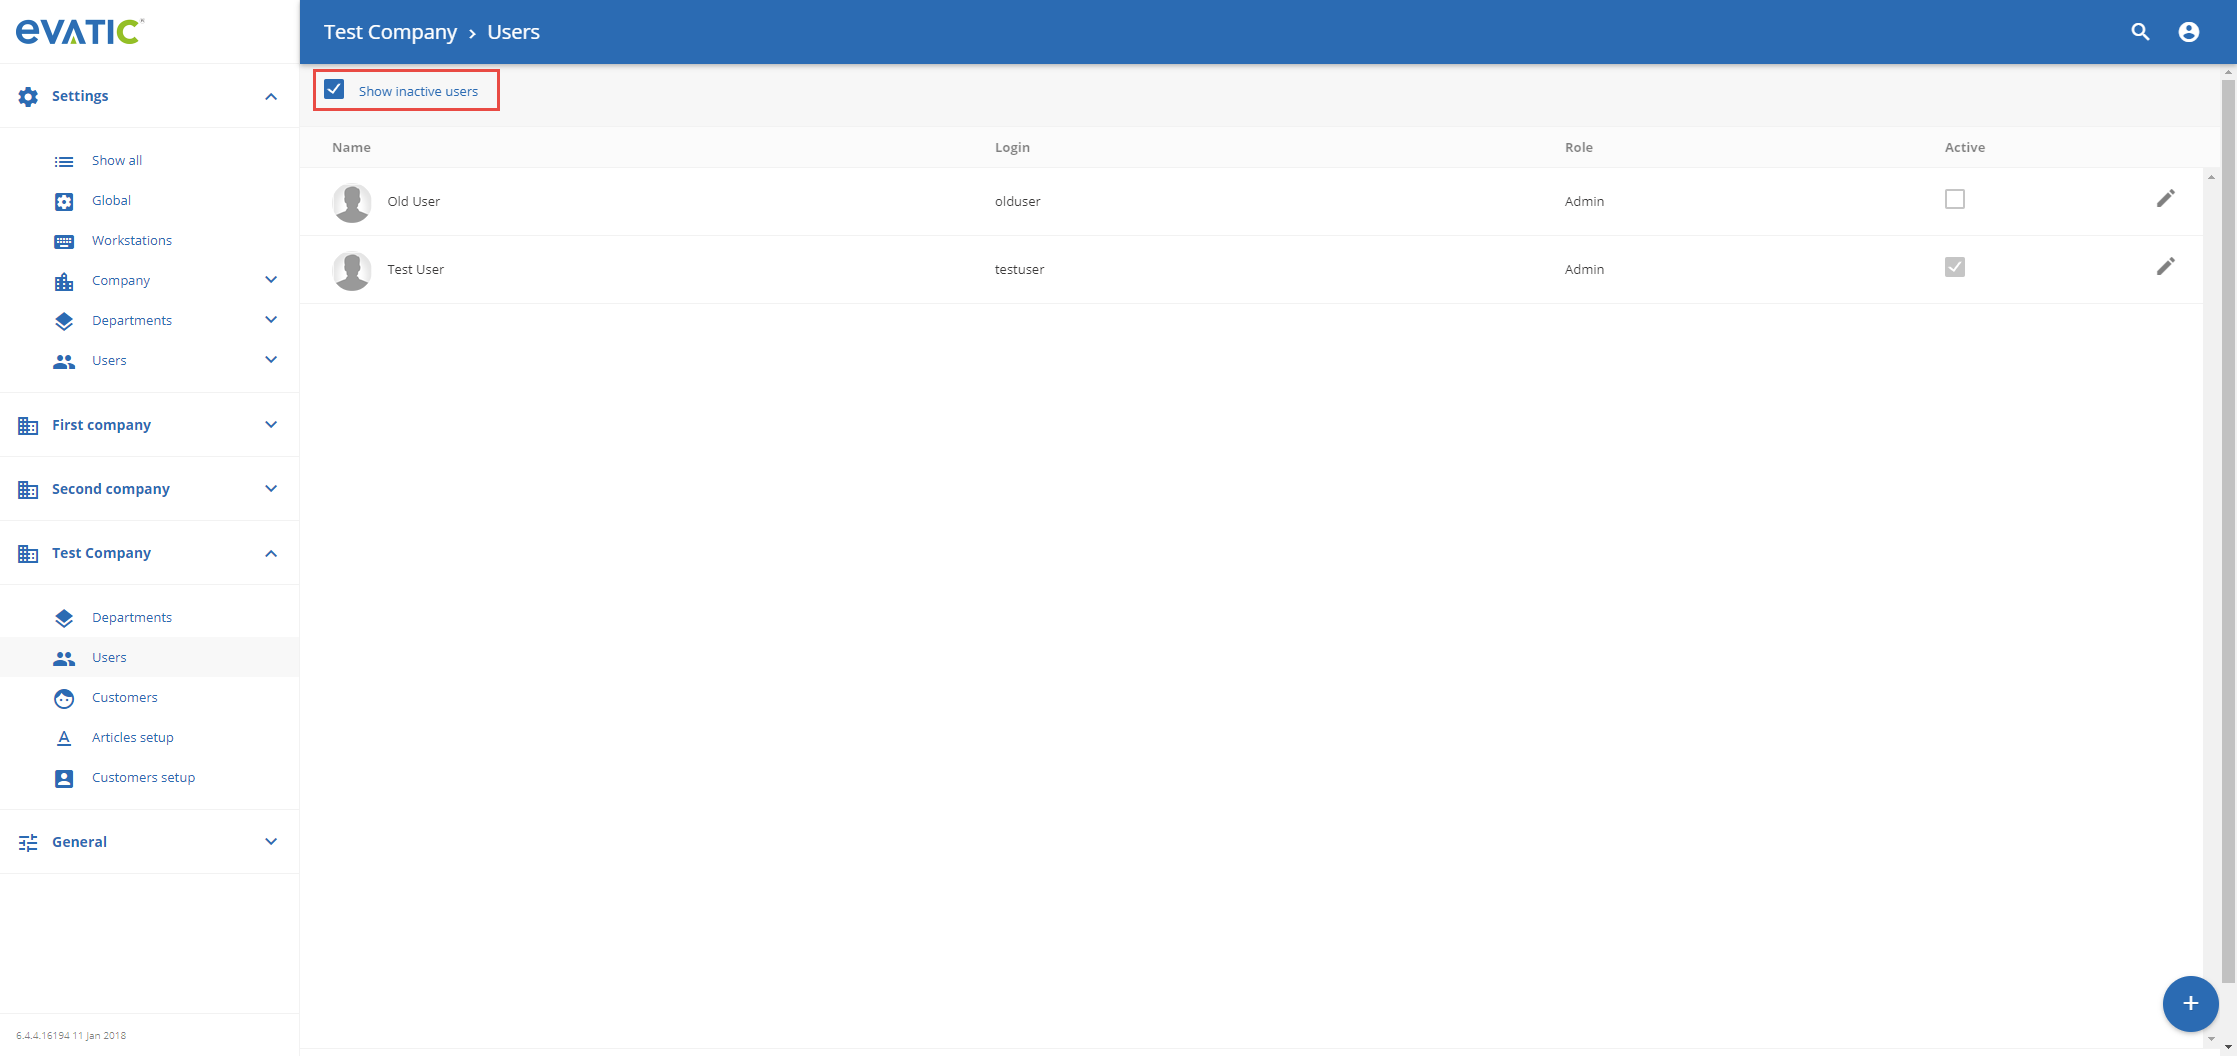
Inactive users
Go to selected company Users. Enable the checkbox Show inactive users to view inactive users.
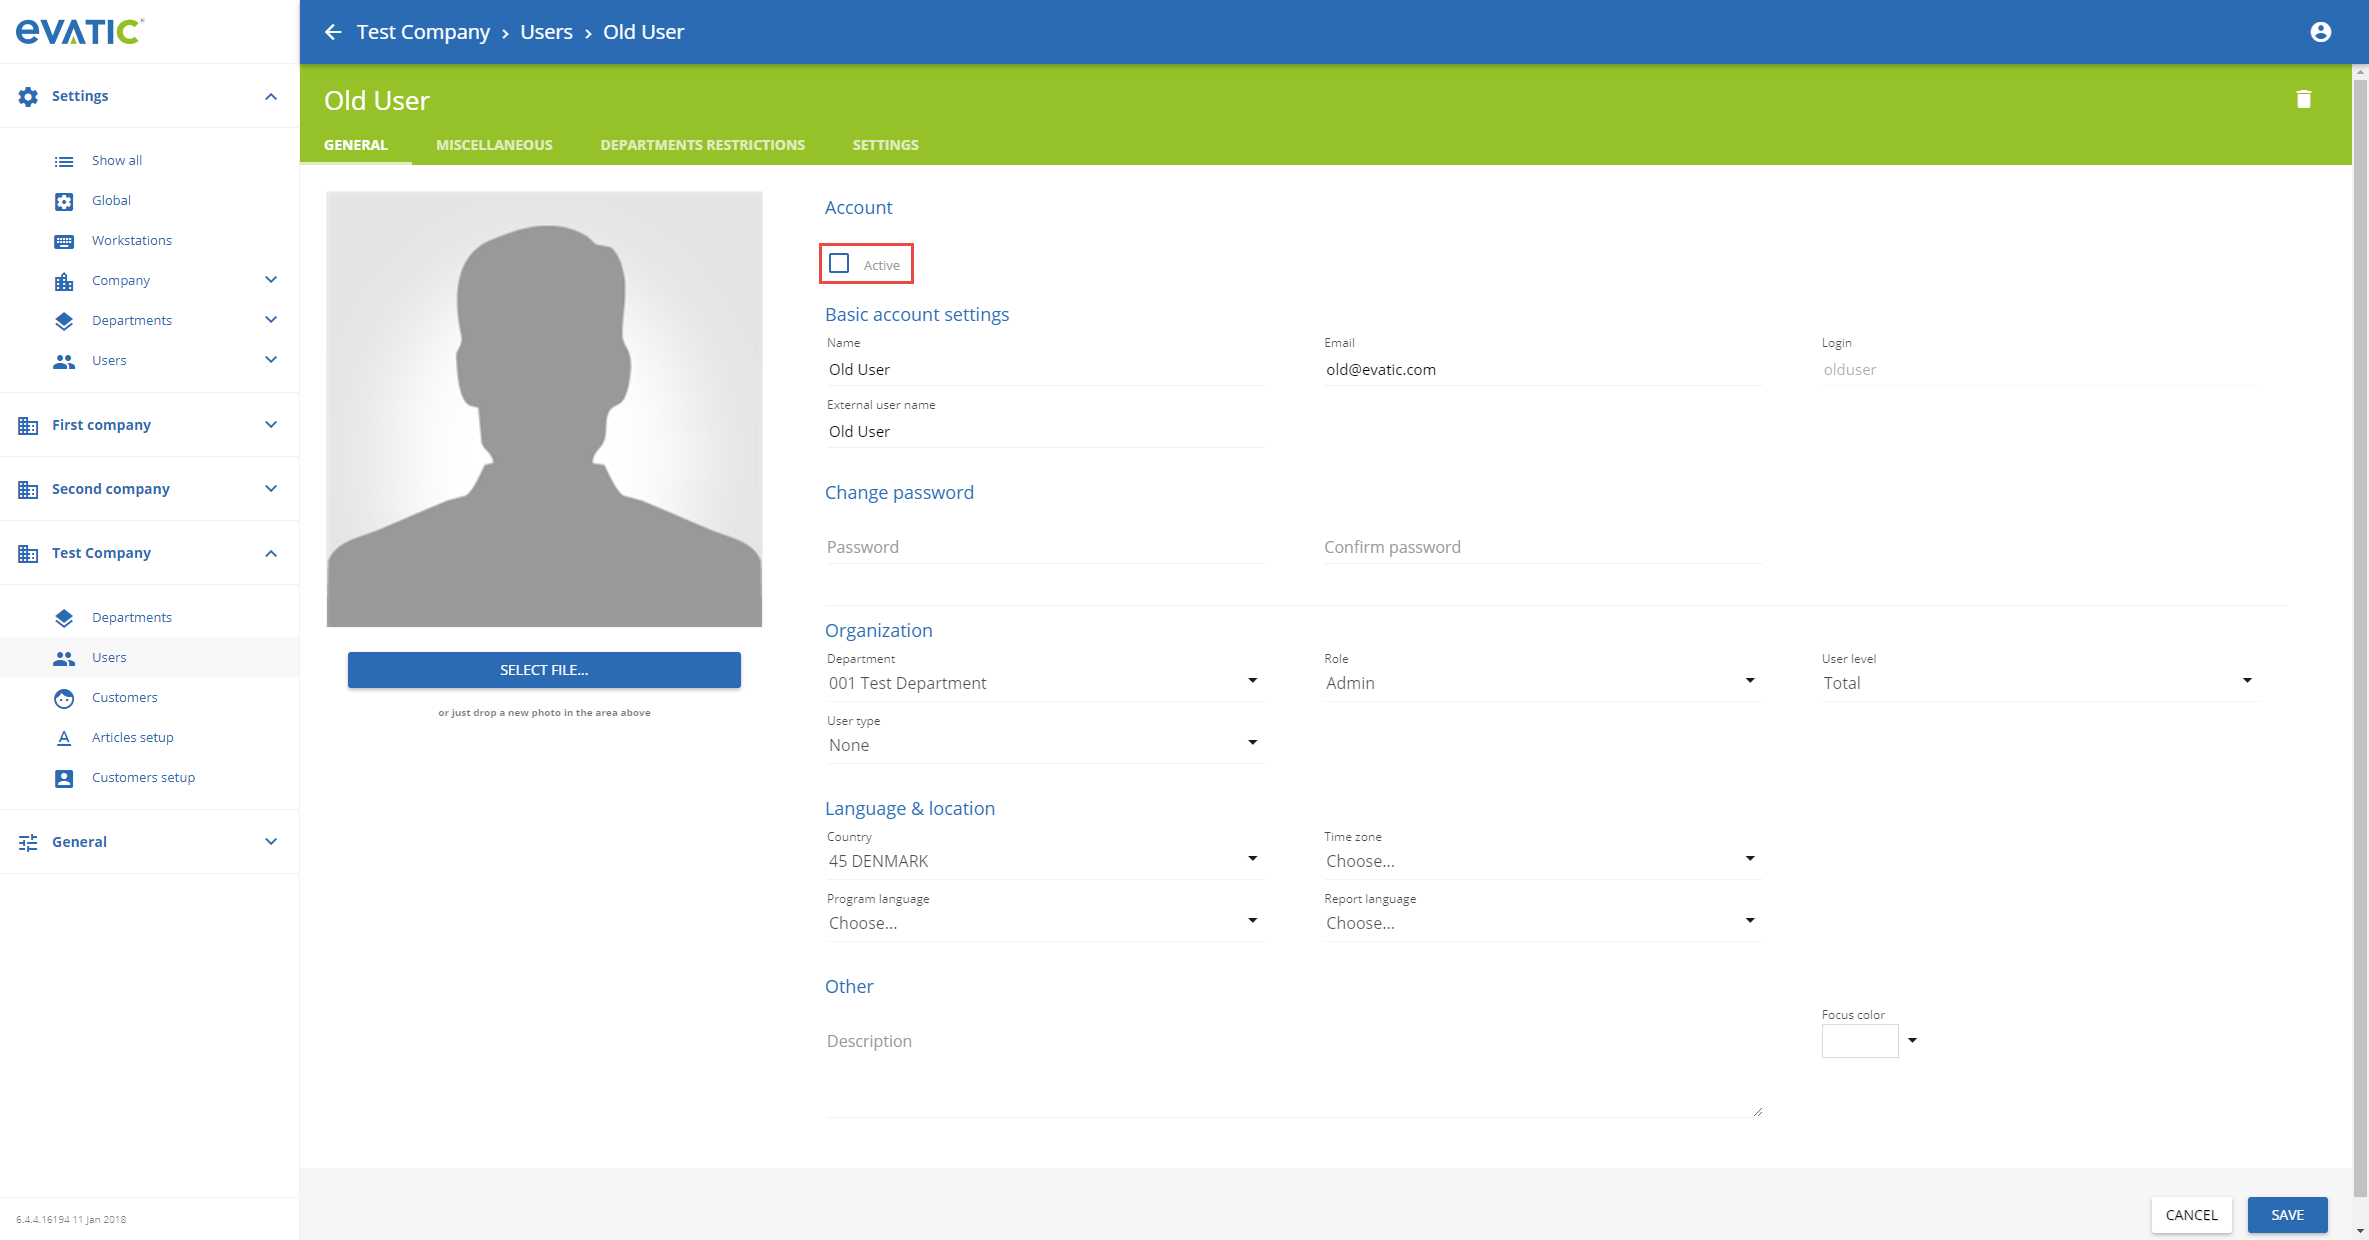
Deactivate/activate user
Go to selected company Users. Enable the checkbox Show inactive users to view inactive users. Select a user from the list and click Edit icon (pencil). In the user details view enable/disable the Active checkbox and confirm operation. Note: an user is not able to deactivate him/her self.
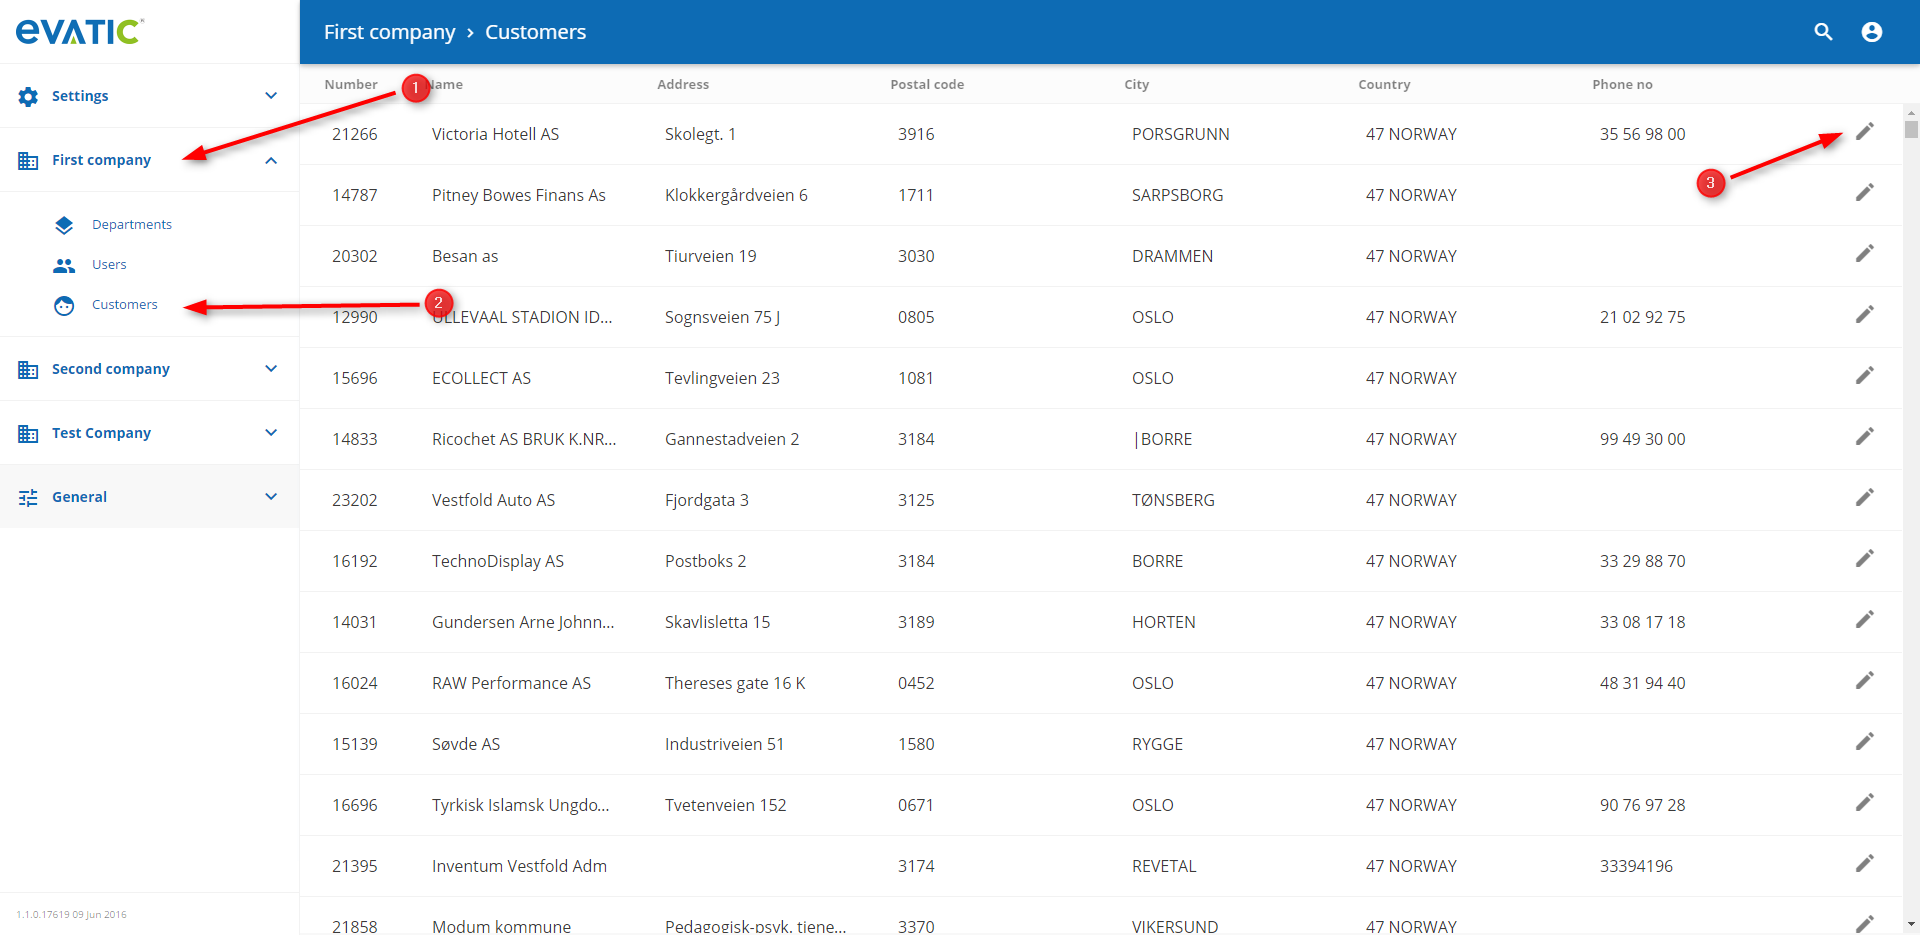
Customers
Display customer
Expand selected company menu (1), then click on Customers (2). On the customer list press Edit button (pencil icon) (3) to display customer details.
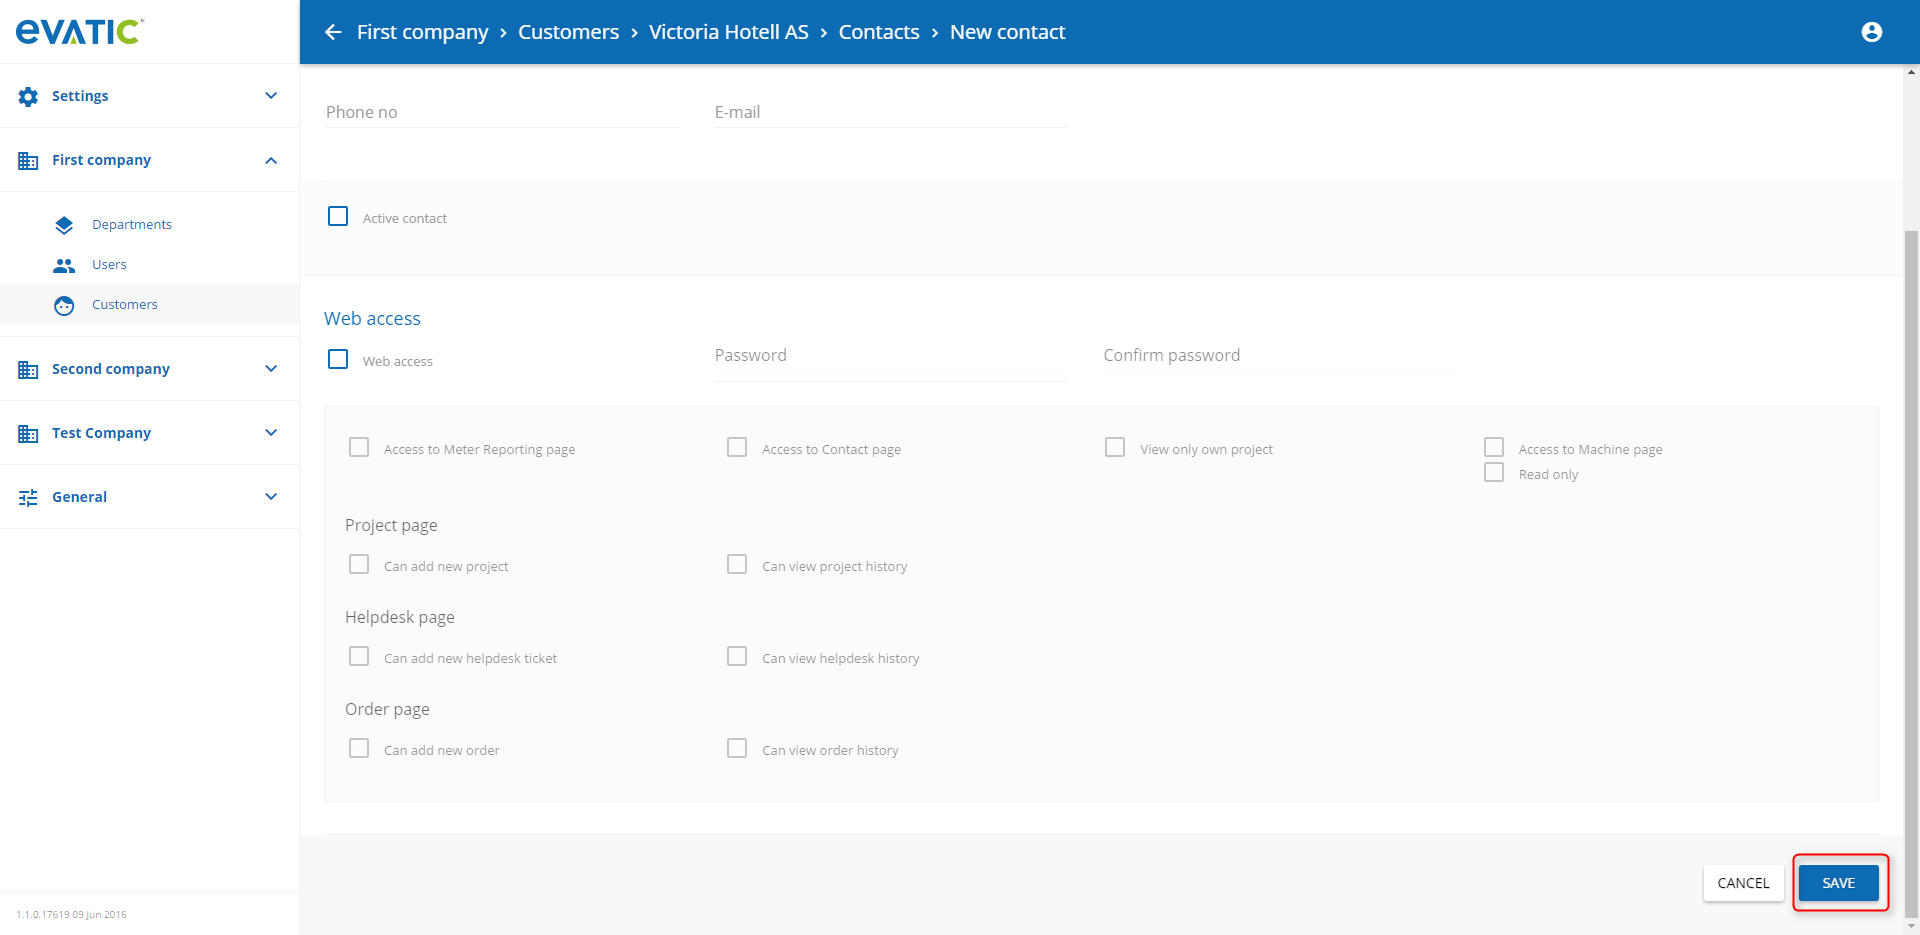
Add contact to customer
Go to selected company Customers, select a customer from the list and go to CONTACTS AND USERS tab (1). In the selected tab click Add button (Plus sign icon) (2).

Fill in the form and save contact with SAVE button.
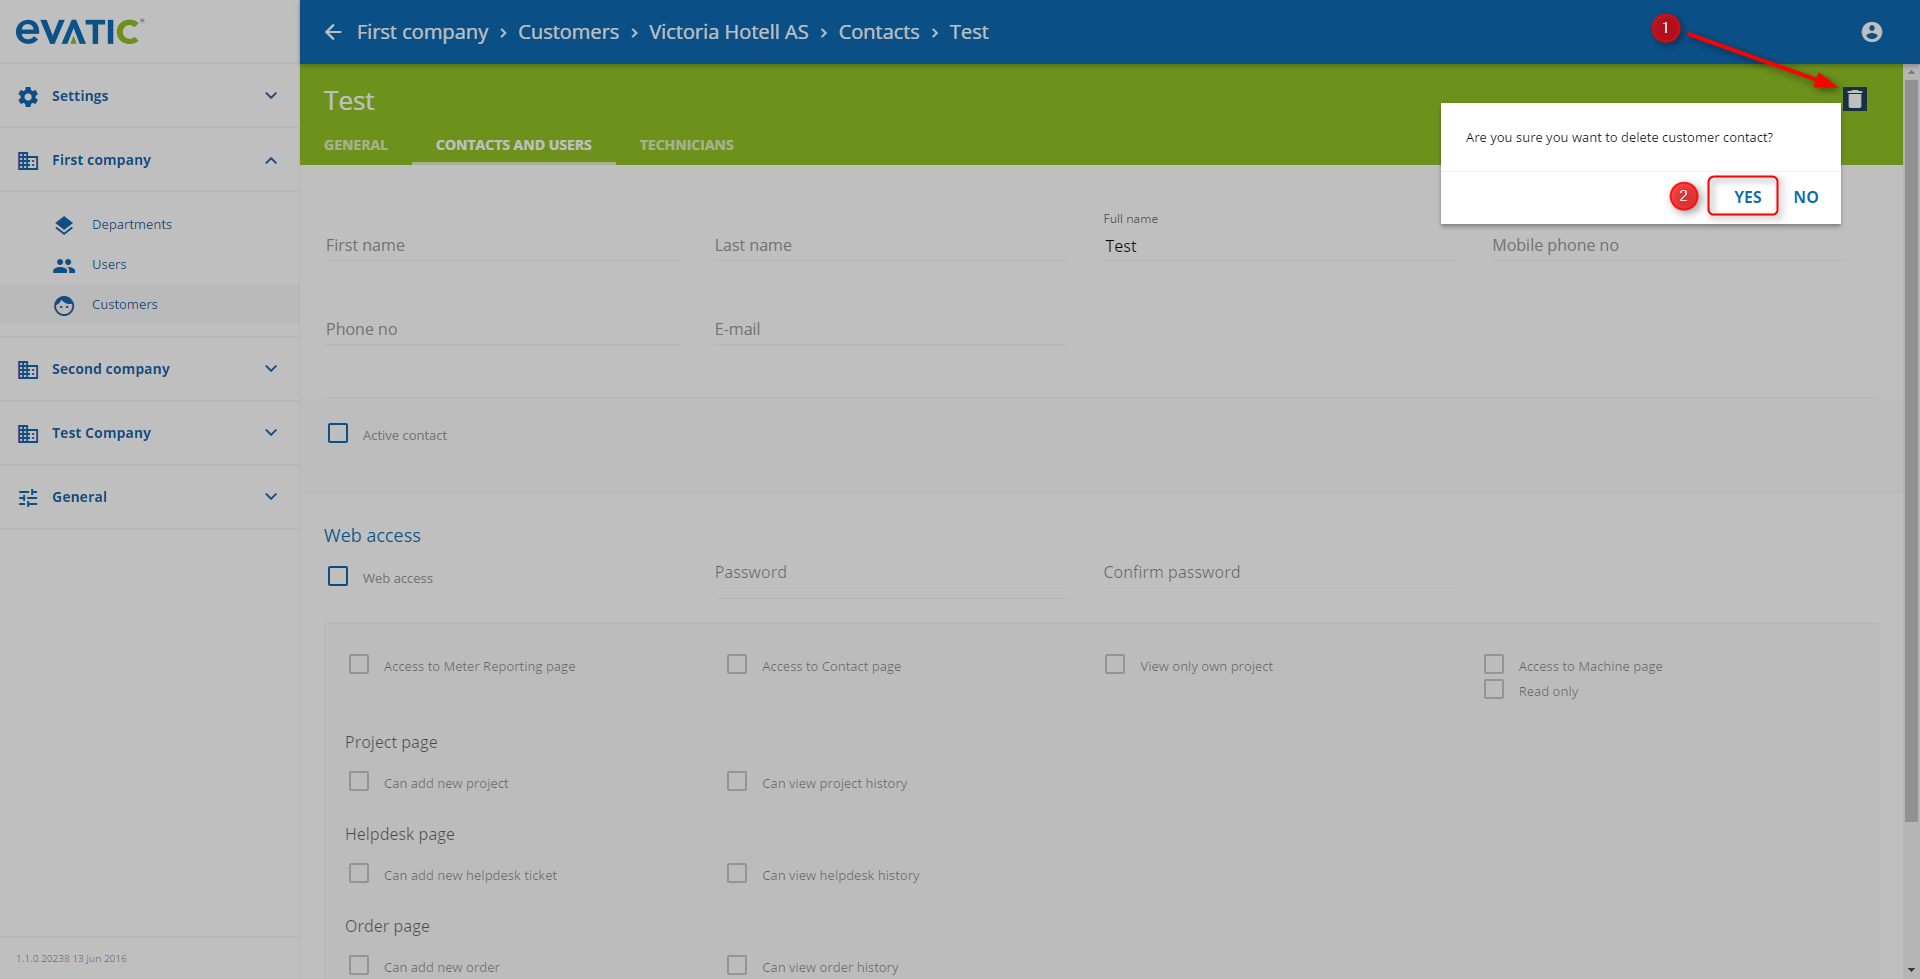
Delete customer contact
Go to customer contact details, press Delete button (trash icon) (1) and confirm operation (2).
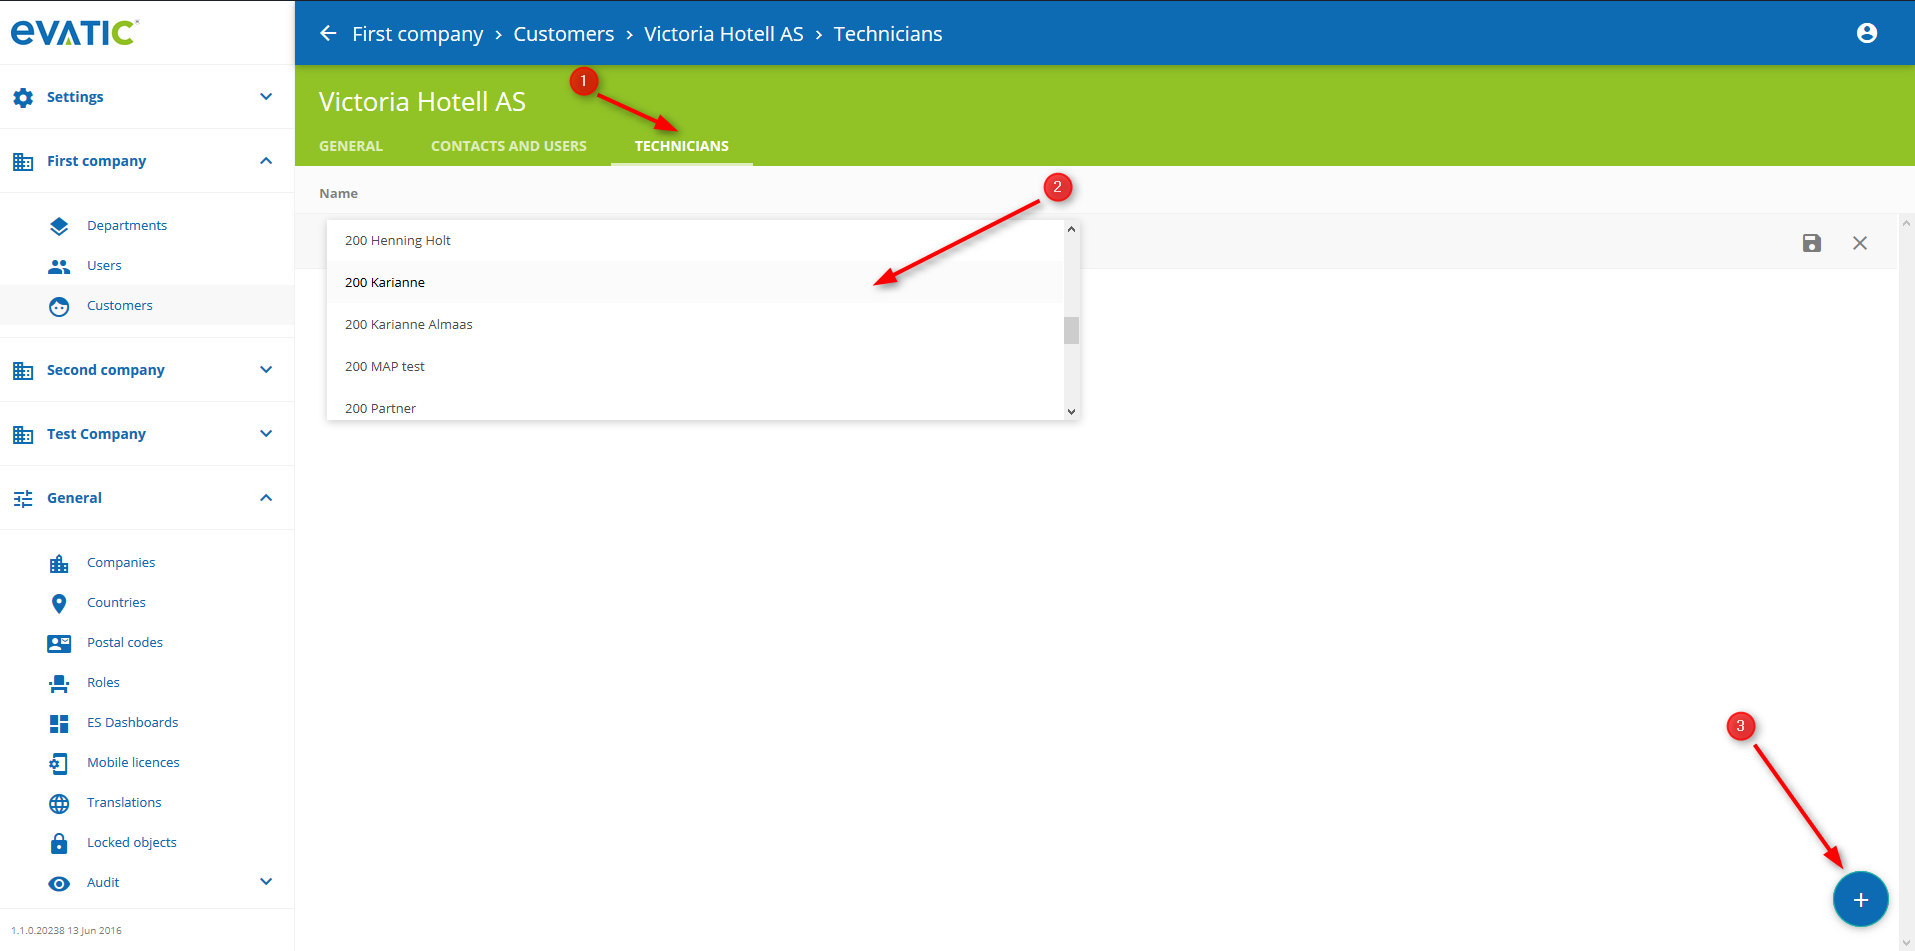
Assign technician to customer
Go to Customers, select a customer from the list and go to TECHNICIANS tab (1). In the selected tab click Add button (Plus sign icon) (2). Select technician from the dropdown (3) and click Save icon (4).
Unassign technician from customer
Go to customer technicians list and press Delete button on technician to delete (trash icon) (1), then confirm operation (2).

Price increase
Recurring project
Please click on this link to learn how to change price to a recurring project.
Contract
Please click on this link to learn how to change contract price
Dealer credit
Similar function as the contract price increase that gives you a possibility to change the price on the dealer credits on the contract. This function has almost the same functionality as the contract price increase, there are only some fields that you not can set here that is available in the contract price increase functions.
Salesmen
Please click on this link to read about how to manage sales persons.
Stock
Create new stock
Expand selected company menu and click Stock item (2). On the list of the stocks click Plus sign button (3).
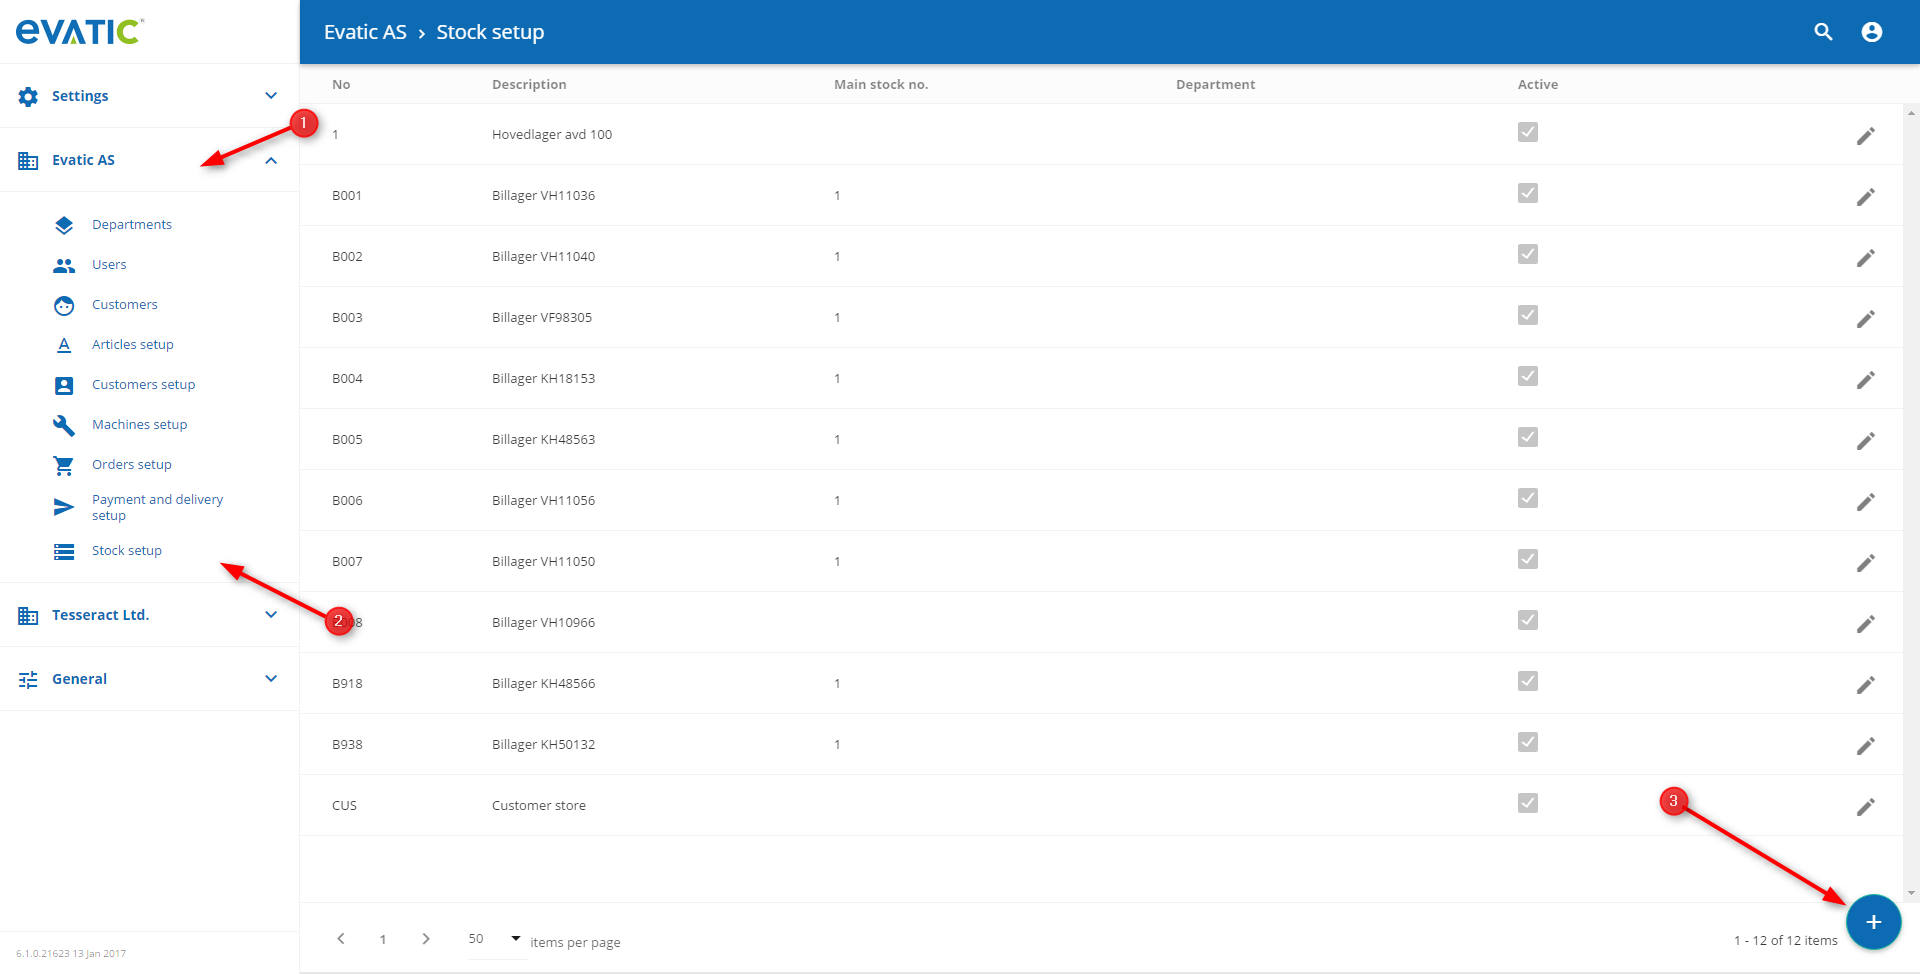
Fill in all mandatory fields and click SAVE button.
Fields: “No”, “Description” are required.
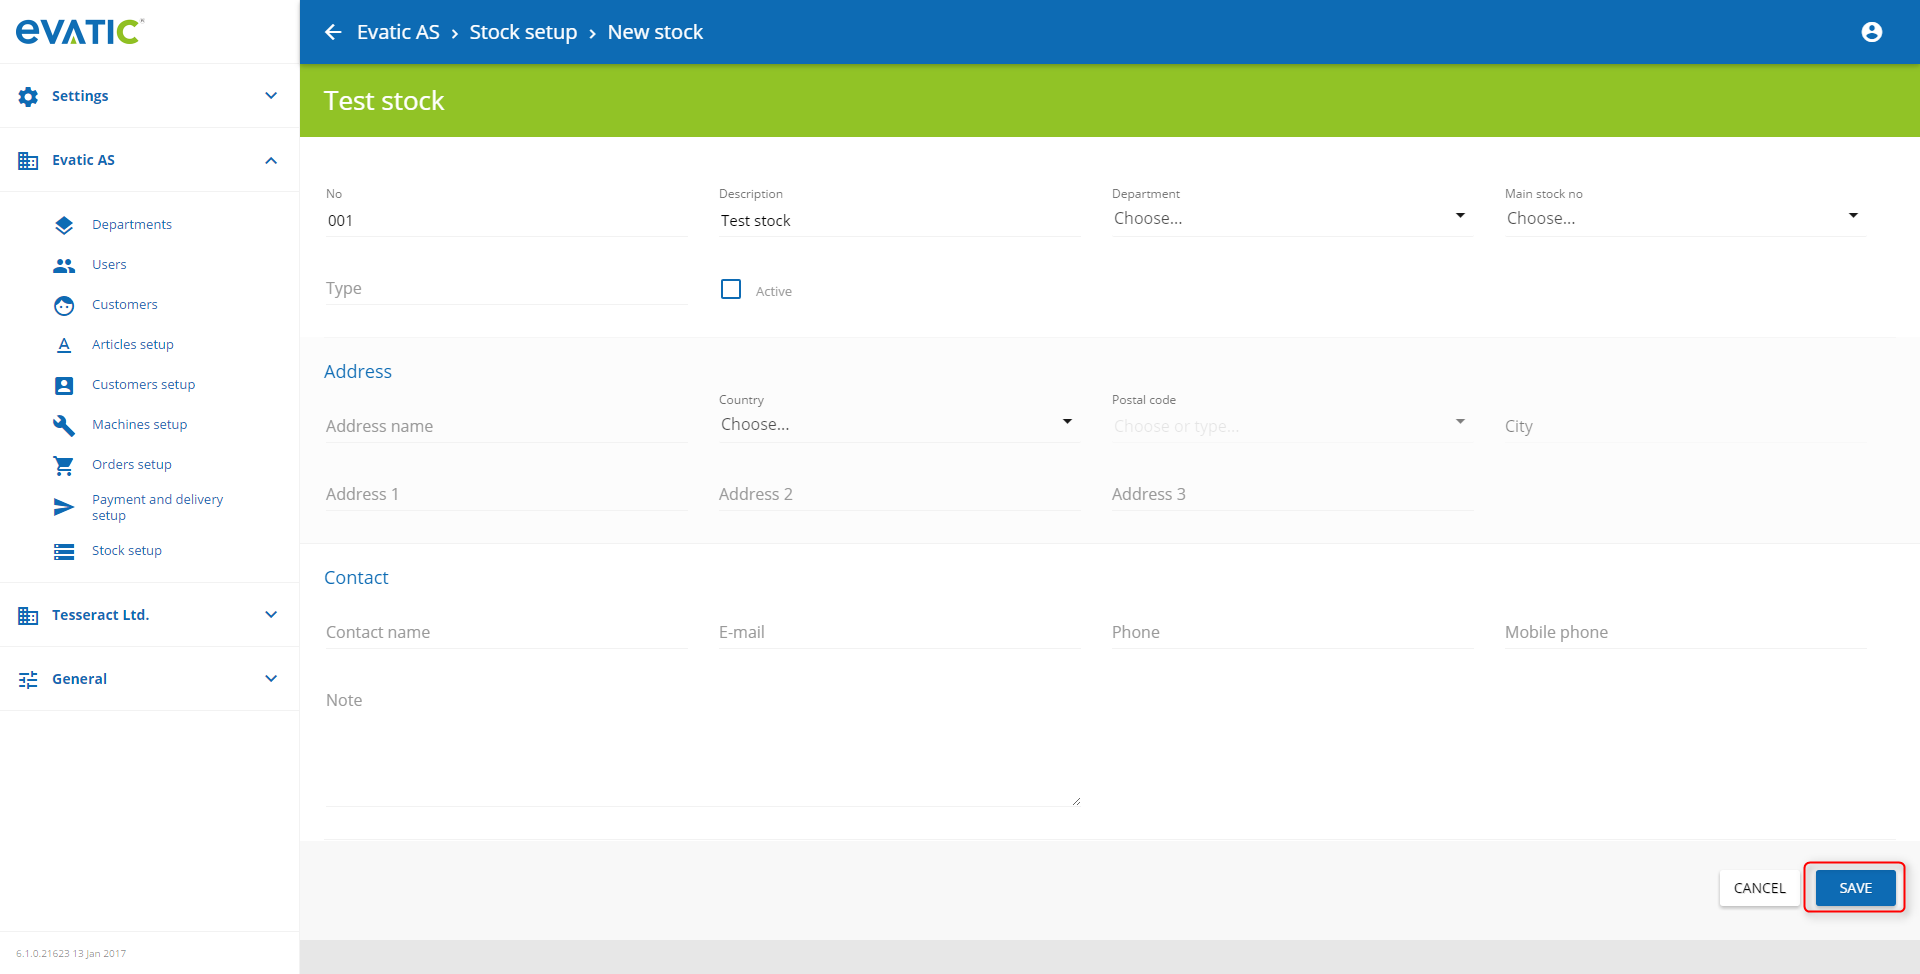
New stock has been added to the list.

Edit stock
Go to Stock list and click on Edit icon (pencil).
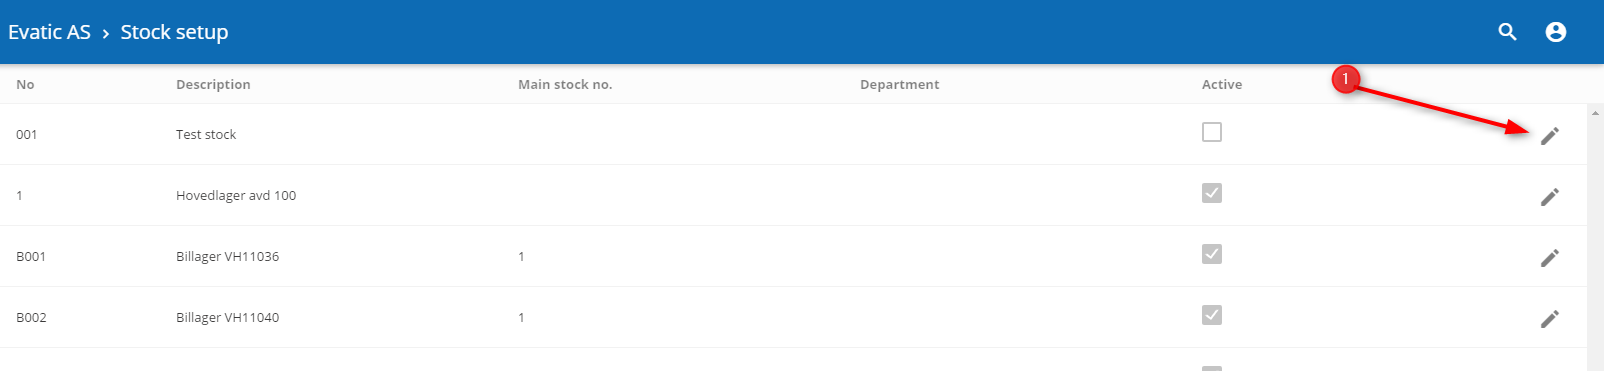
Edit fields and save changes by clicking SAVE button.

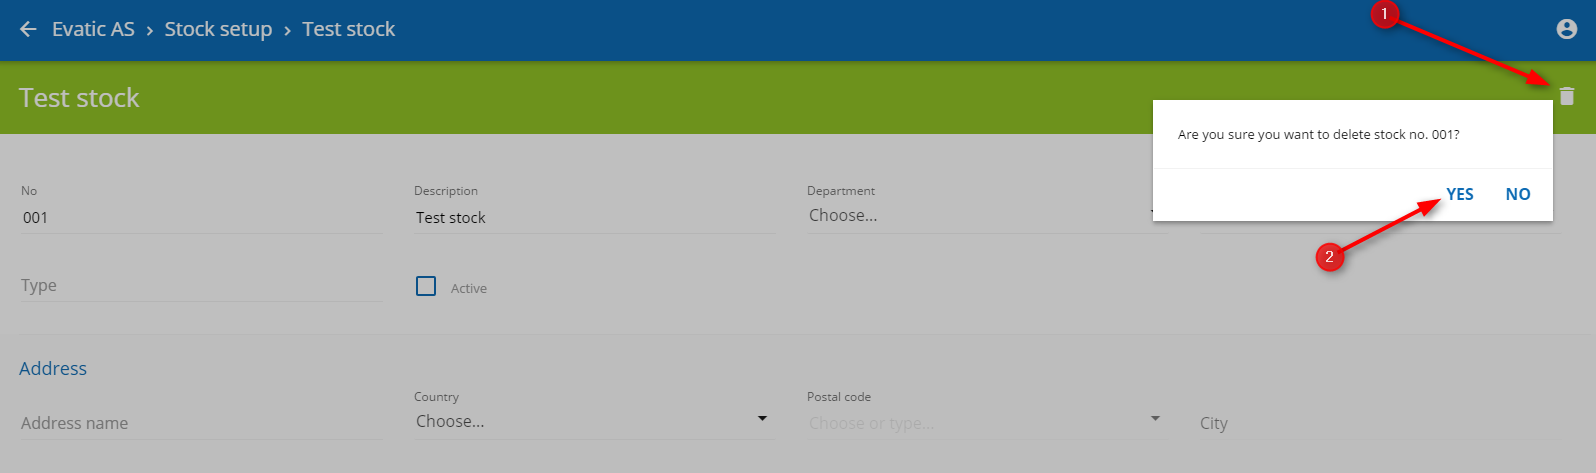
Delete stock
Go to Stock list and click on Edit icon (pencil). In the details view press Delete button (trash icon) and confirm the operation.
It is not possible to delete a stock when it has dependencies with other items in the system (warning message appears: You cannot remove item due to its dependencies).
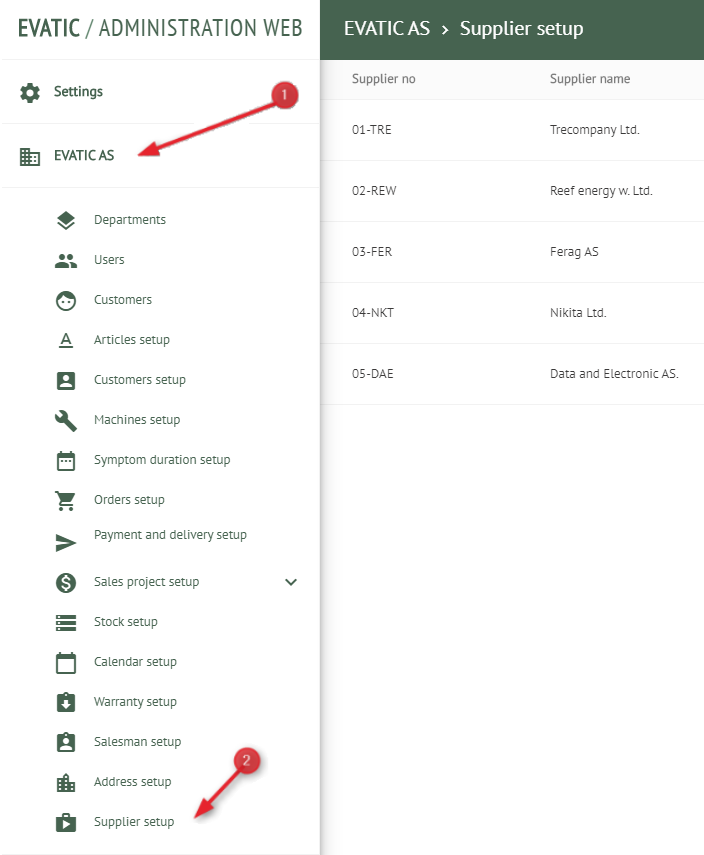
Suppliers
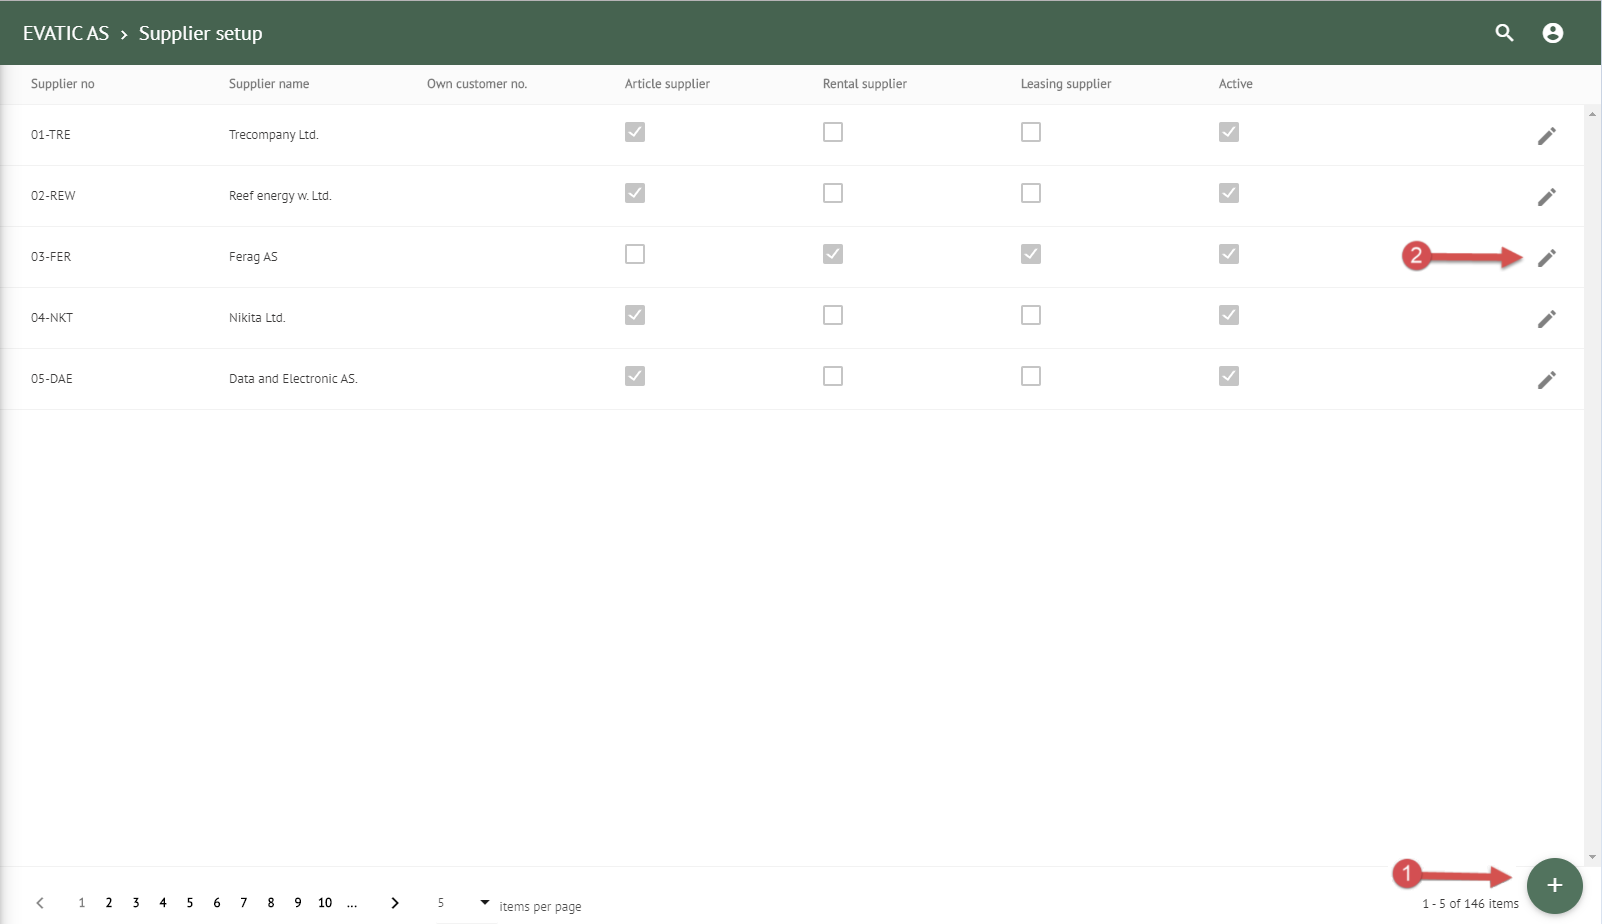
Expand Company menu (1), then select Suppliers (2)
If you want to:
- Add new, use add button (1).
- Edit an existing, use edit button (2) and the supplier window will open.
- Delete an existing, use the edit button to open a supplier then use the delete button (3).
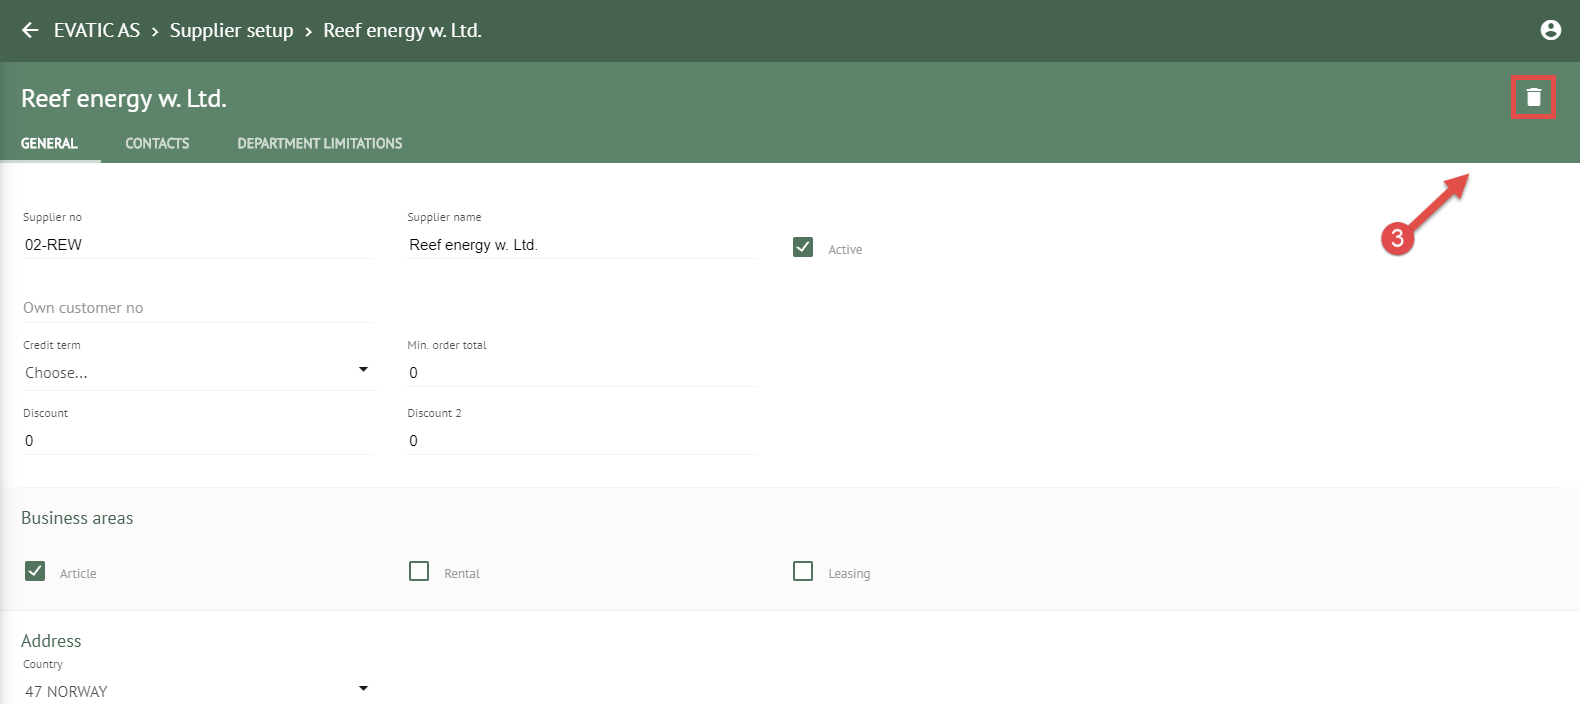
General
Here you can add the general information about the supplier
Contacts
In this window you can add the contacts for this supplier
Department limitations
In the department limitation window you can set up the departments that can use this supplier. This function is only working in Evatic Service if the setting COMPANY \ SUPPLIER \ DEPT_LIMITATION_ON is set to yes. This setting is also availble to edit directly in this window.
Technicians
Expand Company menu, then select Technicians
If you want to:
- Add new, use add button.
- Edit an existing, use edit button and the technician window will open.
- Delete an existing, use the edit button to open a technician then use the delete button.
General
Here you can add the general information about the technician
Competence
Here you can add the competence groups this technician is part of
Team
Here you can add the service and helpdesk teams this technician is part of
Service article price
Here you can set special prices or service article groups used by this technician
Address setup
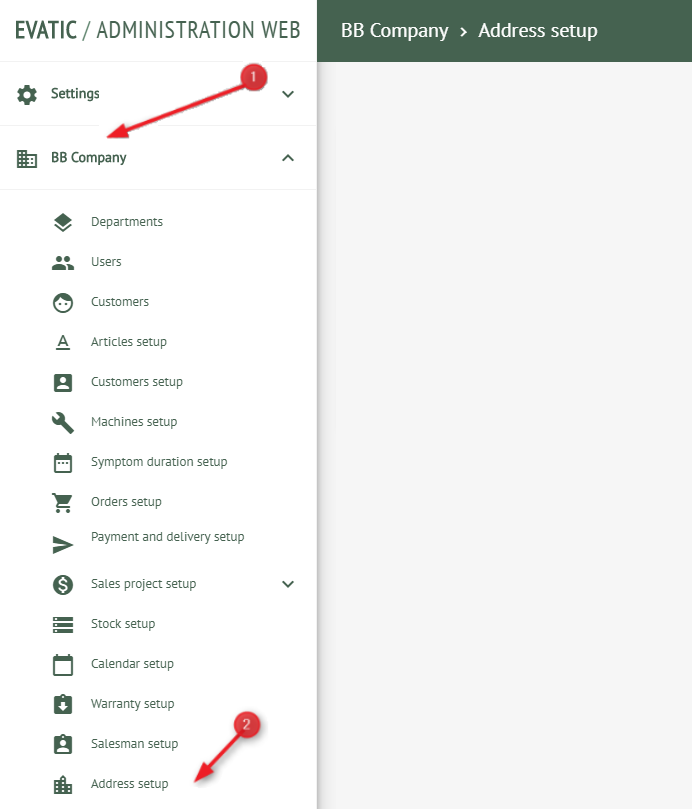
Expand Company menu (1), then select Address setup (2)
Address state
Please click on this link to read about States for federal governments.
Area
Please click on this link to read about Areas.
Technicians
Technicians can be linked to a area. Select technician from the drop-down list.
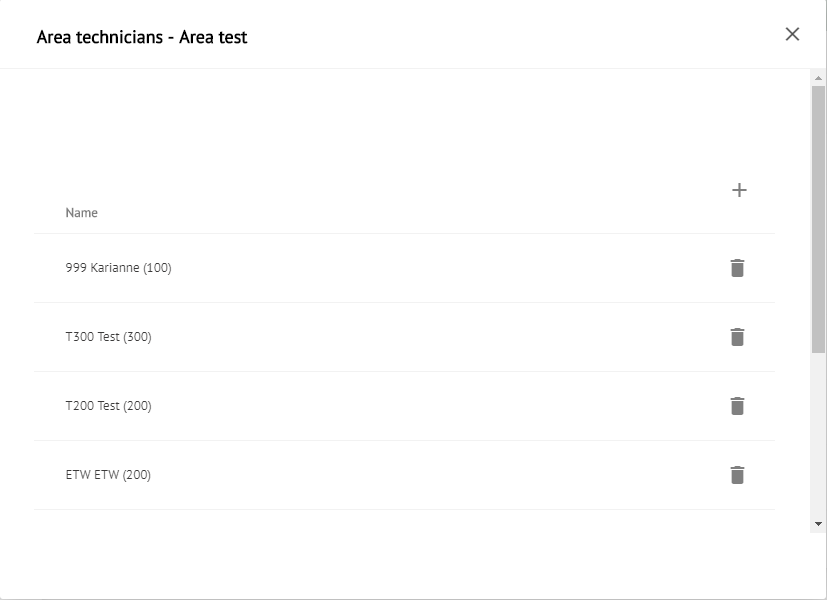
The technician can also be linked to more than one area.
Articles setup
Expand Company menu (1), then select Articles setup (2).
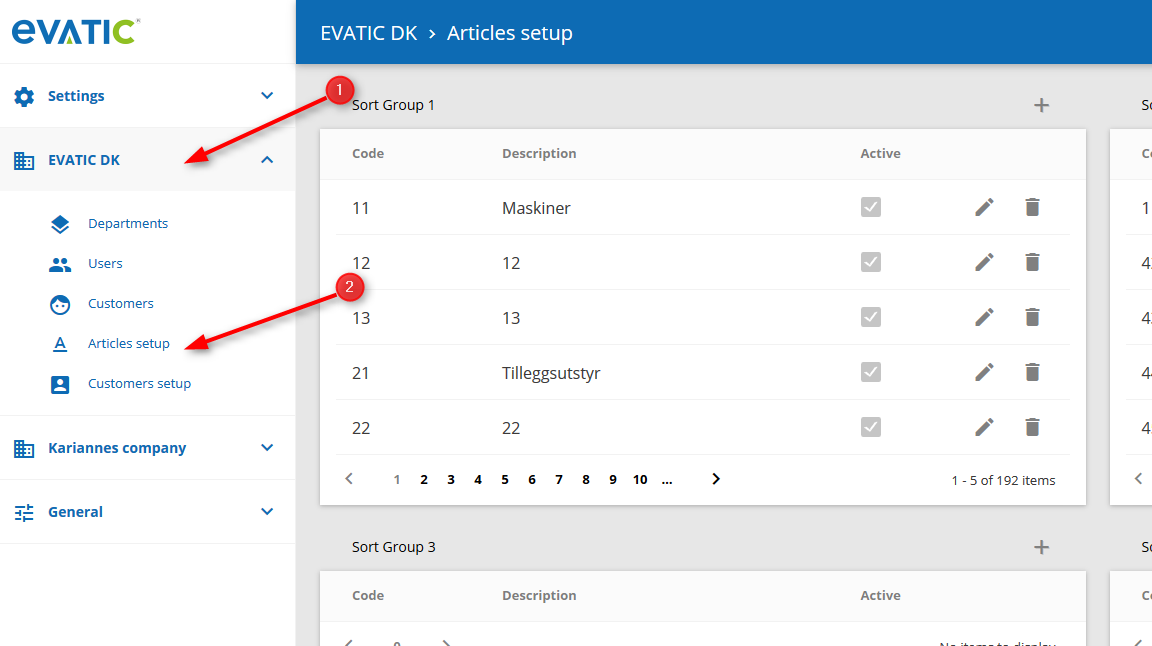
Sort groups management
Please click on this link to read about article's sort groups.
Articles units
Please click on this link to read about article's units.
Articles weight units
Please click on this link to read about article's weight units.
Articles accounts
Please click on this link to read about article's accounts.
Article calc schema
Please click on this link to read about article's calculation scheme.
Articles ECO taxes
Please click on this link to read about article's eco taxes.
Article Default Values
Please click on this link to read about article's default values.
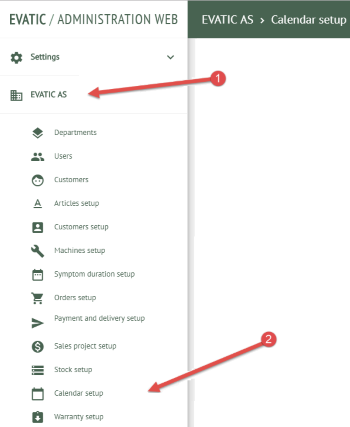
Calendar setup
Expand Company menu (1), then select Calendar setup (2)
Activity type
Please click on this link to read about Activity types.
Activity status
Please click on this link to read about Activity statuses.
Availability type
Please click on this link to read about Availability types.
Contract setup
Expand Company menu, then select Contract setup
Contract template
Please click on this link to read about Contract template.
Contract type
Please click on this link to read about Contract type.
Invoice layout
Please click on this link to read about Invoice layout.
Invoice template
Invoice template function is temporarily removed from EAW from version 7.4.0
Functionality to set up a template for text lines on invoices created from ECM. This functionality will replace the existing "Invoice layout" on all contracts that are invoiced from ECM. Please add a name, save and then press the gear button to insert the text lines you want to be added on the invoices. The window that appear when you press the gear button allows you to insert any text you want and put the values from the contract (select from the bookmarks on the right-hand side) anywhere you want. You can put as many bookmarks as you want on each line. Each line in the template will be a line on the invoice There are three sections;
- Before all services These are text lines that will appear before the first order line from the contract.
- After each service Text that will be added after each order line from the contract
- After all services Text that you want to put on the end of the invoice
In ECM you can select on each service which "Invoice template", you want to use.
Meter reading letter layout
Please click on this link to read about Meter reading letter layout.
Sort groups management
Please click on this link to read about Contract sort groups.
Properties
Please click on this link to read about Contract properties.
Sub contract values
Please click on this link to read about creating subontract codes list.
Helpdesk setup
Expand Company menu, then select Helpdesk setup.
Symptom codes (1 - 4)
Symptom codes for the Helpdesk module, similar to the symptom codes for service projects, please click on this link to read about Symptom codes.
Symptom dependencies
Symptom dependencies for the Helpdesk module, similar to the symptom dependencies for service projects, please click on this link to read about Symptom dependencies.
Action codes (1 - 4)
Action codes for the Helpdesk module, similar to the action codes for service projects, please click on this link to read about Action codes.
Action dependencies
Action dependencies for the Helpdesk module, similar to the action dependencies for service projects, please click on this link to read about Action dependencies.
Priority codes
Priority codes for the Helpdesk module, similar to the priority codes for service projects, please click on this link to read about Priority codes.
Default service articles
Default service articles for the Helpdesk module, similar to the Default service articles for service projects, please click on this link to read about Default service articles.
Task tree
Task tree for the Helpdesk module. This tree cannot be setup for each department, but is similar to the task tree for service projects, please click on this link to read about what is a Task tree.
Helpdesk to service default node
You can decide which nodes the HelpDesk jobs automatically should move, when you press the >Service button in the HelpDesk screen and select a service symptom code.
Helpdesk types
You create a list of all the different HelpDesk types you can choose from on the HelpDesk screen here. HelpDesk-types are being used to classify what you have done, every time you stop working on a HelpDesk-task.
Closure codes
Closure code in a drop down list in the action-section. Visible if HELPDESK \ CLOSURE_STATUS_ON = 1
Pre-defined values can be entered here with a code and description
E.g. Change request, Fixed, Workaround.
Incident status
Status on incident in a drop down list in the symptom-section. Visible if HELPDESK \ INCIDENT_STATUS_ON = 1
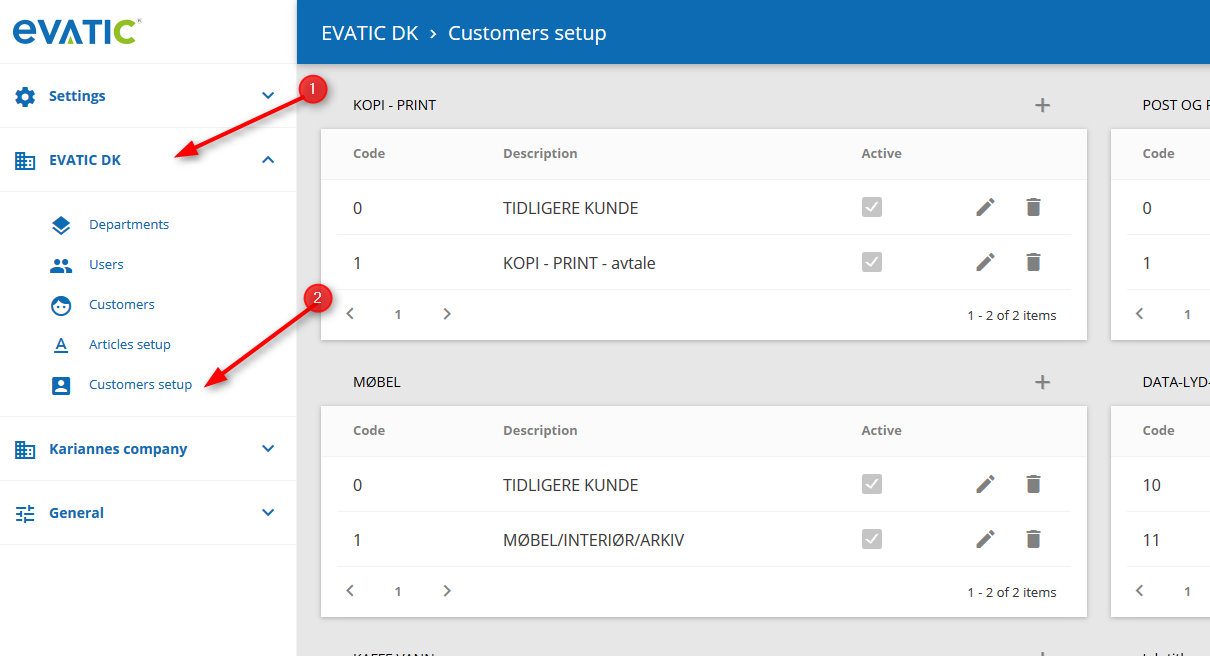
Customers setup
Expand Company menu (1), then select Customers setup (2).
Sort groups management
Please click on this link to read about Customers' sort groups.
Job titles
Please click on this link to read about job titles.
Business codes
Please click on this link to read about business codes.
Order information
Please click on this link to read about customers' order information.
Contact mail groups and Address book
These instructions have been updated. Please click on this link to read about how to create and manage the Address book.
Customer properties
Please click on this link to read about customer properties.
Default event tree
Please click on this link to read about setting up a default event tree.
Machines setup
Sort groups management
Please click on this link to read about Machines sort groups.
Follow up category
Please click on this link to read about creating sales activities to follow up a machine.
Consumables configuration
Please click on this link to read about configuring colors for consumables.
Meters
Please click on this link to read about creating a meters' list.
Properties
Please click on this link to read about Machine's properties.
Delivery rules
Please click on this link to read about Machine's delivery rules.
Competence groups
Please click on this link to read about managing competence groups.
Meter type convert
This is a list where you can set up rules used to find the correct meter for some types of mail import of meter readings. These convertion rules are only used if you had turned on the setting for MAIL PROJECT RECEIVER for format KYOCOUNT_XML, TOSHIBA_XML or EFMS_XML
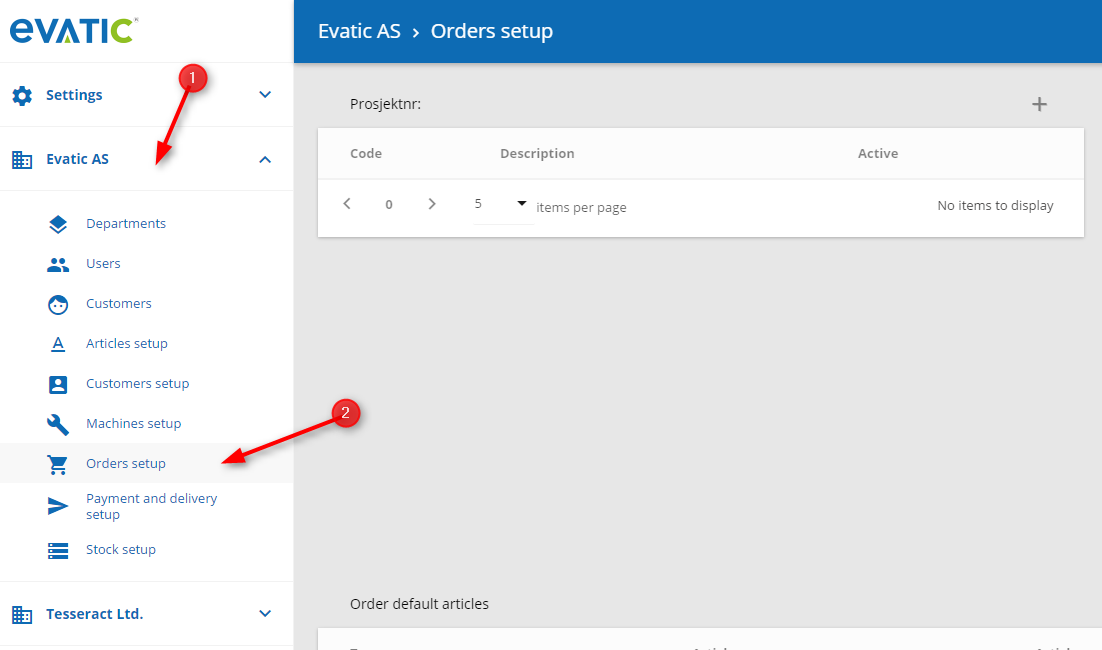
Orders setup
Expand Company menu (1), then select Orders setup (2).
Order tags
Please click on this link to read about Order tags.
Order types
Please click on this link to read about Order types.
Orders default articles
This article has been updated. Please click on this link to read about Order default articles.
Properties
Please click on this link to read about Order properties.
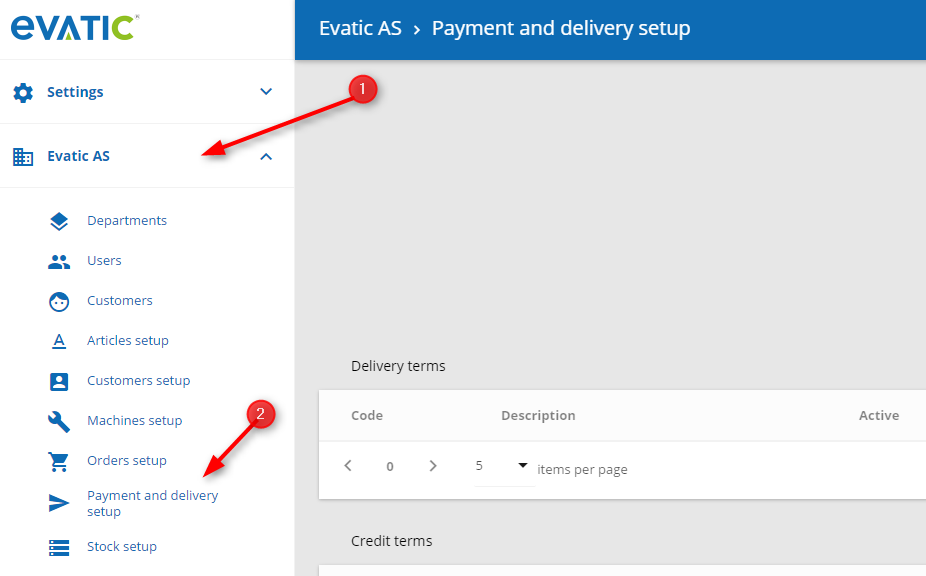
Payment and delivery setup
Expand Company menu (1), then select Payment and delivery setup (2).
Payment types
Please click on this link to read about payment types.
Means of delivery
Please click on this link to read about means of delivery.
Delivery terms
Please click on this link to read about terms of delivery.
Credit terms
Please click on this link to read about terms of credit.
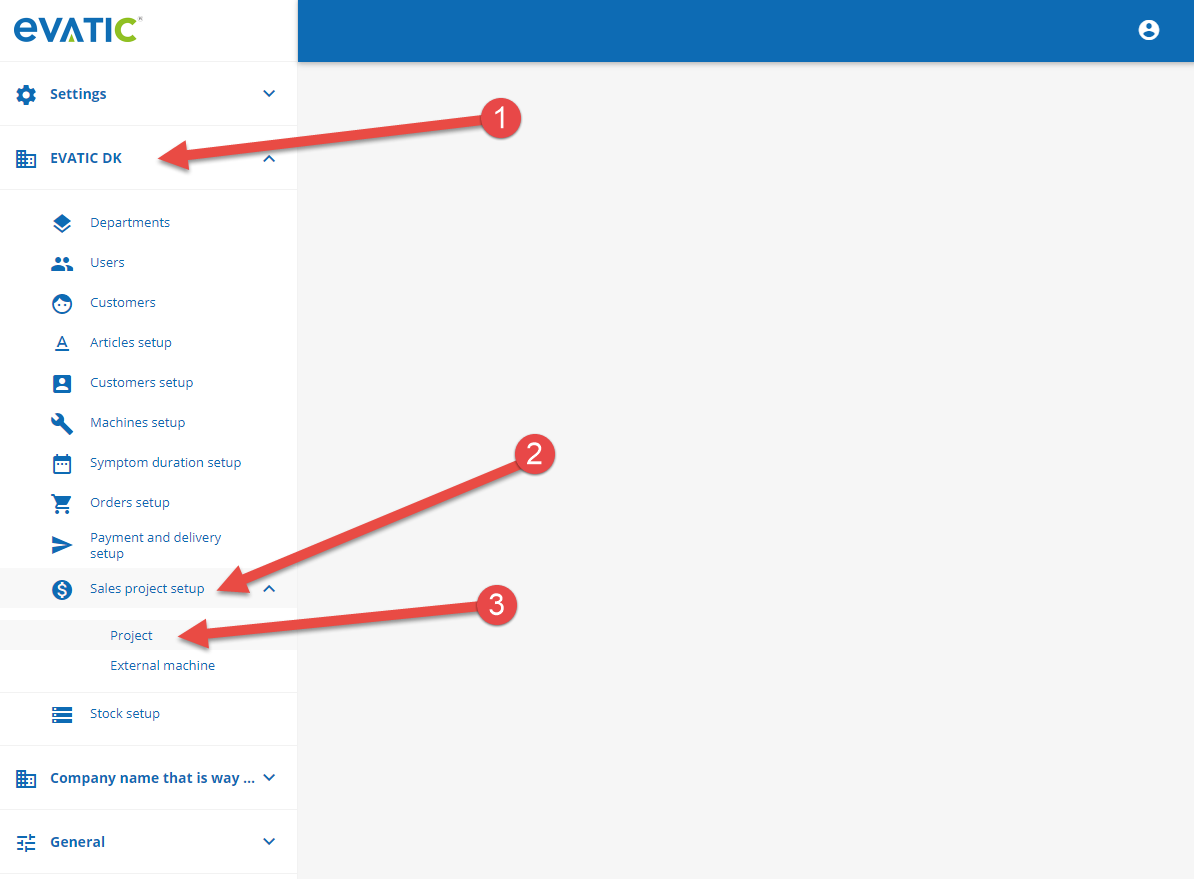
Sales project setup - Project
Expand Company menu (1), then select Sales project setup (2), then select Project(3).
Probability of sale
Please click on this link to read about sales probabilities.
Document category
Please click on this link to read about document categories.
Hardware sales bonus levels
Please click on this link to read about provision calculation.
Service sales bonus levels
Please click on this link to read about provision calculation.
State of sale
Please click on this link to read about state of sale.
Sales provision
Please click on this link to read about provision calculation.
Target price
Please click on this link to read about target price.
Properties
Please click on this link to read about sales project's properties.
Meter interval
Please click on this link to read about meter intervals.
Supplier factors
Please click on this link to read about supplier factors.
Sales Project setup - External machine
Please click on this link to read about external machines set up.
Service project setup
Expand Company menu, then select Service project setup.
Symptom codes (1 - 3)
Please click on this link to read about Symptom codes.
Task status
Please click on this link to read about Task statuses.
Symptom tree
Please click on this link to read about Symptom tree.
Priority codes
Please click on this link to read about Priority codes.
Action codes (1 - 3)
Please click on this link to read about Action codes.
Service articles type
Please click on this link to read about Service articles type.
Symptom dependencies
Please click on this link to read about Symptom dependencies.
Action dependencies
Please click on this link to read about Action dependencies.
Default service articles
Please click on this link to read about Default service articles.
Service articles
See also here.
The mission for the service article is to ease the work volume for the operator when completed service tasks are to be reported in. When a service code is connected to a machine, Evatic will automatically propose an article number for the task duration, travel time, travel distance and any other fixed sums or fees. In this way the time to register a service order will be reduced.
Tip
A default service article code(s) can be linked to the technician. Note! The following setting Company XXX/Department XXX/CHECK_SERVICE_ARTICLE_TYPE must also be set.
Project template
Please click on this link to read about Project template.
Task tree
Please click on this link to read about what is a Task tree.
Warranty compensation
Here you can setup warranty compensation rules to be used in the Warranty window in Evatic Service.
Check list stat. group
Please click on this link to read about Checklist statistic group.
Check lists
Please click on this link to read about Checklists.
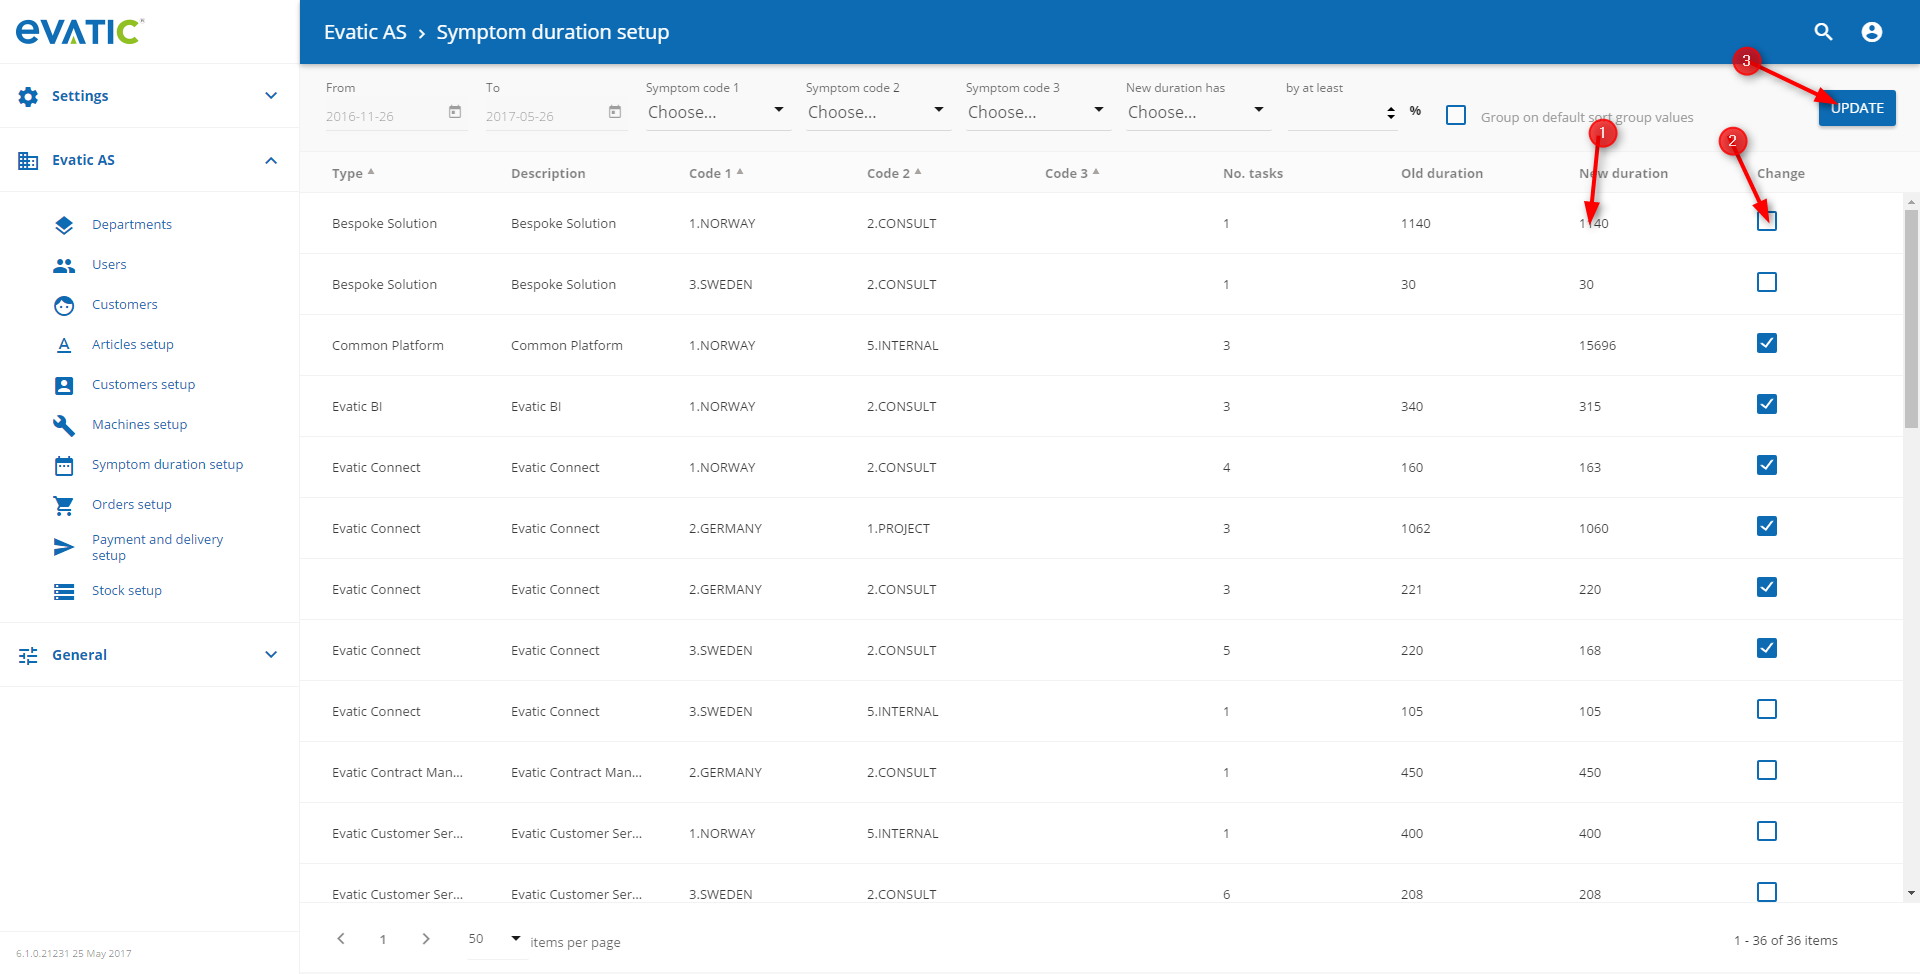
Symptom duration setup
Please click on this link to read about Symptom duration setup.
Sorting and column description.
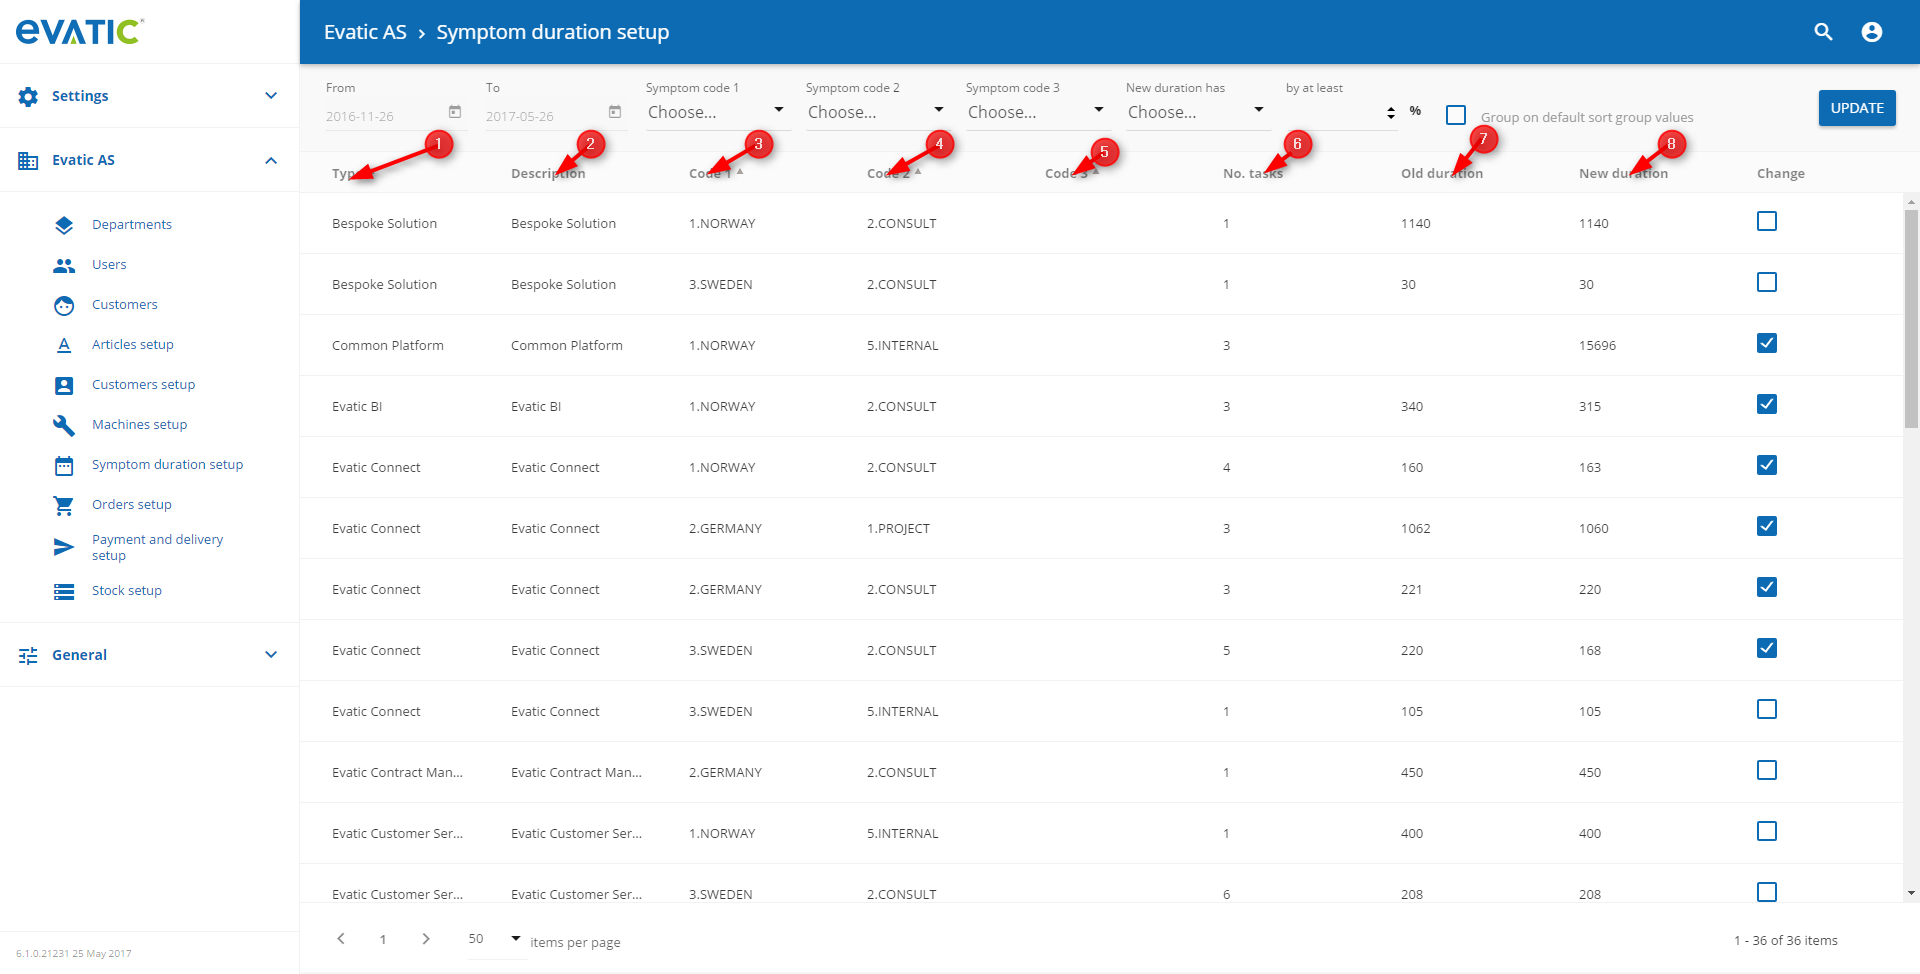
- Table is sorted by "Type" column (1). Column contains models name.
- Table is sorted by "Description" column (2). Column contains model description.
- Table is sorted by "Code 1" column (3). Column contains symptom code 1.
- Table is sorted by "Code 2" column (4). Column contains symptom code 2.
- Table is sorted by "Code 3" column (5). Column contains symptom code 3.
- Table is sorted by "No. tasks" column (6). Column contains models name Number of tasks.
- Table is sorted by "Old duration" column (7). Column contains current duration for given row.
- Table is sorted by "New duration" column (8). Column contains new duration proposal suggested by system.
- Last column indicate which rows should be updated after press "Update" button.
Filtering
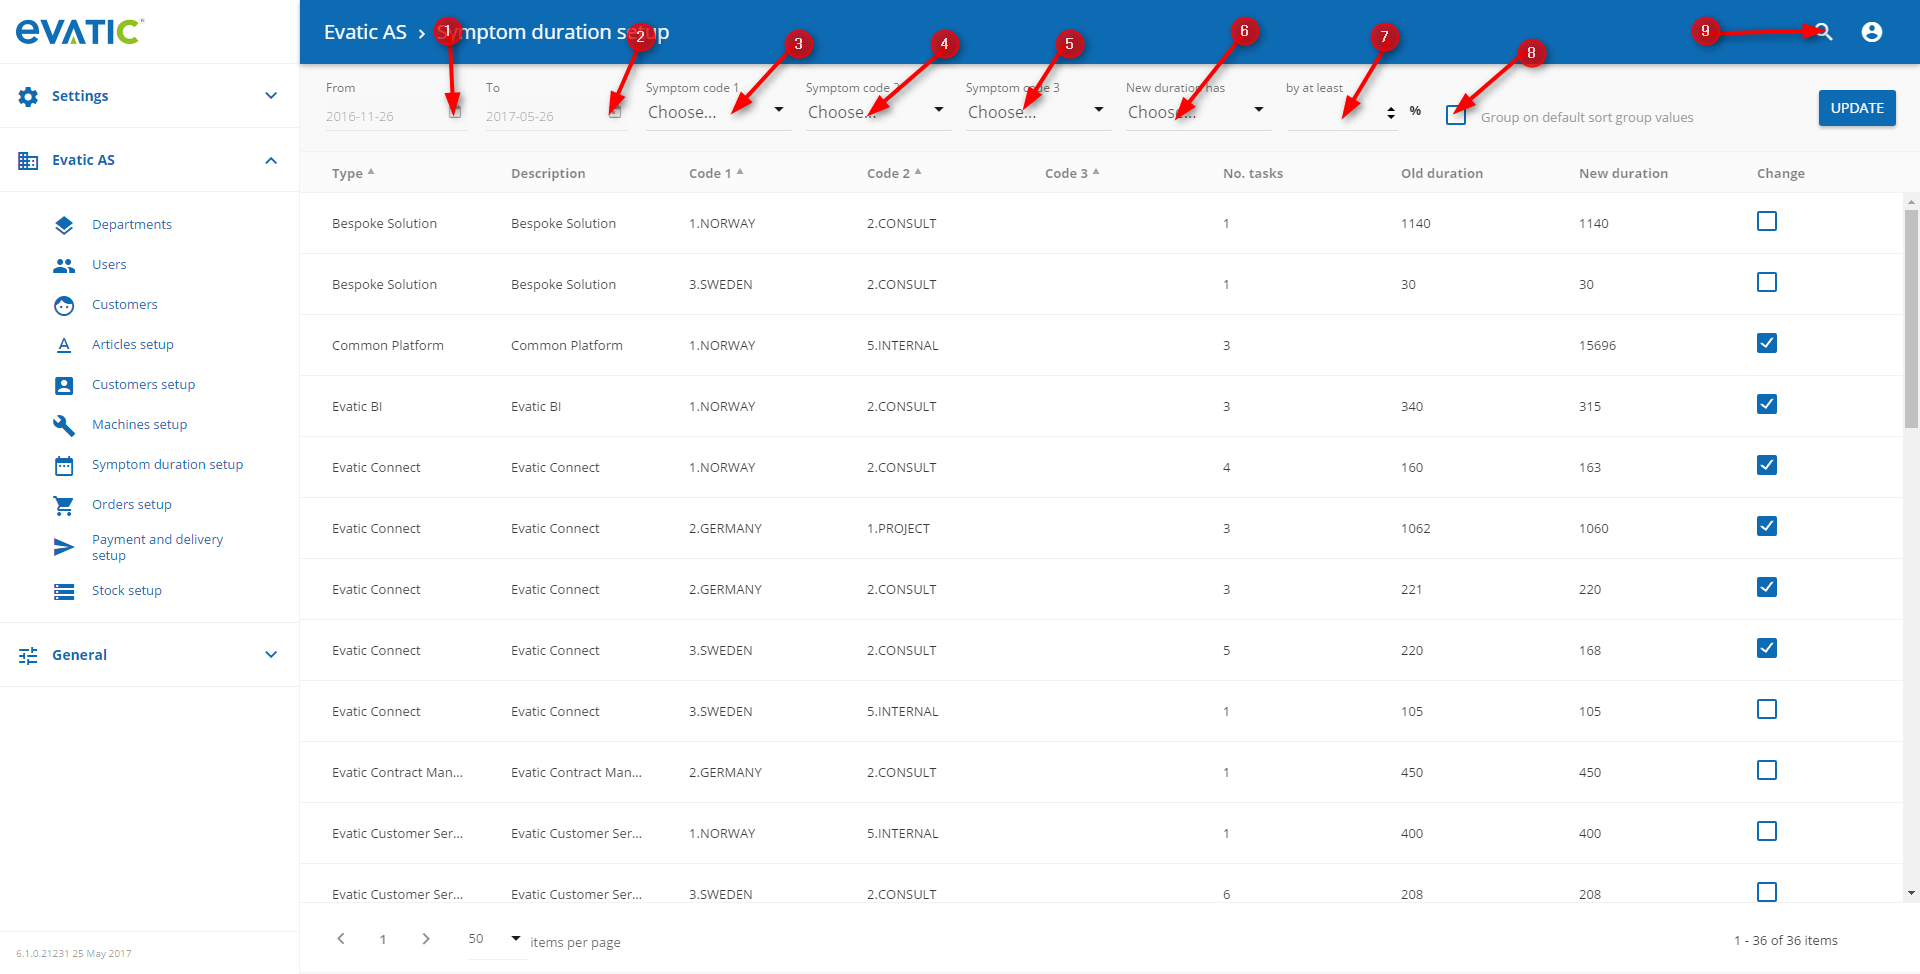
Filters task datescope on which suggested new duration will be computed. (1 and 2)
Table will contain only rows with "Code 1" equals to selected value from drop down list. (3)
Table will contain only rows with "Code 2" equals to selected value from drop down list. (4)
Table will contain only rows with "Code 3" equals to selected value from drop down list.(5)
Rows in table are additionally grouped by model sort groups.(8)
- You can filter rows where new duration is bigger than old duration by at least x%. Or you can show rows where new duration is less than old duration by at least x%. (6 and 7) Table below describe how table should look like for various combination of values in table and selected filter.
Row number Old duration New Duration Value increased Percentage diff Filter type Filter value Is it displayed in table? Why 1 4 8 true 100 Increased 100 yes Value increased and filter type = Increased and Percentage diff >= 100 2 8 4 false 50 Increased 100 no Value decreased ("Value increased" = false) 3 10
5 false 50 Decreased 50 yes Filter type = Decreased and Percentage diff >= 50 4 8 1 false 87,5 Decreased 50 yes Value decreased and filter type = Decreased and Percentage diff >= 50 5 5 10 true 100 Decreased 50 no Filter type = Decreased 6 2 12 true 500 Increased 200 yes Value increased and filter type = Increased and and Percentage diff >= 200 7 doesn't exists Any value true +infinity Increased Any value yes Value increased and filter type = Increased 8 doesn't exists Any value true +infinity Decreased Any value
no Value increased and filter type = Decreased
Updating rows
Table displays rows with model name, model description, symptom code 1, symptom code 2, symptom code 3. System suggest new duration and fill it in editable field in column 'New duration'. You can change new duration value by clicking at value (1). To commit changes to database you need press 'Update' button (3). Only rows with selected 'Change' checkbox (2) will be updated after press 'Update' button. Only rows with old duration different to new duration are selected by default. To update row, change 'new duration' value and check checkbox in 'Change' column (2). To exclude row from changes make checkbox not checked.
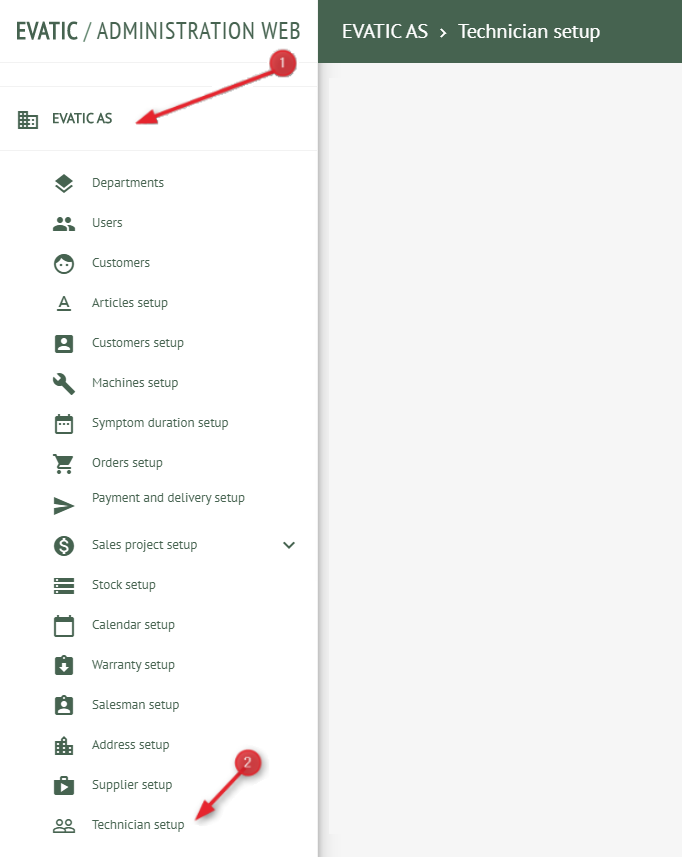
Technician setup
The Technician setup window gives you the possibility to add/change values for sort groups, teams and technicians.
Expand Company menu (1), then select Technician setup (2)
Service/HelpDesk Teams
Please click on this link to read about teams for technicians.
Sort groups management
Please click on this link to read about technicians sort groups.
Warranty setup
Please click on this link to read about warranty settings.
Roles
Please click on this link to read about User's roles.
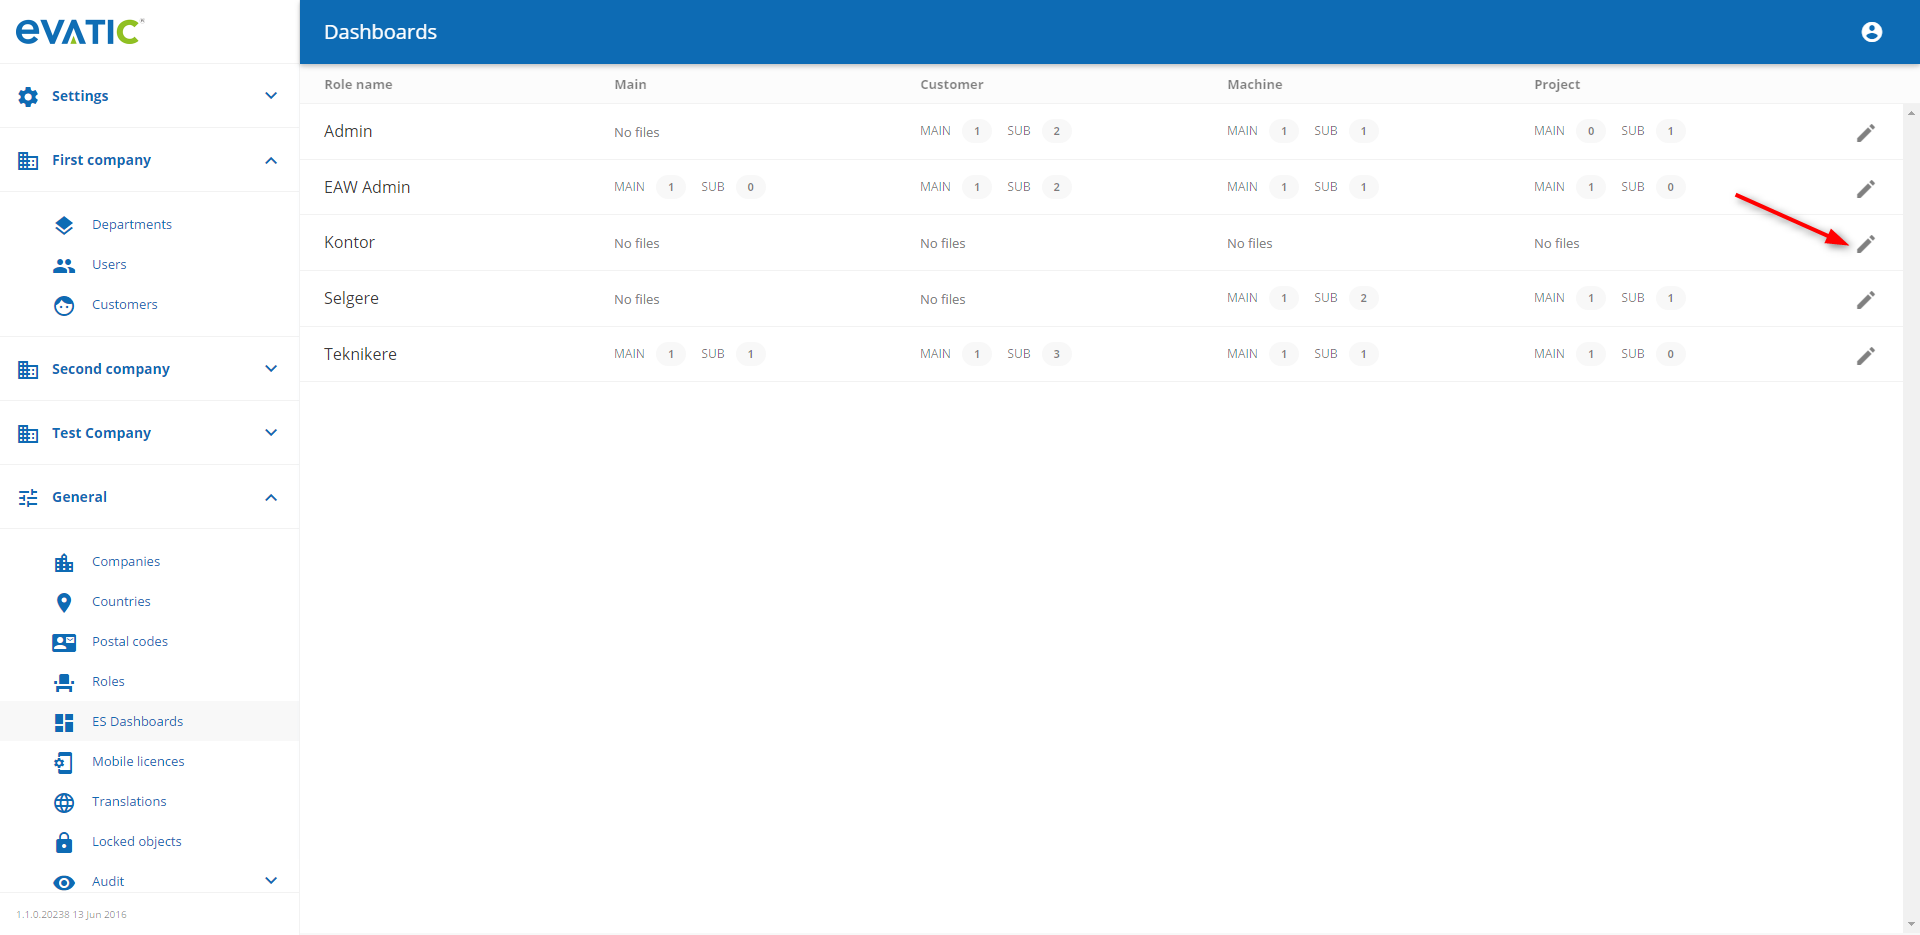
ES Dashboards
Adding / removing of Evatic Service dashboard files.
Display uploaded dashboard files
Expand General menu (1), then click on ES Dashboards (2). Table presents all stored user roles and groups of dashboards: Main, Customer, Machine, Project. If there are any files uploaded in a given group, then the their quantity is displayed near the group name (see label 3).

Upload dashboard file
Go to ES Dashboards, click on Edit button of selected role (1).
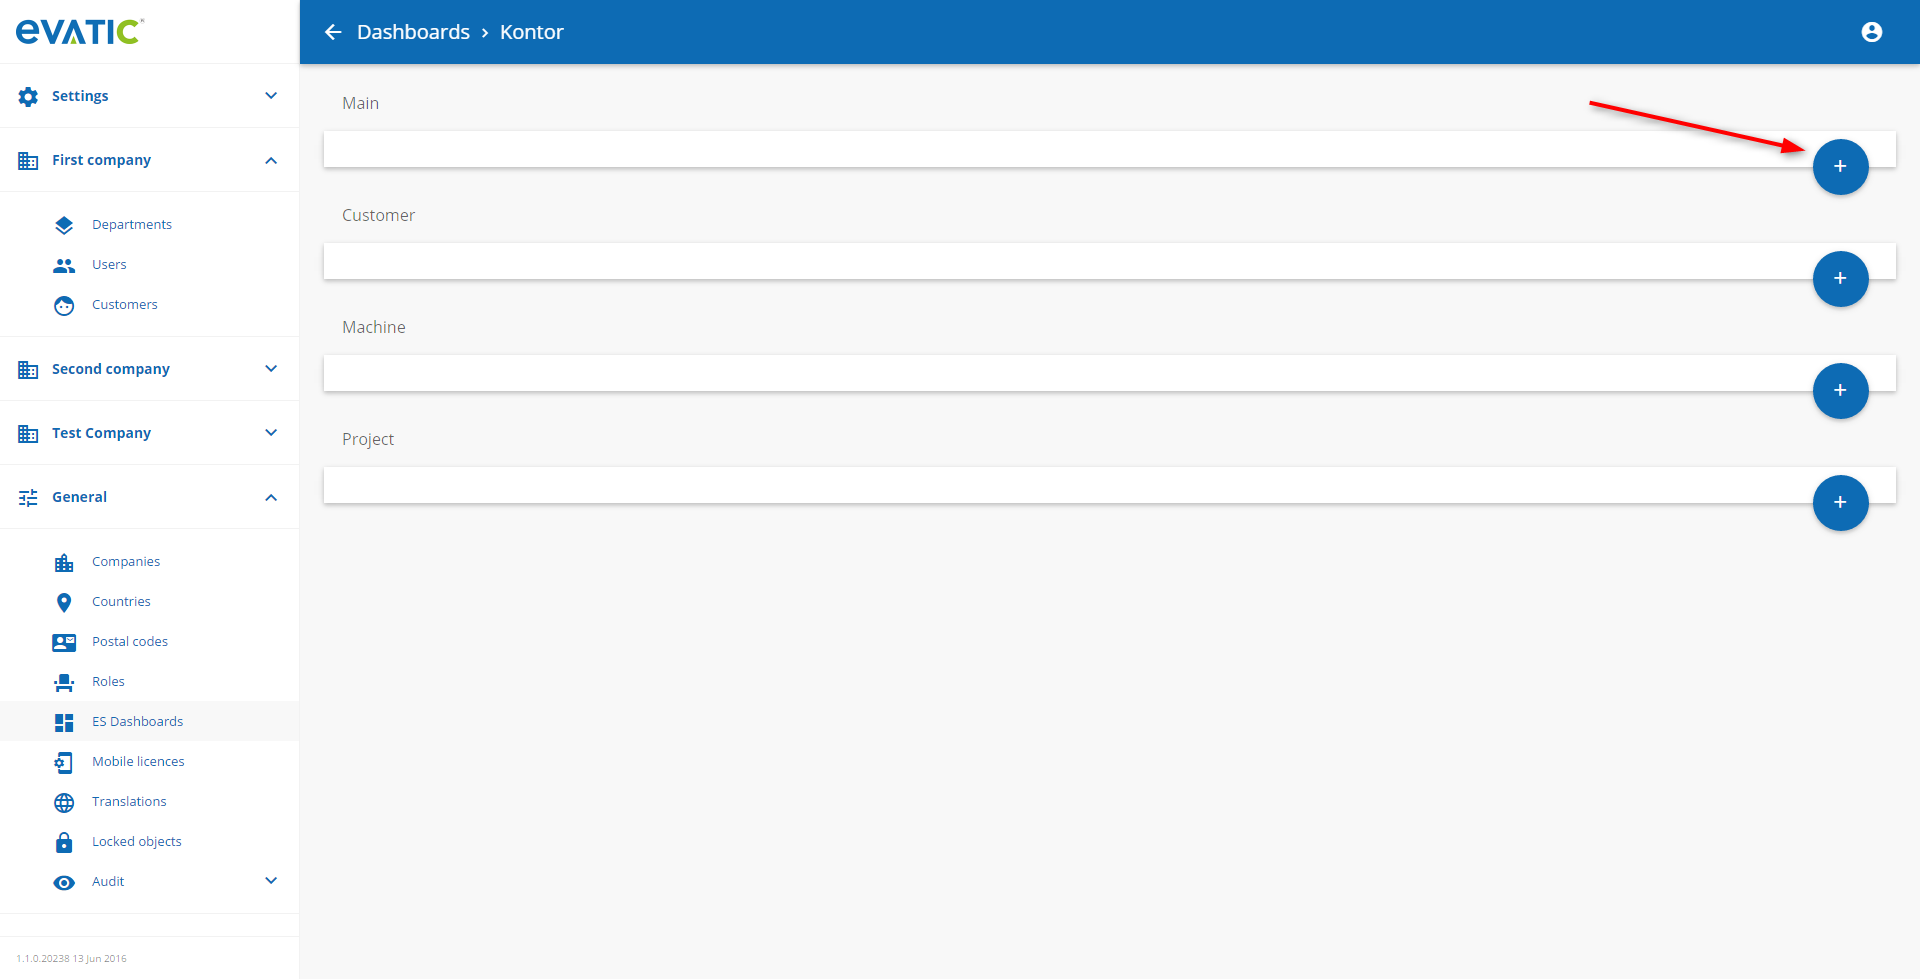
Click on Add button (Plus sign icon) in the group where file should be stored. In popup window select .RDL file (2).
Every first upload in the group is set as main file. Next uploads are set as sub dashboards. If you want to replace main file, delete existing one and upload once again.
Main files are stored with predefined names, current filename is ignored (for e.g. main file for Customer dashboards has name CUSTOMER_DASHBOARD.RDL).
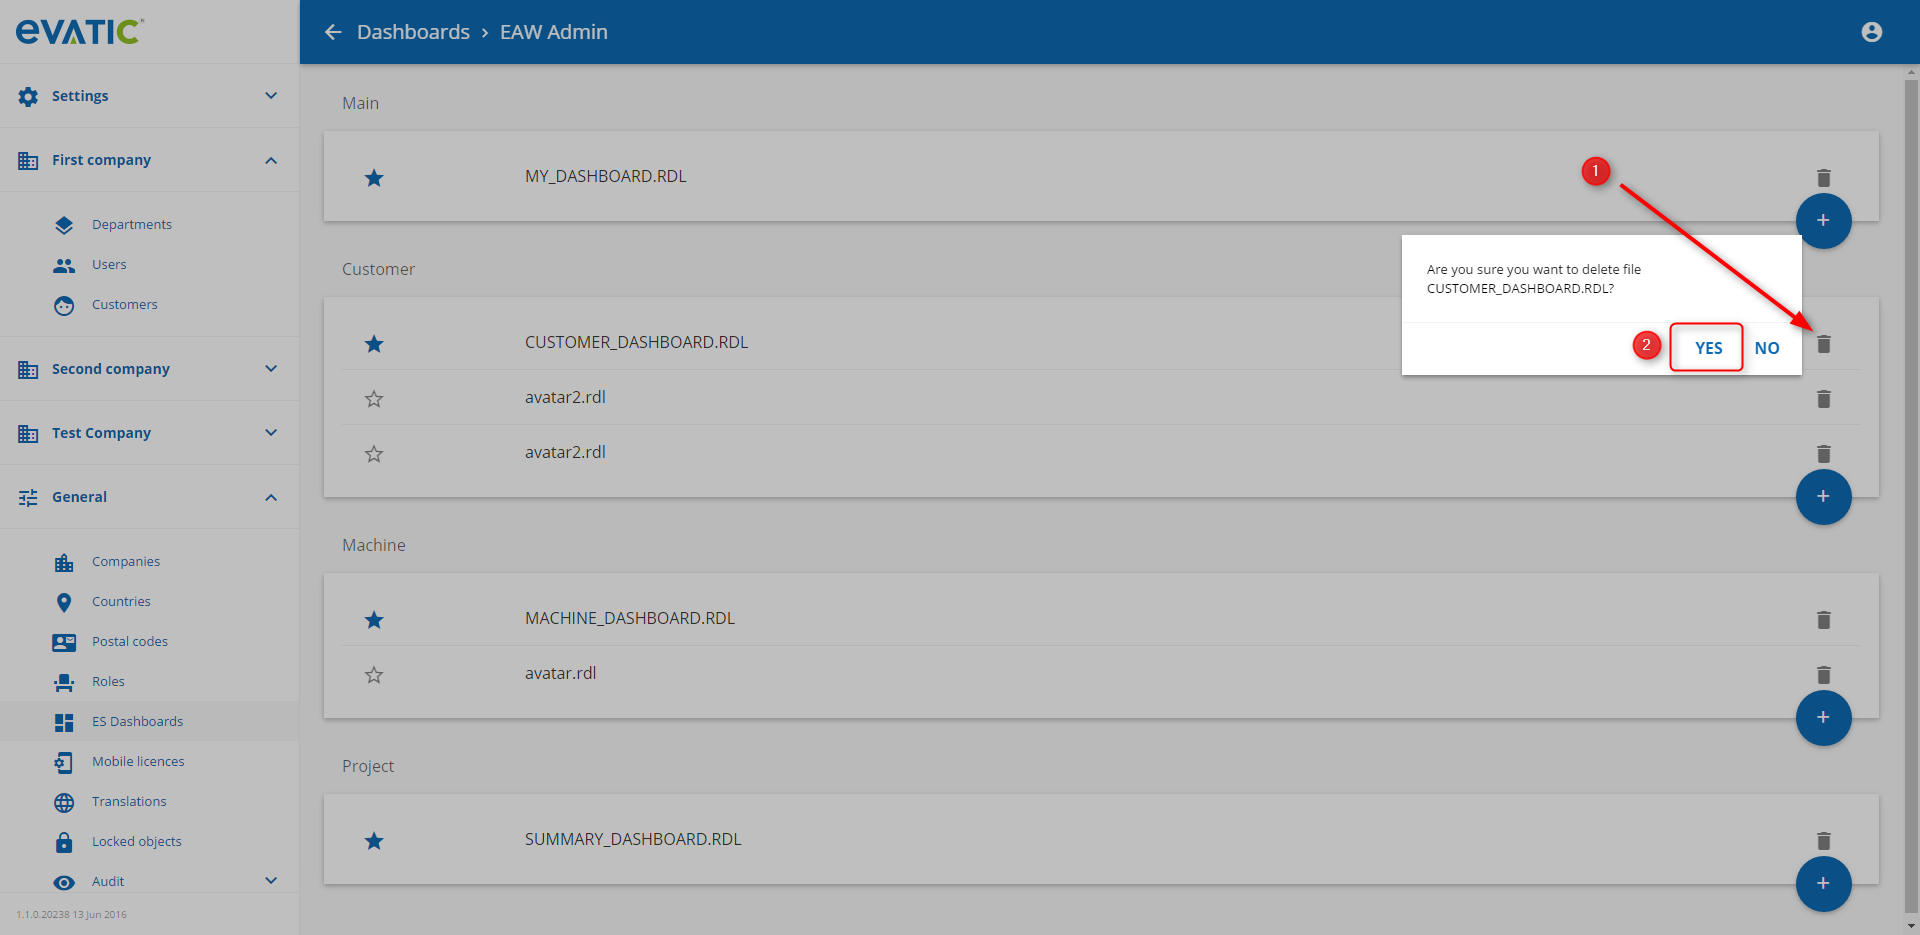
Delete dashboard file
Go to ES Dashboards, select a role and a dashboard group. Press Delete button on the file to delete (1) and confirm operation (2).
Settings
There are a few types of settings editors. Below are examples how to change values of every setting data type. In order to change settings values go to Settings (for e.g. Settings -> Company) and click on Edit icon of the selected setting.
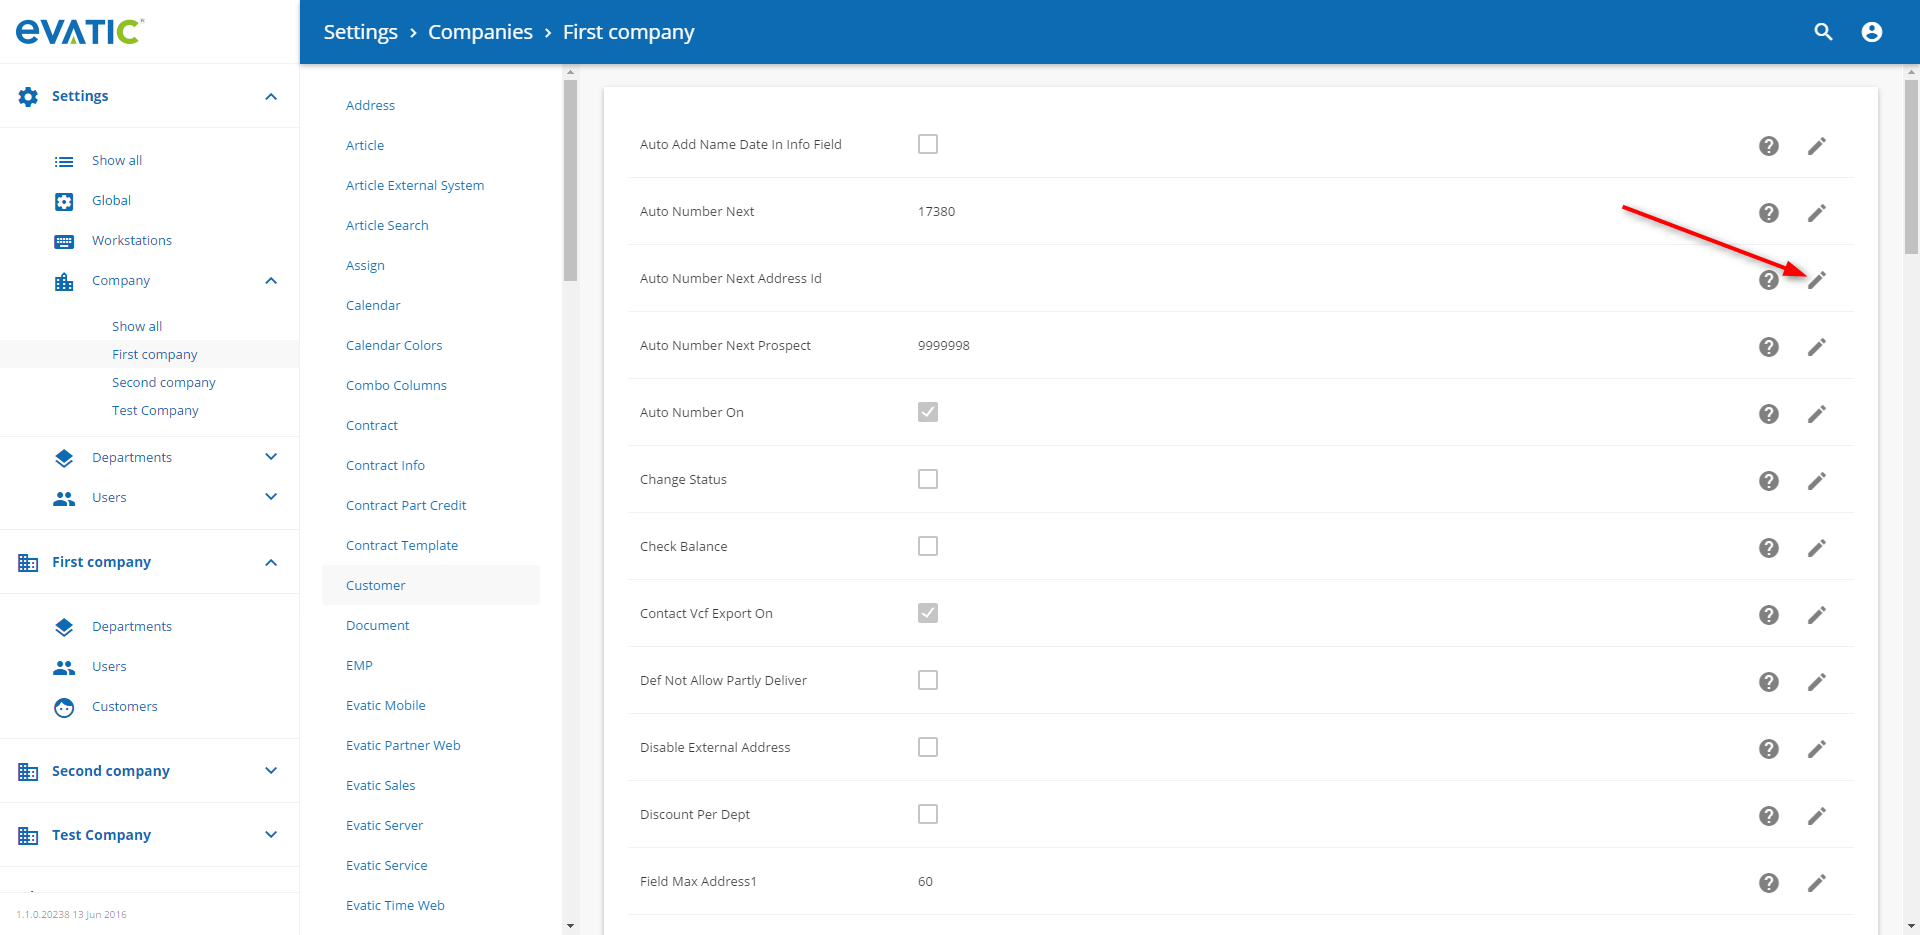
Text settings
Example setting path: Settings -> Company -> Customer -> Auto Number Next
How to change value: Type value of setting.
Editor: 
True/false settings
Example setting path: Settings -> Company -> Customer -> Auto Add Name Date In Info Field
How to change value: Click on checkbox to change value (unchecked is false, checked is true)
Editor:

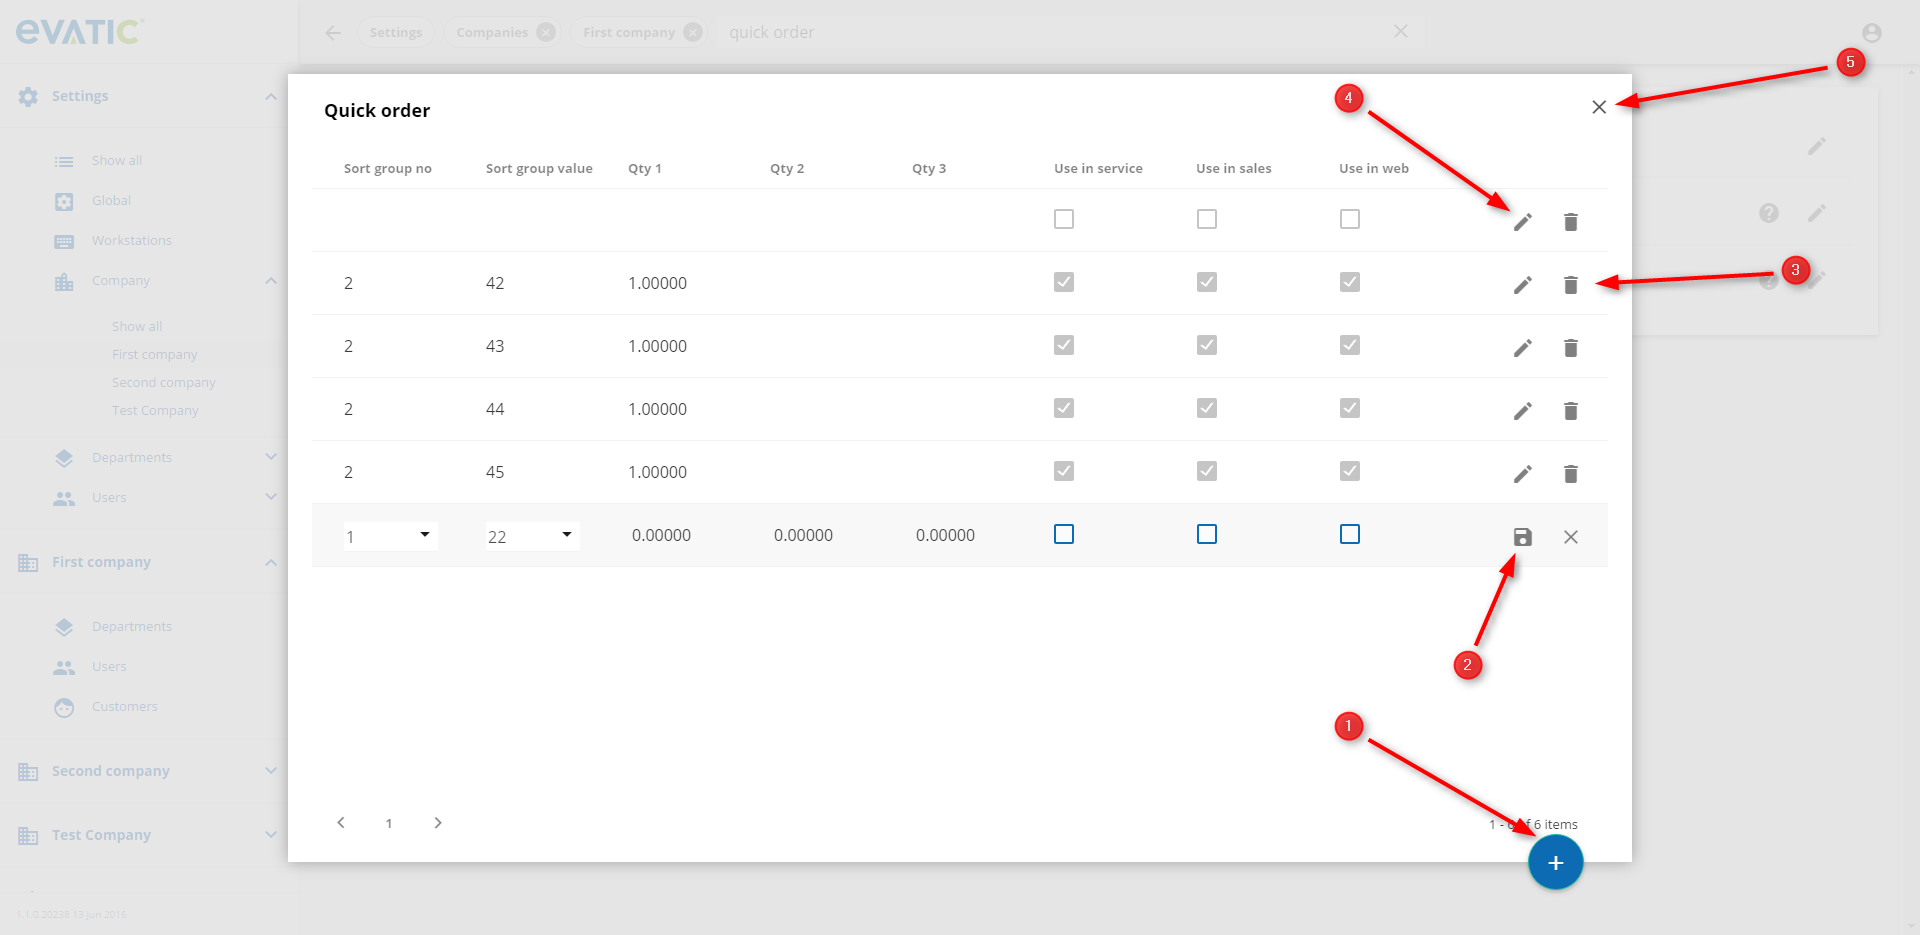
Quick Order settings
Example setting path: Settings -> Company -> Article -> Quick Order Article Default
How to change value: Popup window will open.
- To add new row click on add button (1). Sort group no and sort group value combination needs to be unique. Save it with save button (2).
- To edit row click on edit button (4). Save changes with save button (2).
- To delete row click on delete button (3).
- Close window with X button (5).
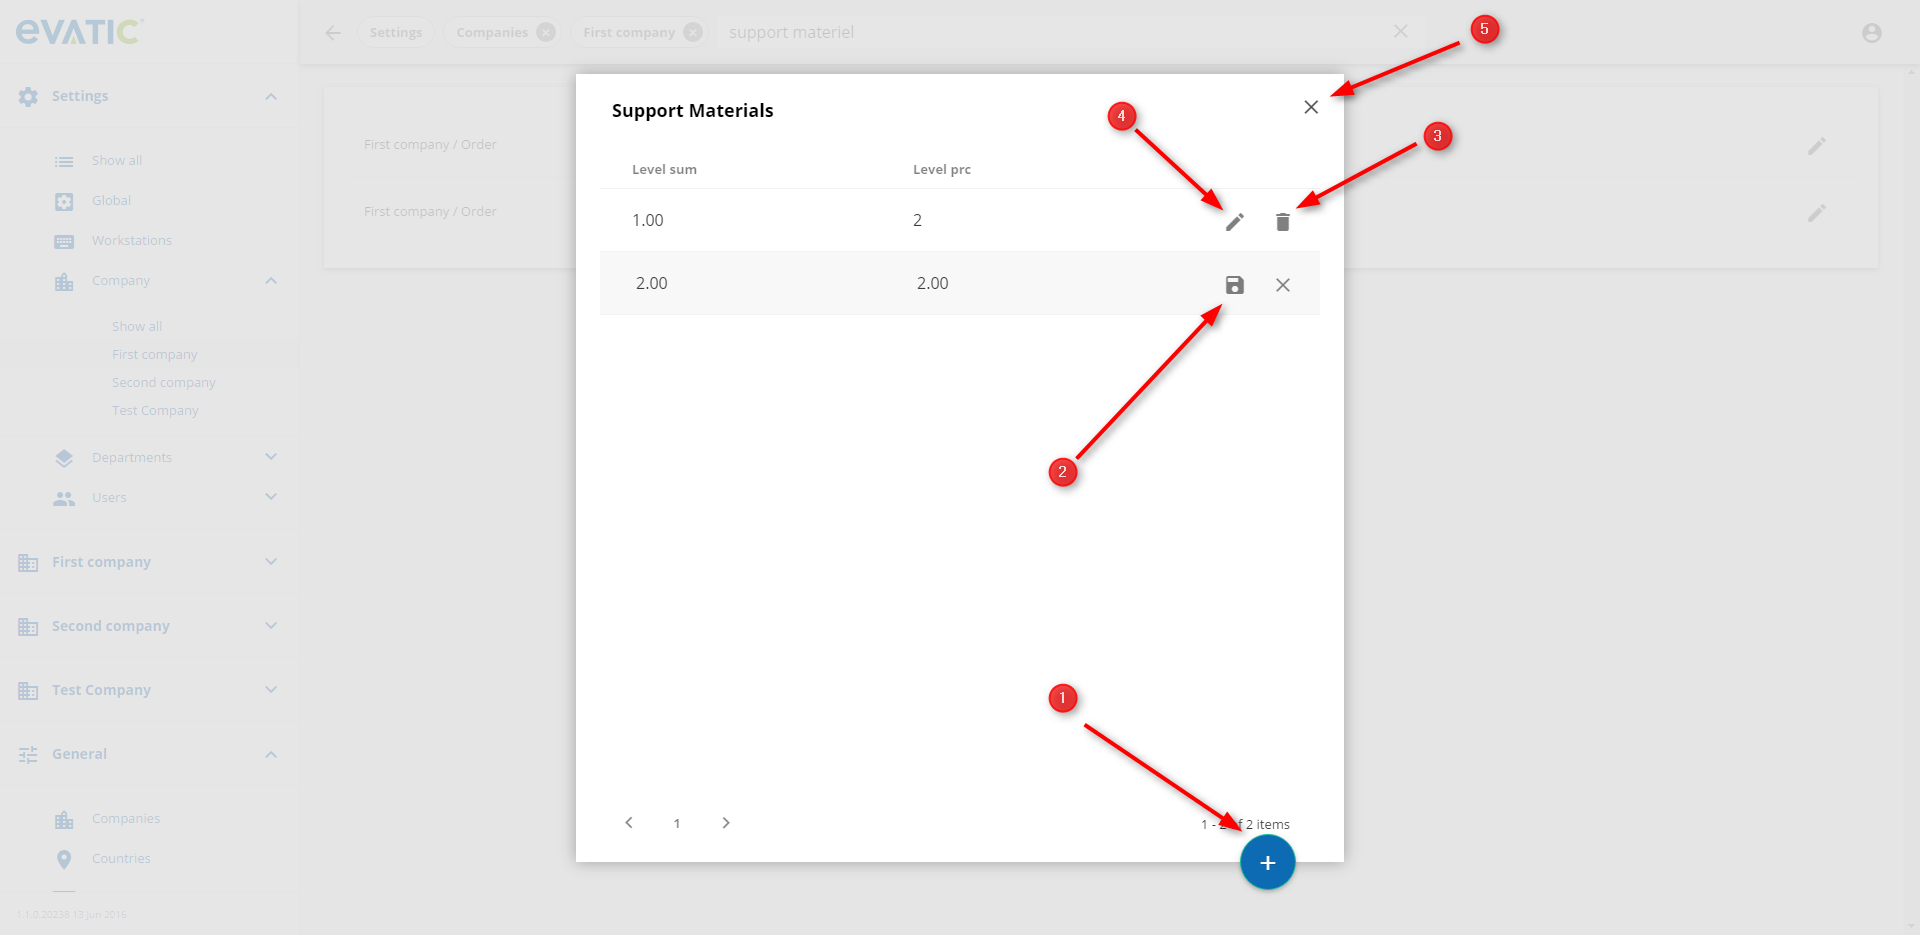
Support Material Settings
Example setting path: Settings -> Company -> Order -> Support Materiel
How to change value: Popup window will open.
- To add new row click on add button (1). Level sum value needs to be unique. Save it with save button (2).
- To edit row click on edit button (4). Save changes with save button (2).
- To delete row click on delete button (3).
- Close window with X button (5).
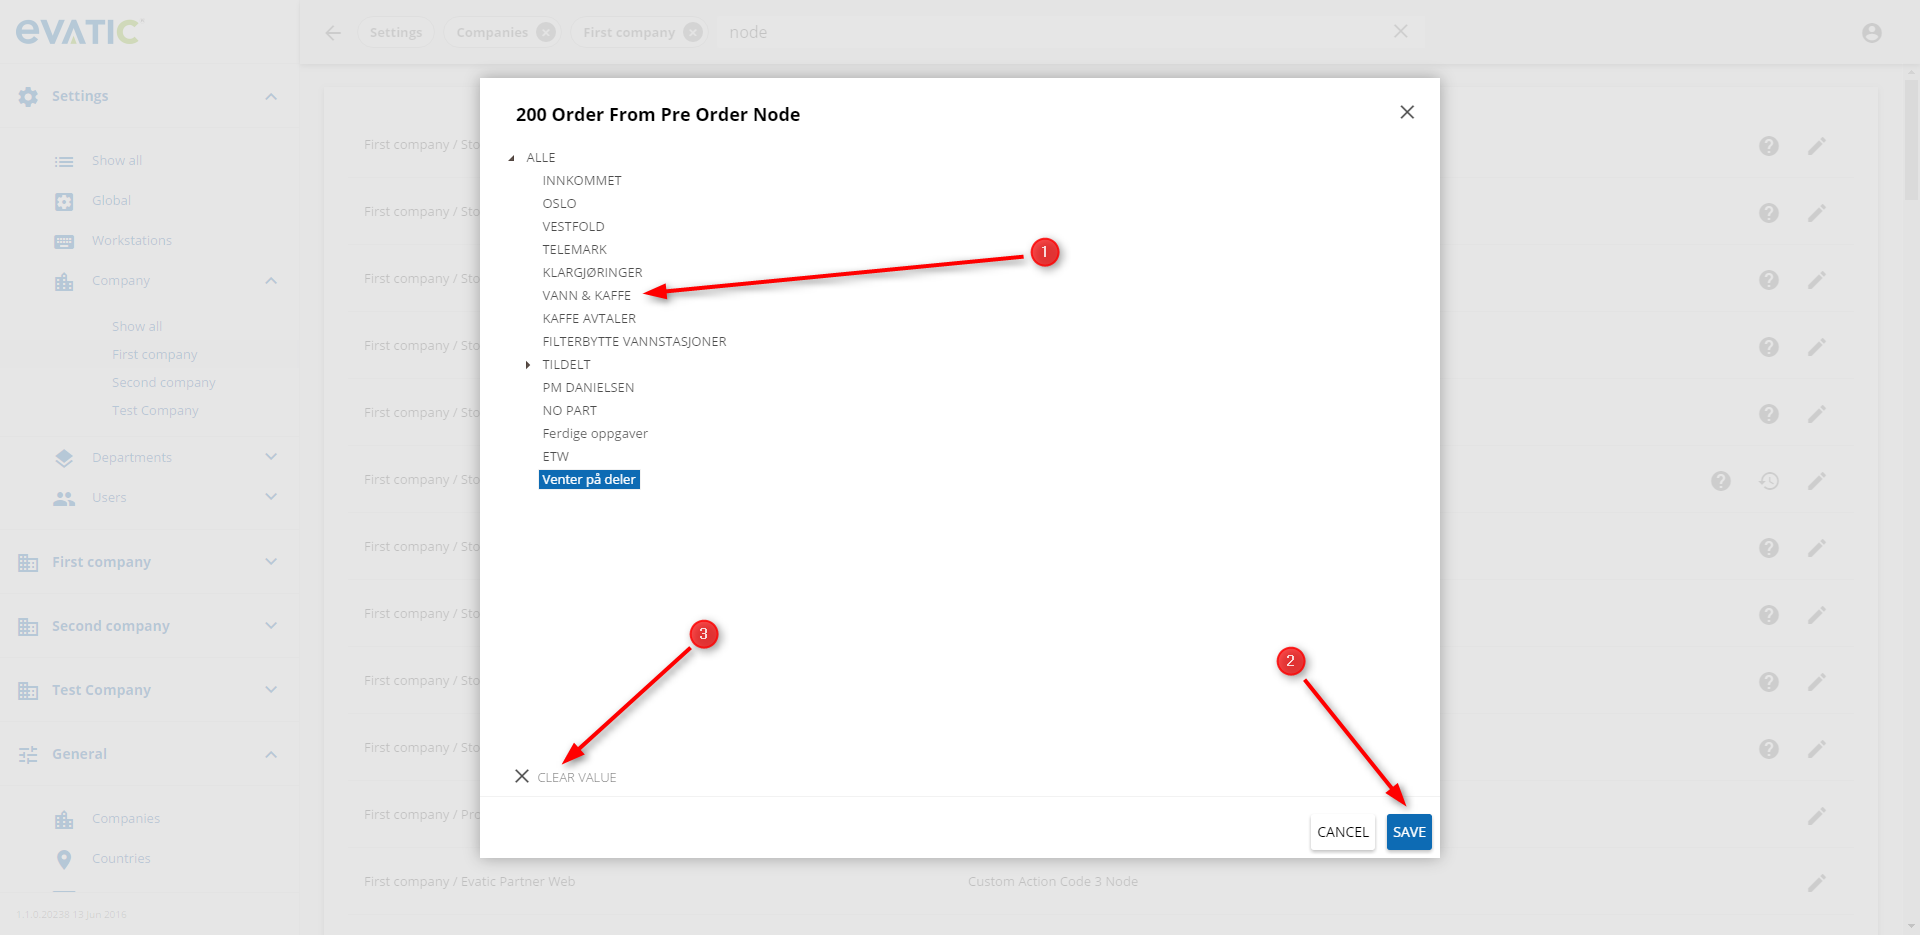
Tree settings
Example setting path: Settings -> Company -> Stock Admin Project Order -> Order From Pre Order Node
How to change value: Popup window will open.
- Select one of the nodes (1) and save value with save button (2).
- If setting has already some value and you want to set it to empty use Clear value button (3).
Settings searching
All settings search
Please click on this link to read about how to search for settings.
All companies search
Go to Settings -> Company -> Show all (1). All settings appear by default. If you want to filter results, please select the Magnifier icon (2) and enter text to search.

All departments search
Go to Settings -> Departments -> Show all. All settings appear by default. If you want to filter results, please select the Magnifier icon and enter text to search.
All users settings search
Go to Settings -> Users -> Show all. All settings appear by default. If you want to filter results, please select the Magnifier icon and enter text to search.
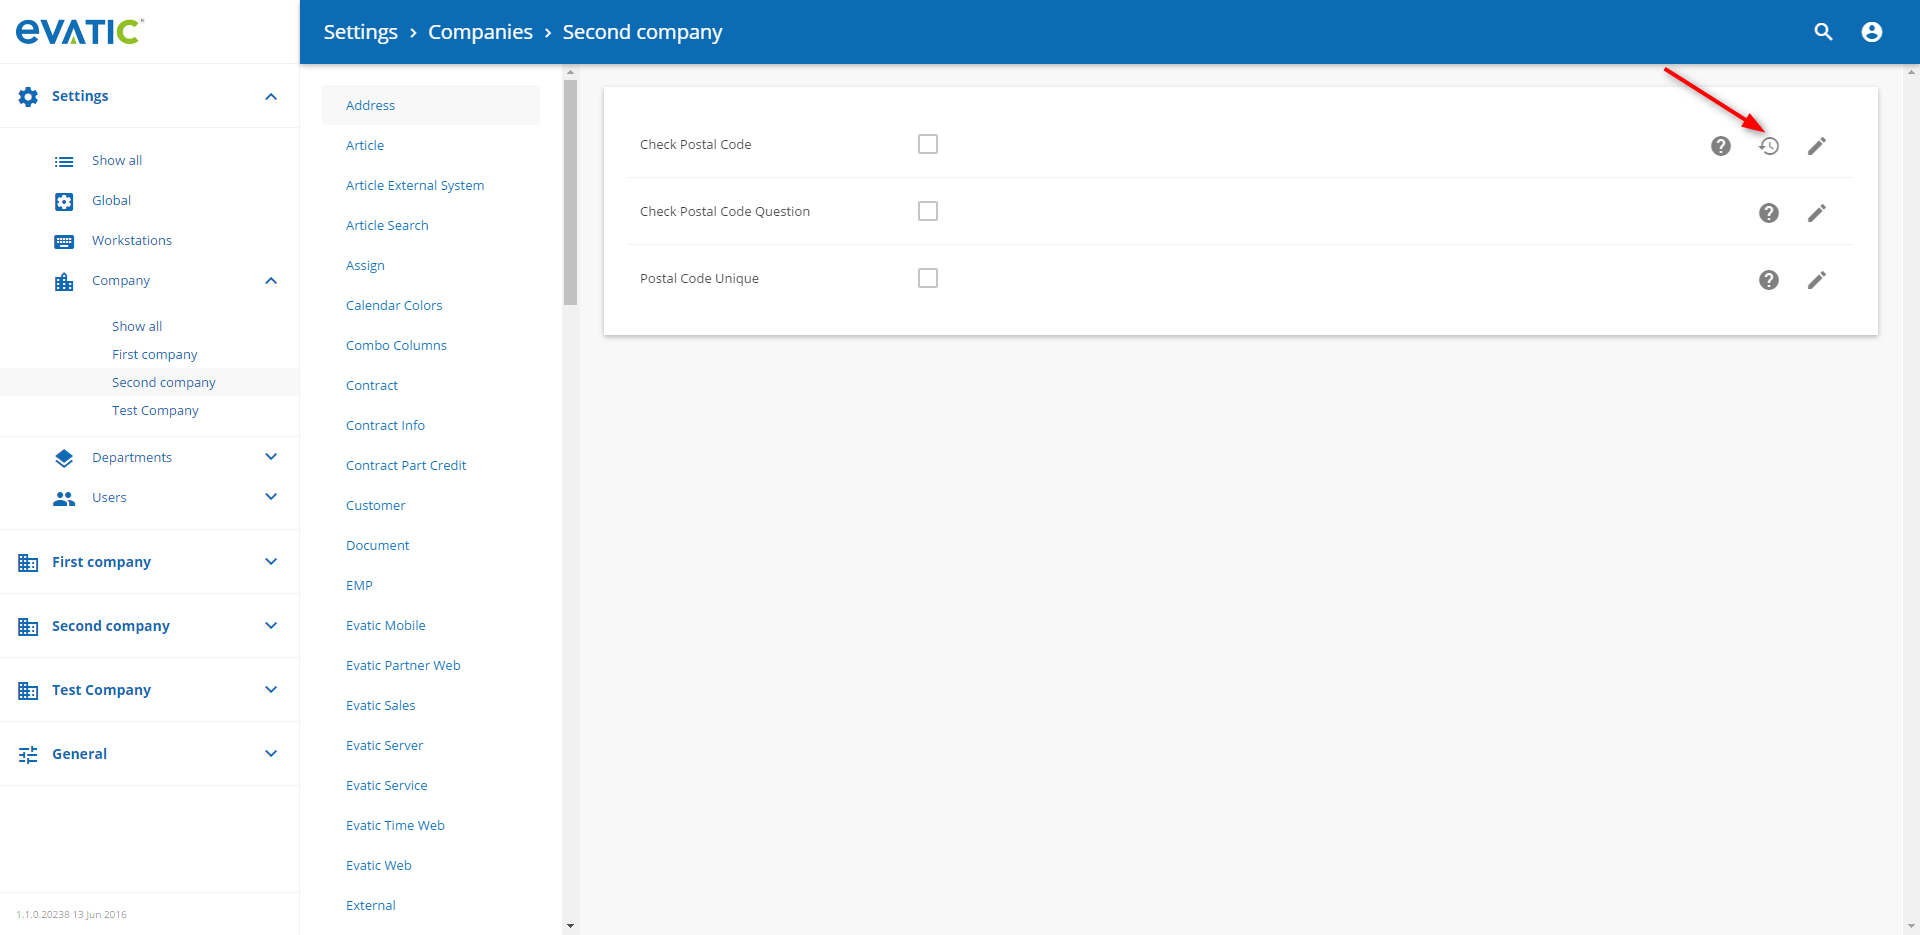
Settings audit log
All settings changes are stored in the database. If setting has been changed at least once then the Clock icon appears. Click on this icon to see the changes history of a given setting.
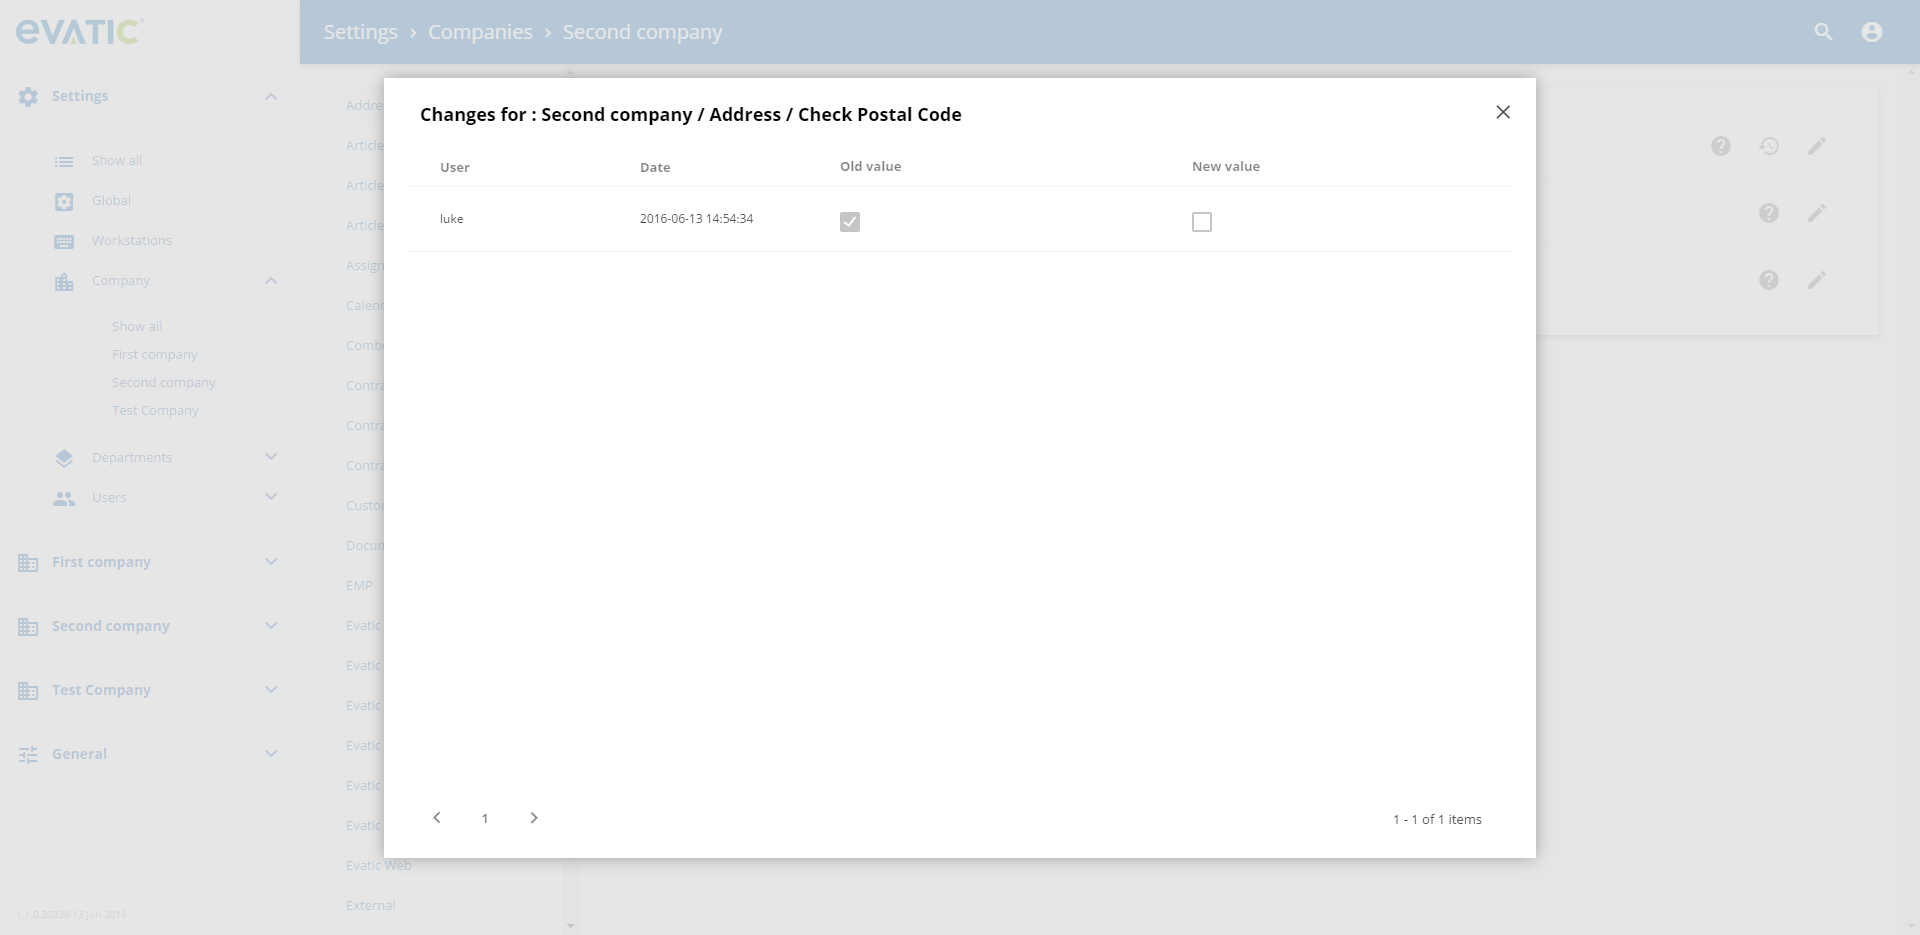
Example of changes history for setting “Check Postal Code”:
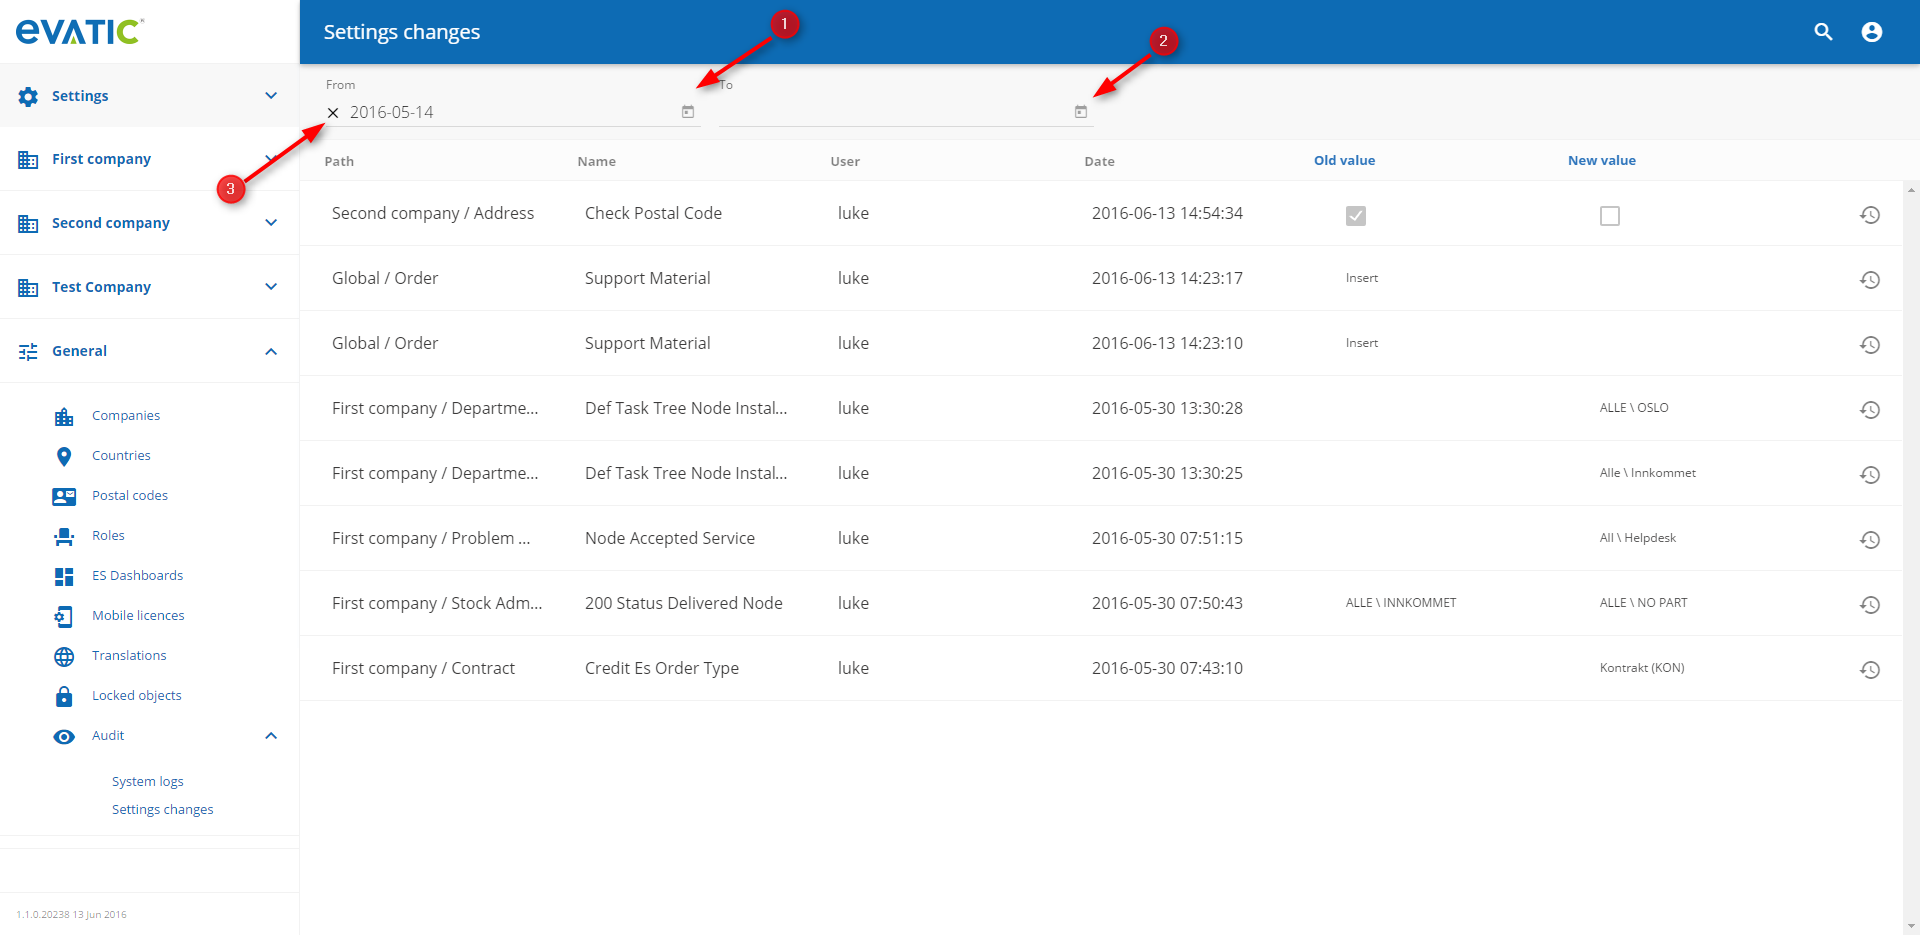
Settings changes
Changes history of all settings is presented in the Settings changes. Expand General menu then expand Audit submenu and select Settings changes.
- To filter records use Calendar icons in From (1) or To fields (2).
- To clear filter click on X icon in From or To Fields (3).
- Default From filter is set to (today’s date - 30 days)
Countries
Please click on this link to read about how to handle a list of Countries.
Postal codes
Please click on this link to read about how to handle a list of Postal codes.
Translations
Add new translation
Expand General menu (1), then click on Translations (2). To add a new translation, click on Add button (Plus sign icon) (3).
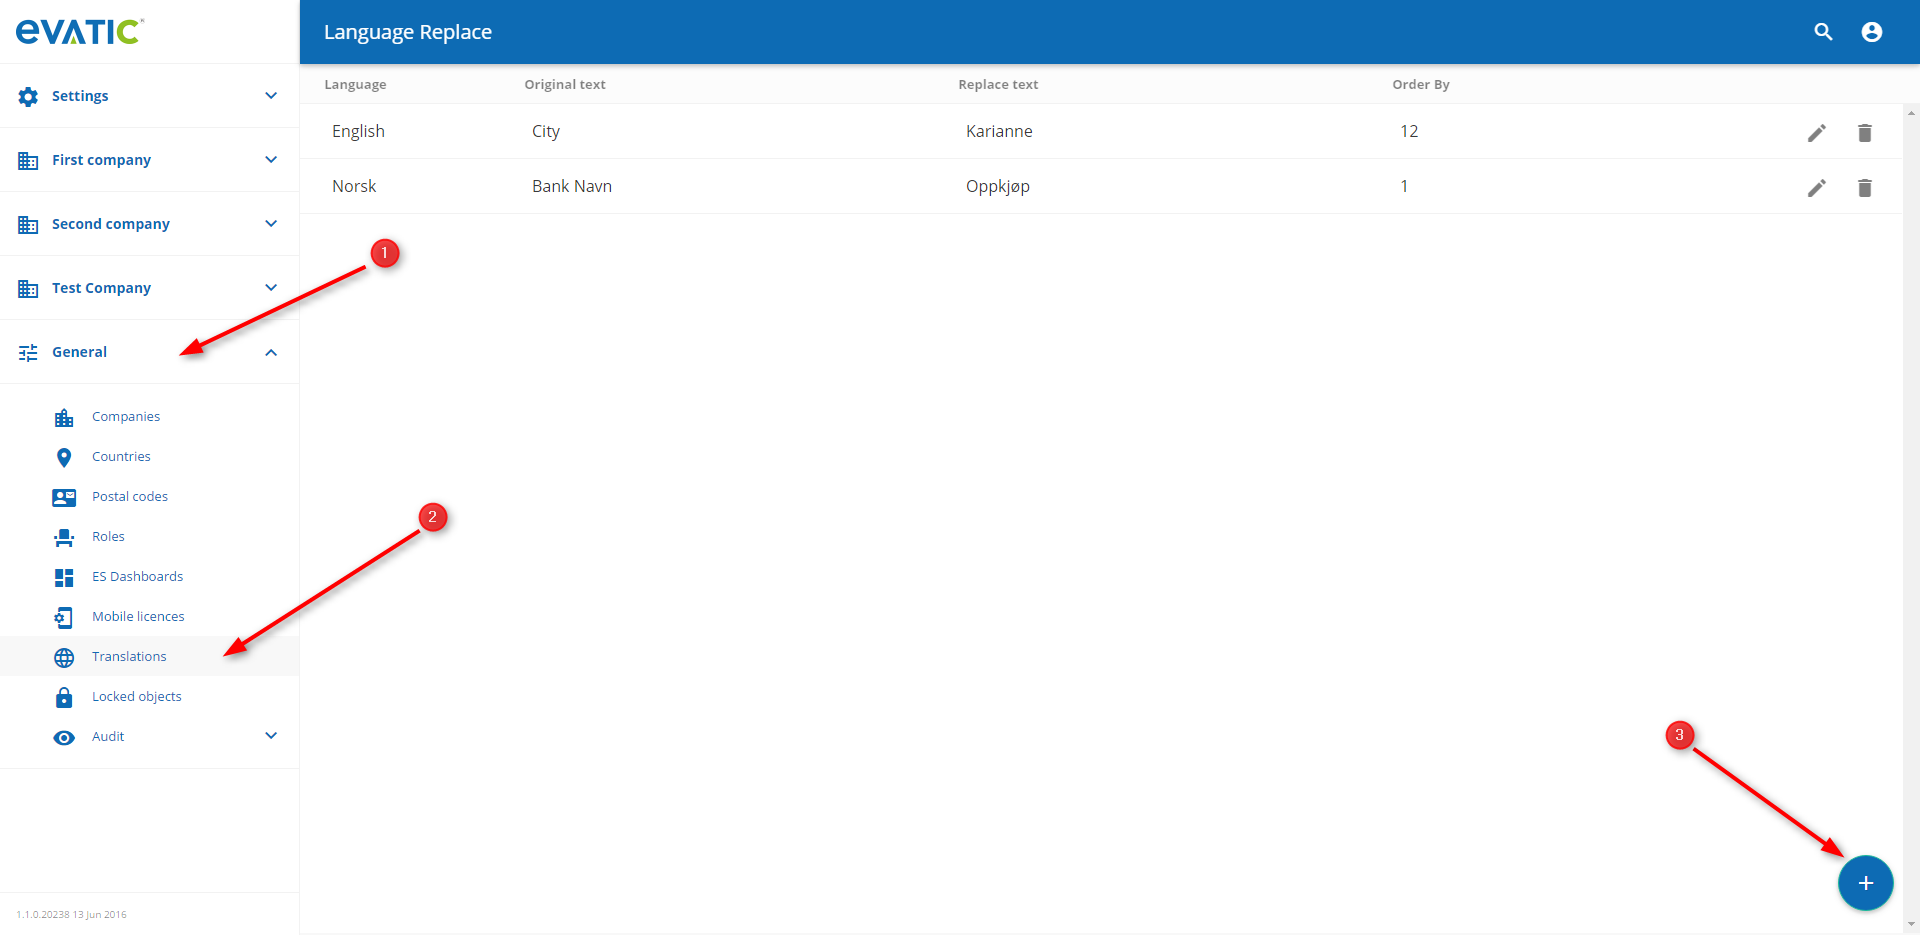
Enter Language (required), Original text (required) and Replace text (required), order by (optional). Confirm changes with click on Save button.
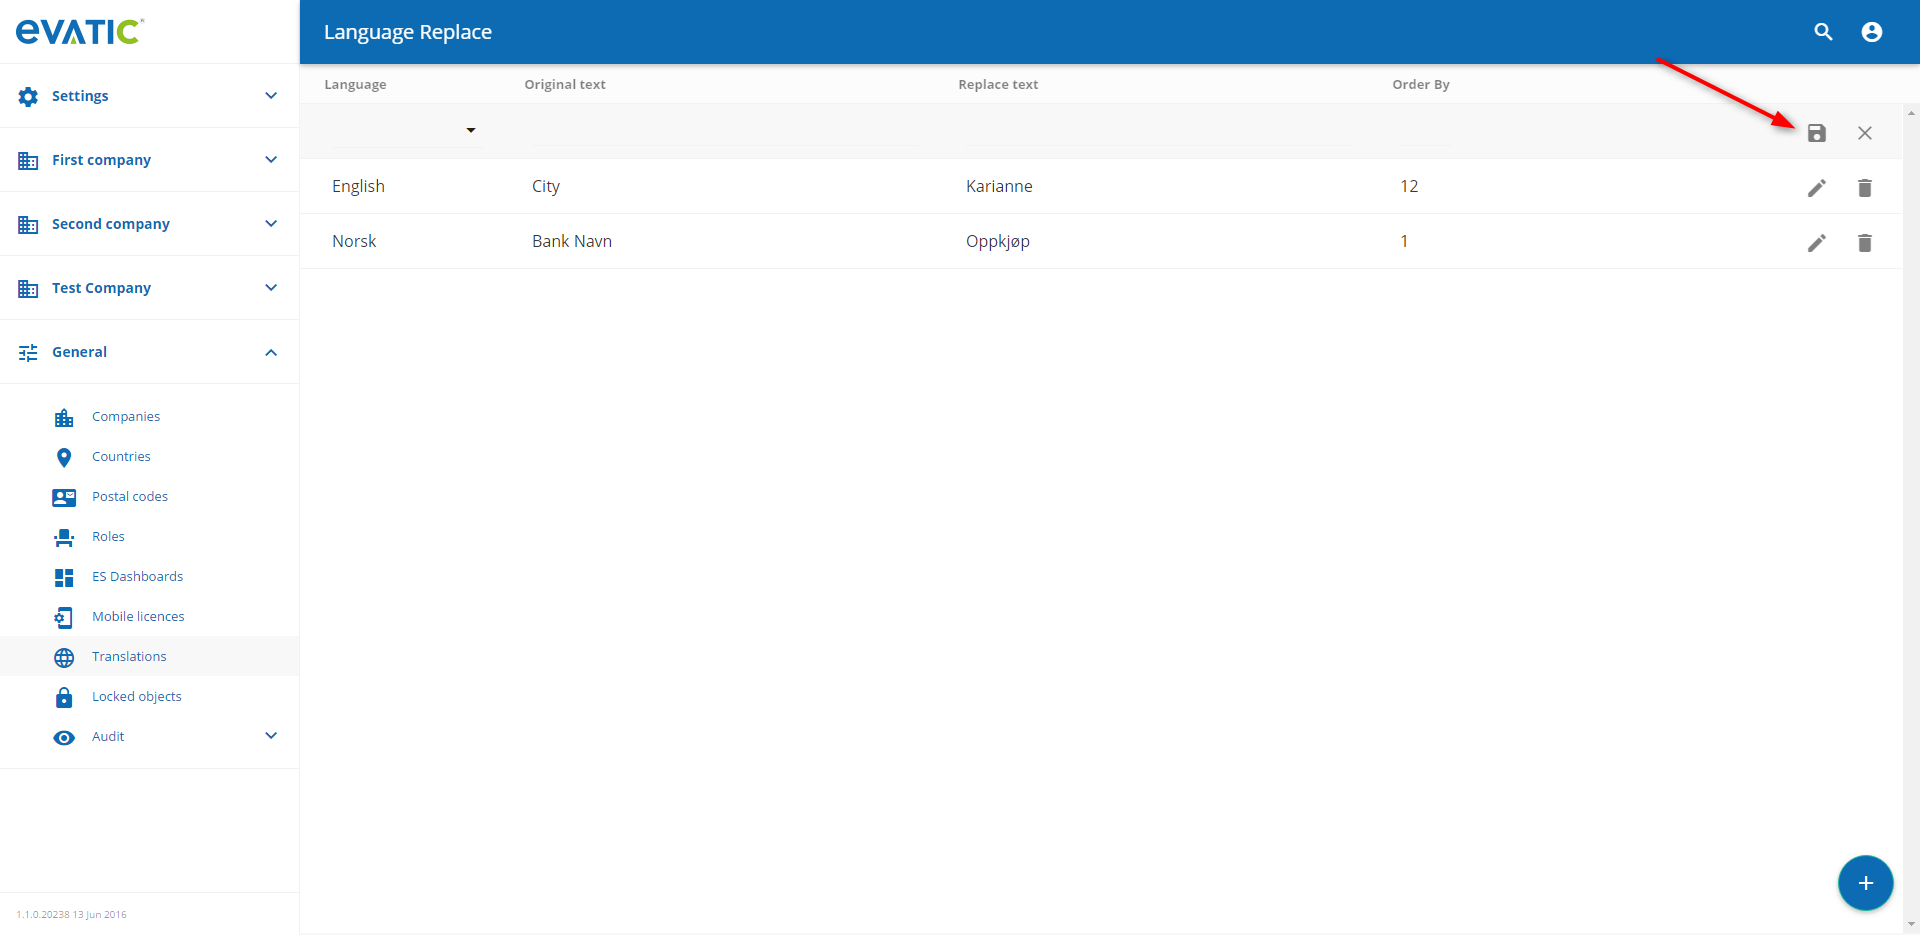
Edit translation
Click Edit button (Pencil icon) on a selected country to enter edit mode. Save changes with Save button.
Remove translation
Click on Delete button (Trash icon) (1) and confirm the operation (2).

Mobile licenses
Please click on this link to read about how to handle ems licences.
Set planner nodes
Click on Note icon to set planner nodes.
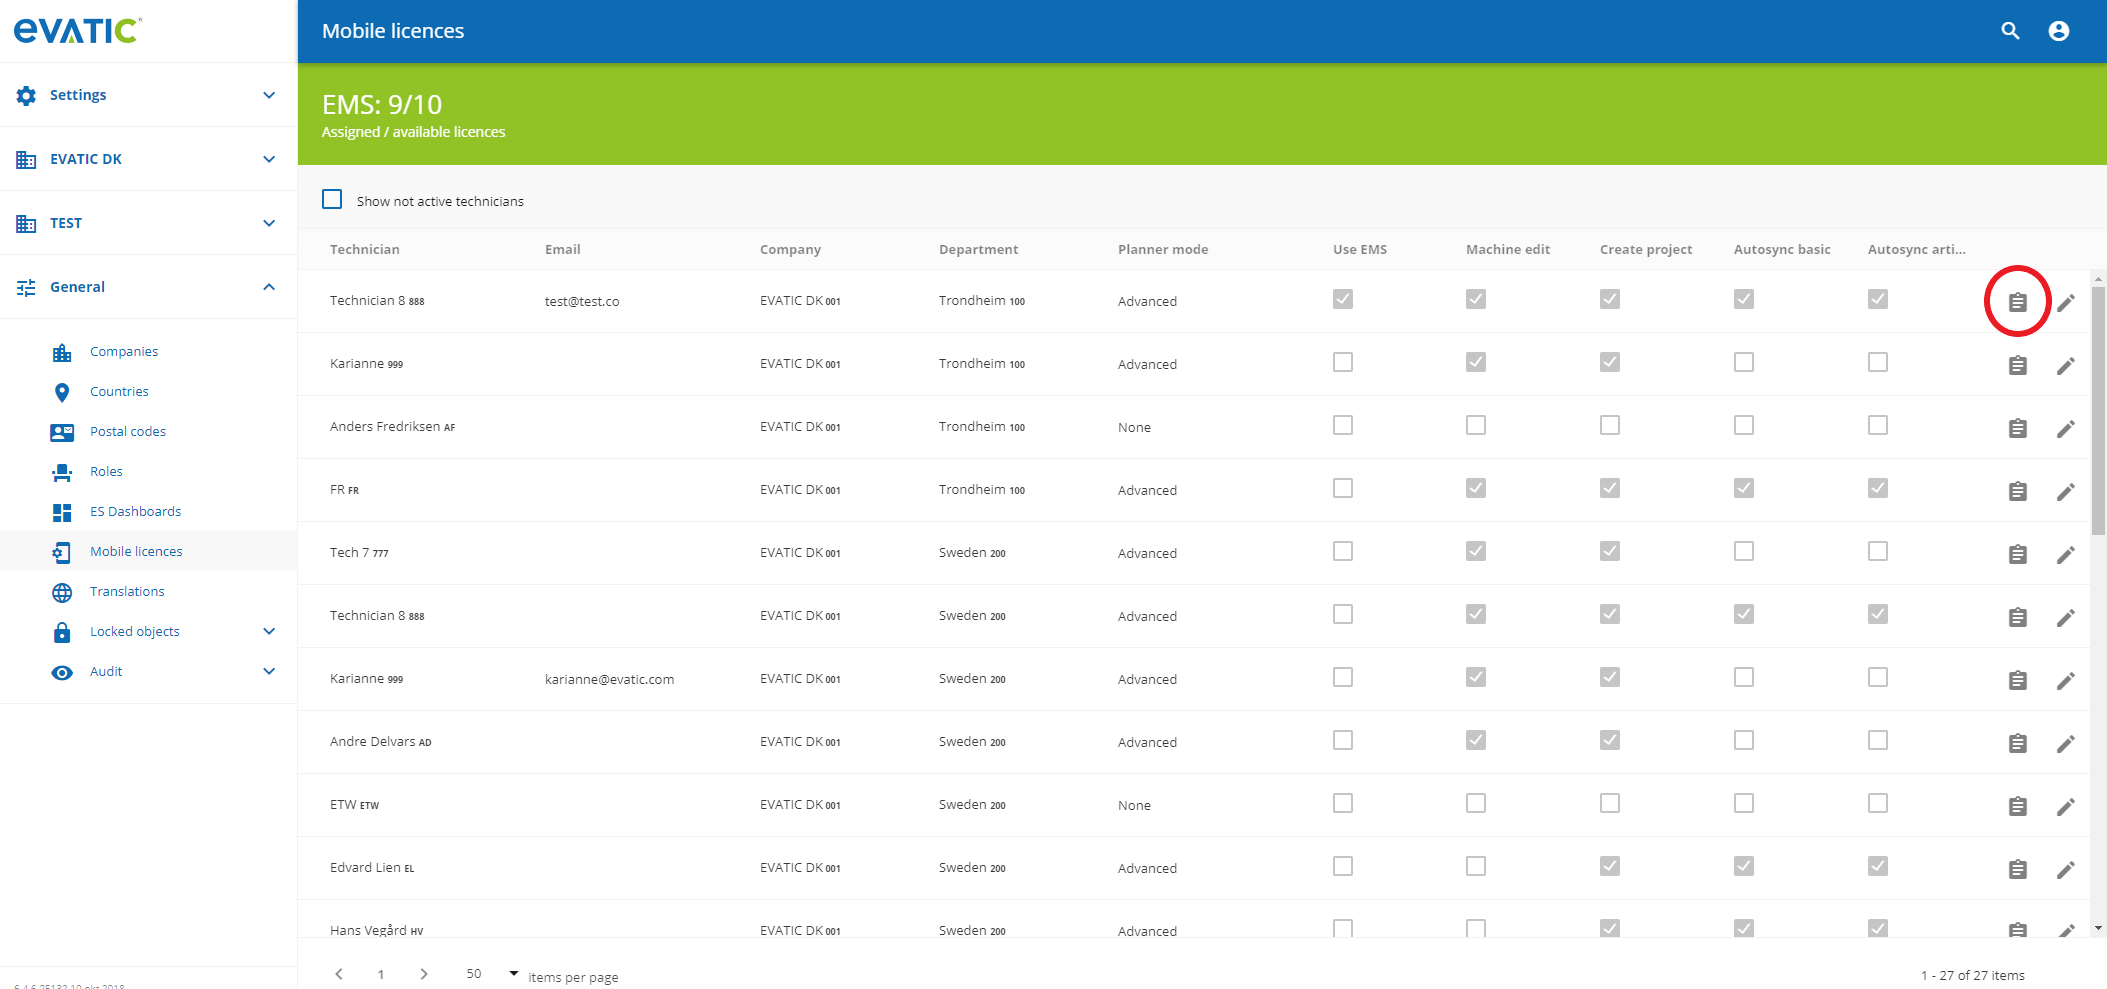
Set nodes with click on checkbox near the label and save changes with Save button.

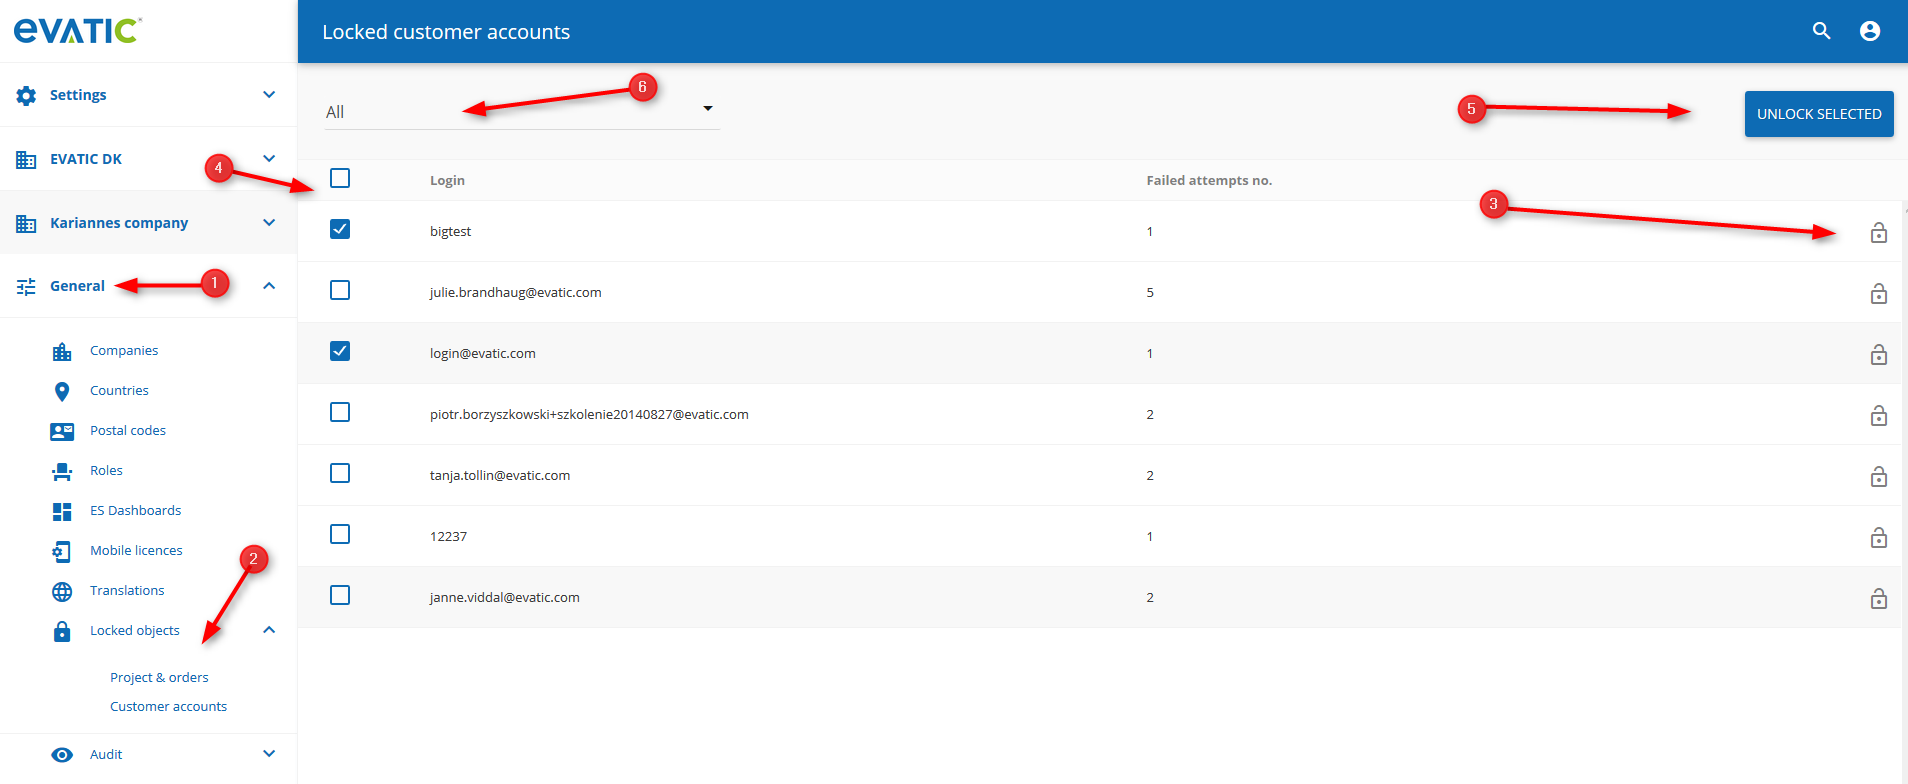
Locked objects
Locked objects contains info on blocked projects / orders and customer accounts. In order to review lists of blocked items and unlock selected:
Expand General menu (1), click on Locked objects (2) and choose either Projects & orders or Customer accounts.
- To unlock one selected object, click on locker icon (3)
- To unlock many objects at the same time, select objects with checkboxes (4), then click on UNLOCK SELECTED button (5)
- To filter objects by company use dropdown (6)
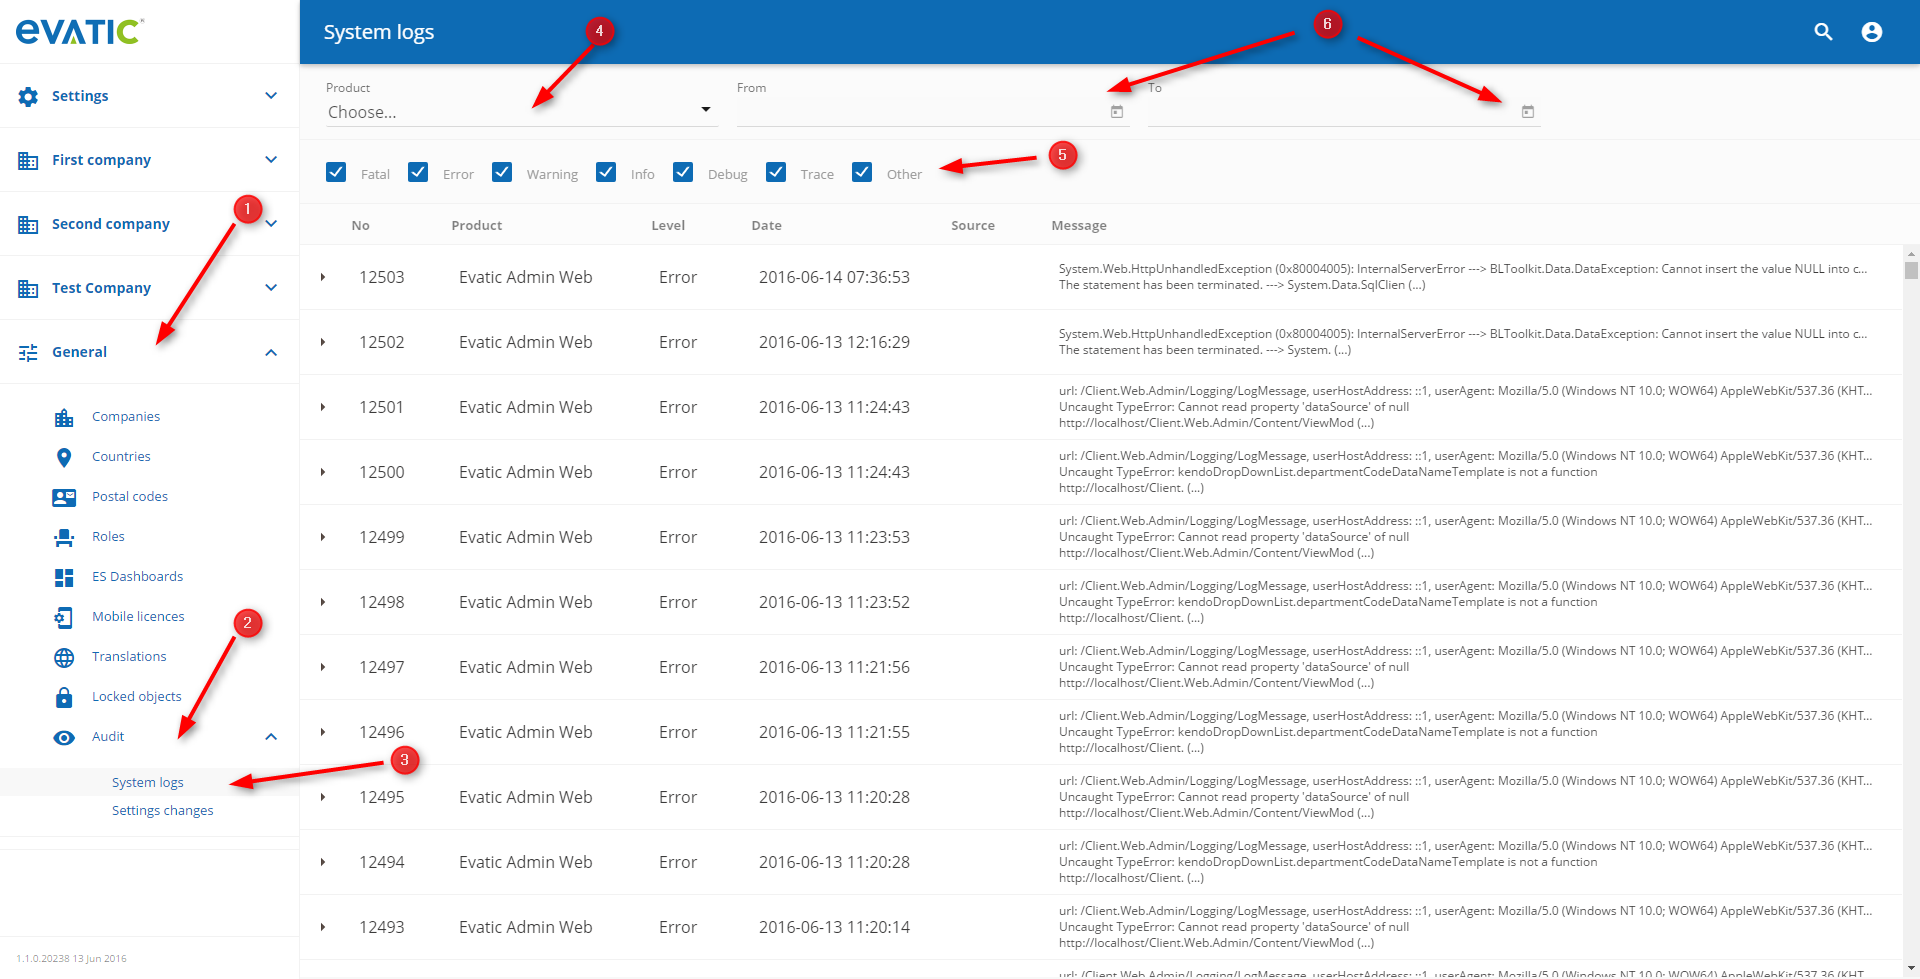
System logs
All unexpected errors and warnings are stored in System logs.
In order to view and filter System logs expand General menu (1), then expand Audit sub menu (2). Click on System logs (3).
- To filter logs by products, use dropdown (4).
- To filter by log type use checkboxes (5).
- To filter logs by date range, click on calendar icon located at from and to fields (6).
Searching on lists
Most of the list views in EAW have the Magnifier icon. When it is present, it’s possible to search the list.
Views where search is enabled
- Departments
- Users
- Customers
- Companies
- Countries
- Postal codes
- Roles
- Mobile licenses
- Translations
- Locked objects
- System logs
- Settings changes
How to search
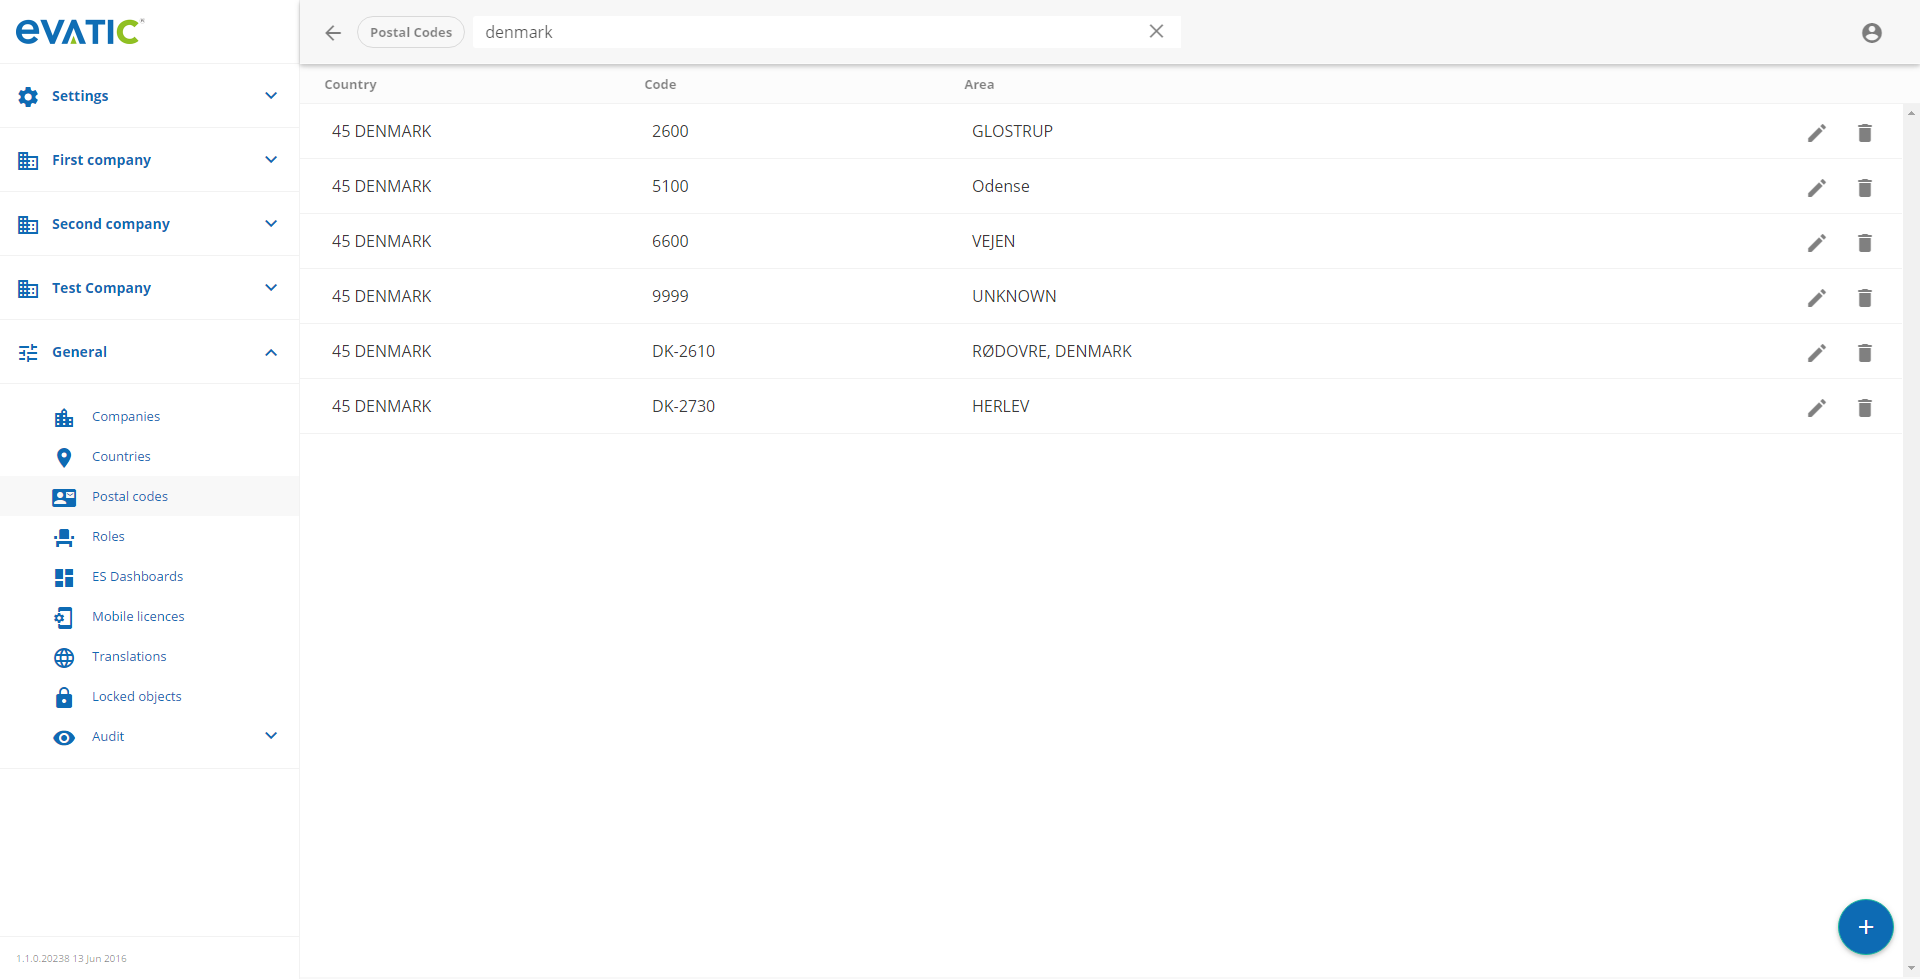
Example on postal codes list. Go to General (1) -> Postal codes (2). Click on magnifier icon (3).
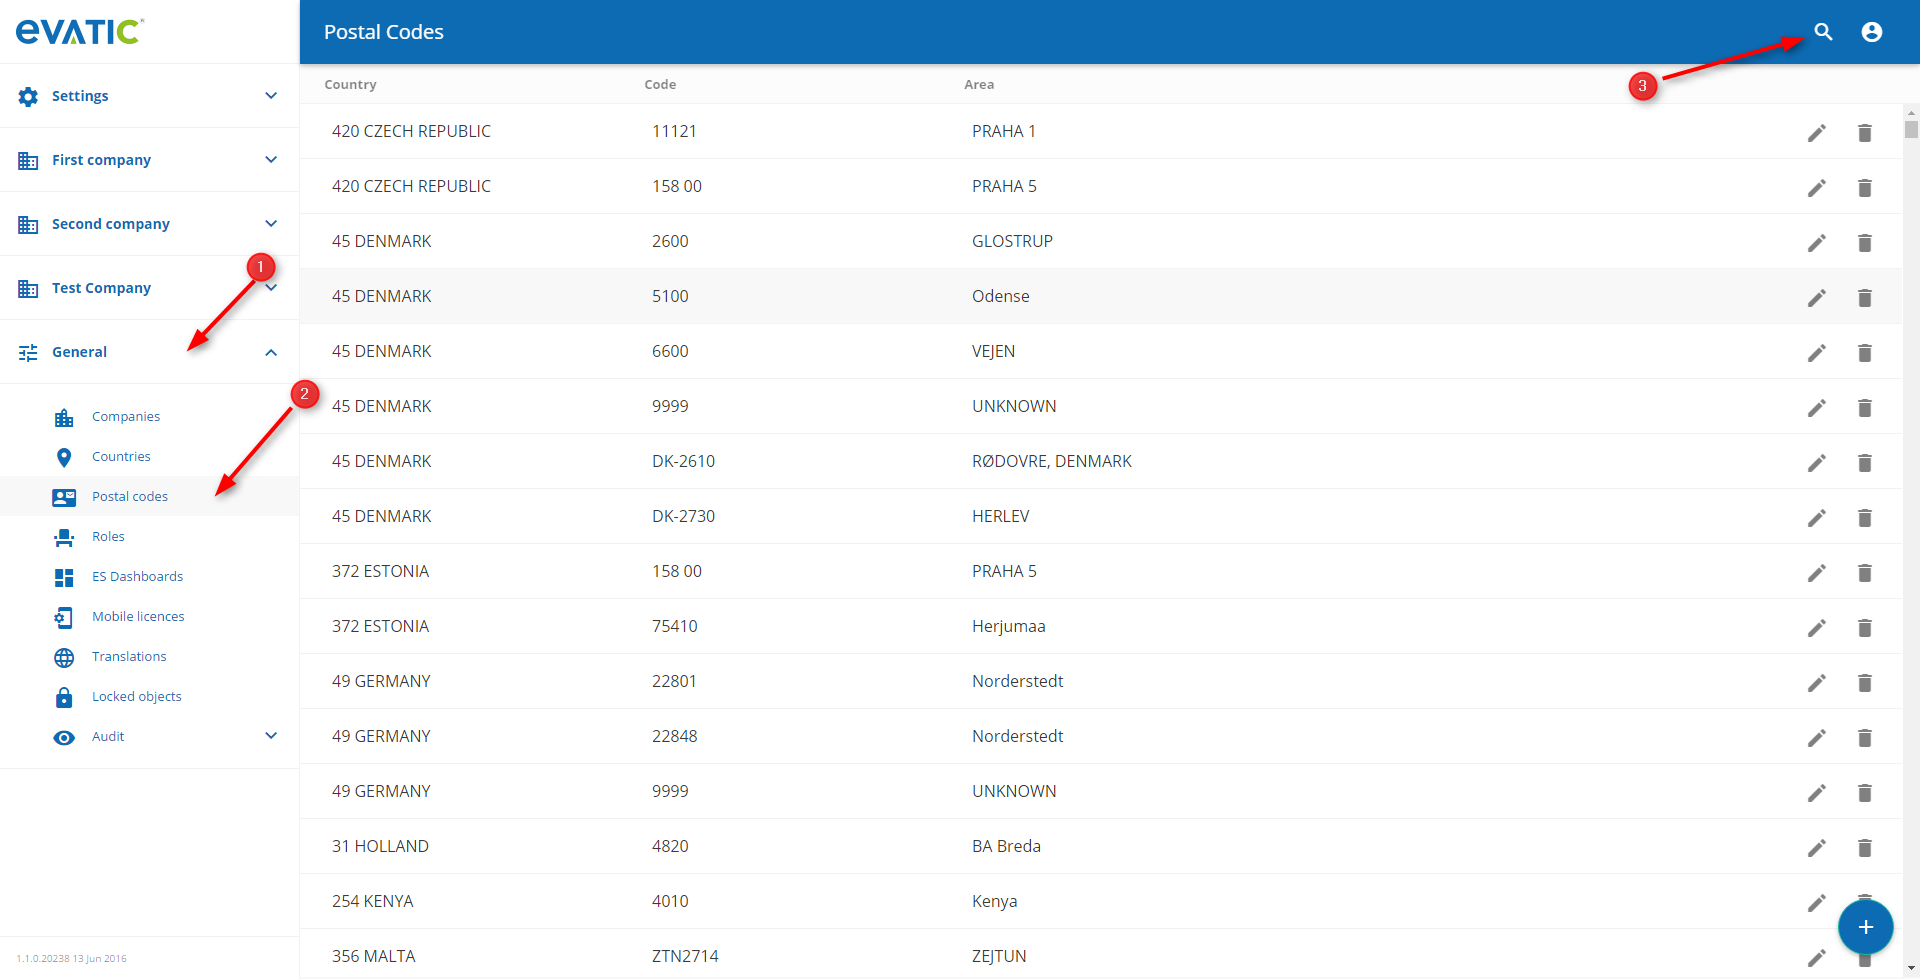
Type search phrase and press enter.